wsctl
wsctl is the v0.5 command-line tool partners use to install,
operate, and upgrade a Waveshift deployment. The supported way
to use it is the bubbletea TUI — run wsctl with no
arguments and the TUI walks you through every flow.
What it does
- Deploy — bootstrap the customer's AWS account and roll out Waveshift end-to-end: VPC, subnets, NAT gateway, IAM roles, Route 53 private zone, the orchestrator EC2 instance, the Kasm Workspaces host, certificates, and per-Site Infrastructure Servers. Also handles the day-to-day partner-side ops on top of the deployment: provisioning Sites, flashing Hub routers, port-forwarding to the Console, and SSM-ing into EC2 instances.
- Configure — read and write
wsctl.json, the single source of truth for AWS profile, region, and per-service settings. See the wsctl.json reference. - Upgrade — flash new firmware onto a connected Control Hub (Upgrading router firmware). Node and service upgrades show in the menu as Coming soon; see Upgrading Waveshift.
TUI walkthrough — first deploy
The flow below is a fresh install on a new AWS account, end to end, screen by screen.
1. First launch
Get there: run wsctl in an empty deployment directory.
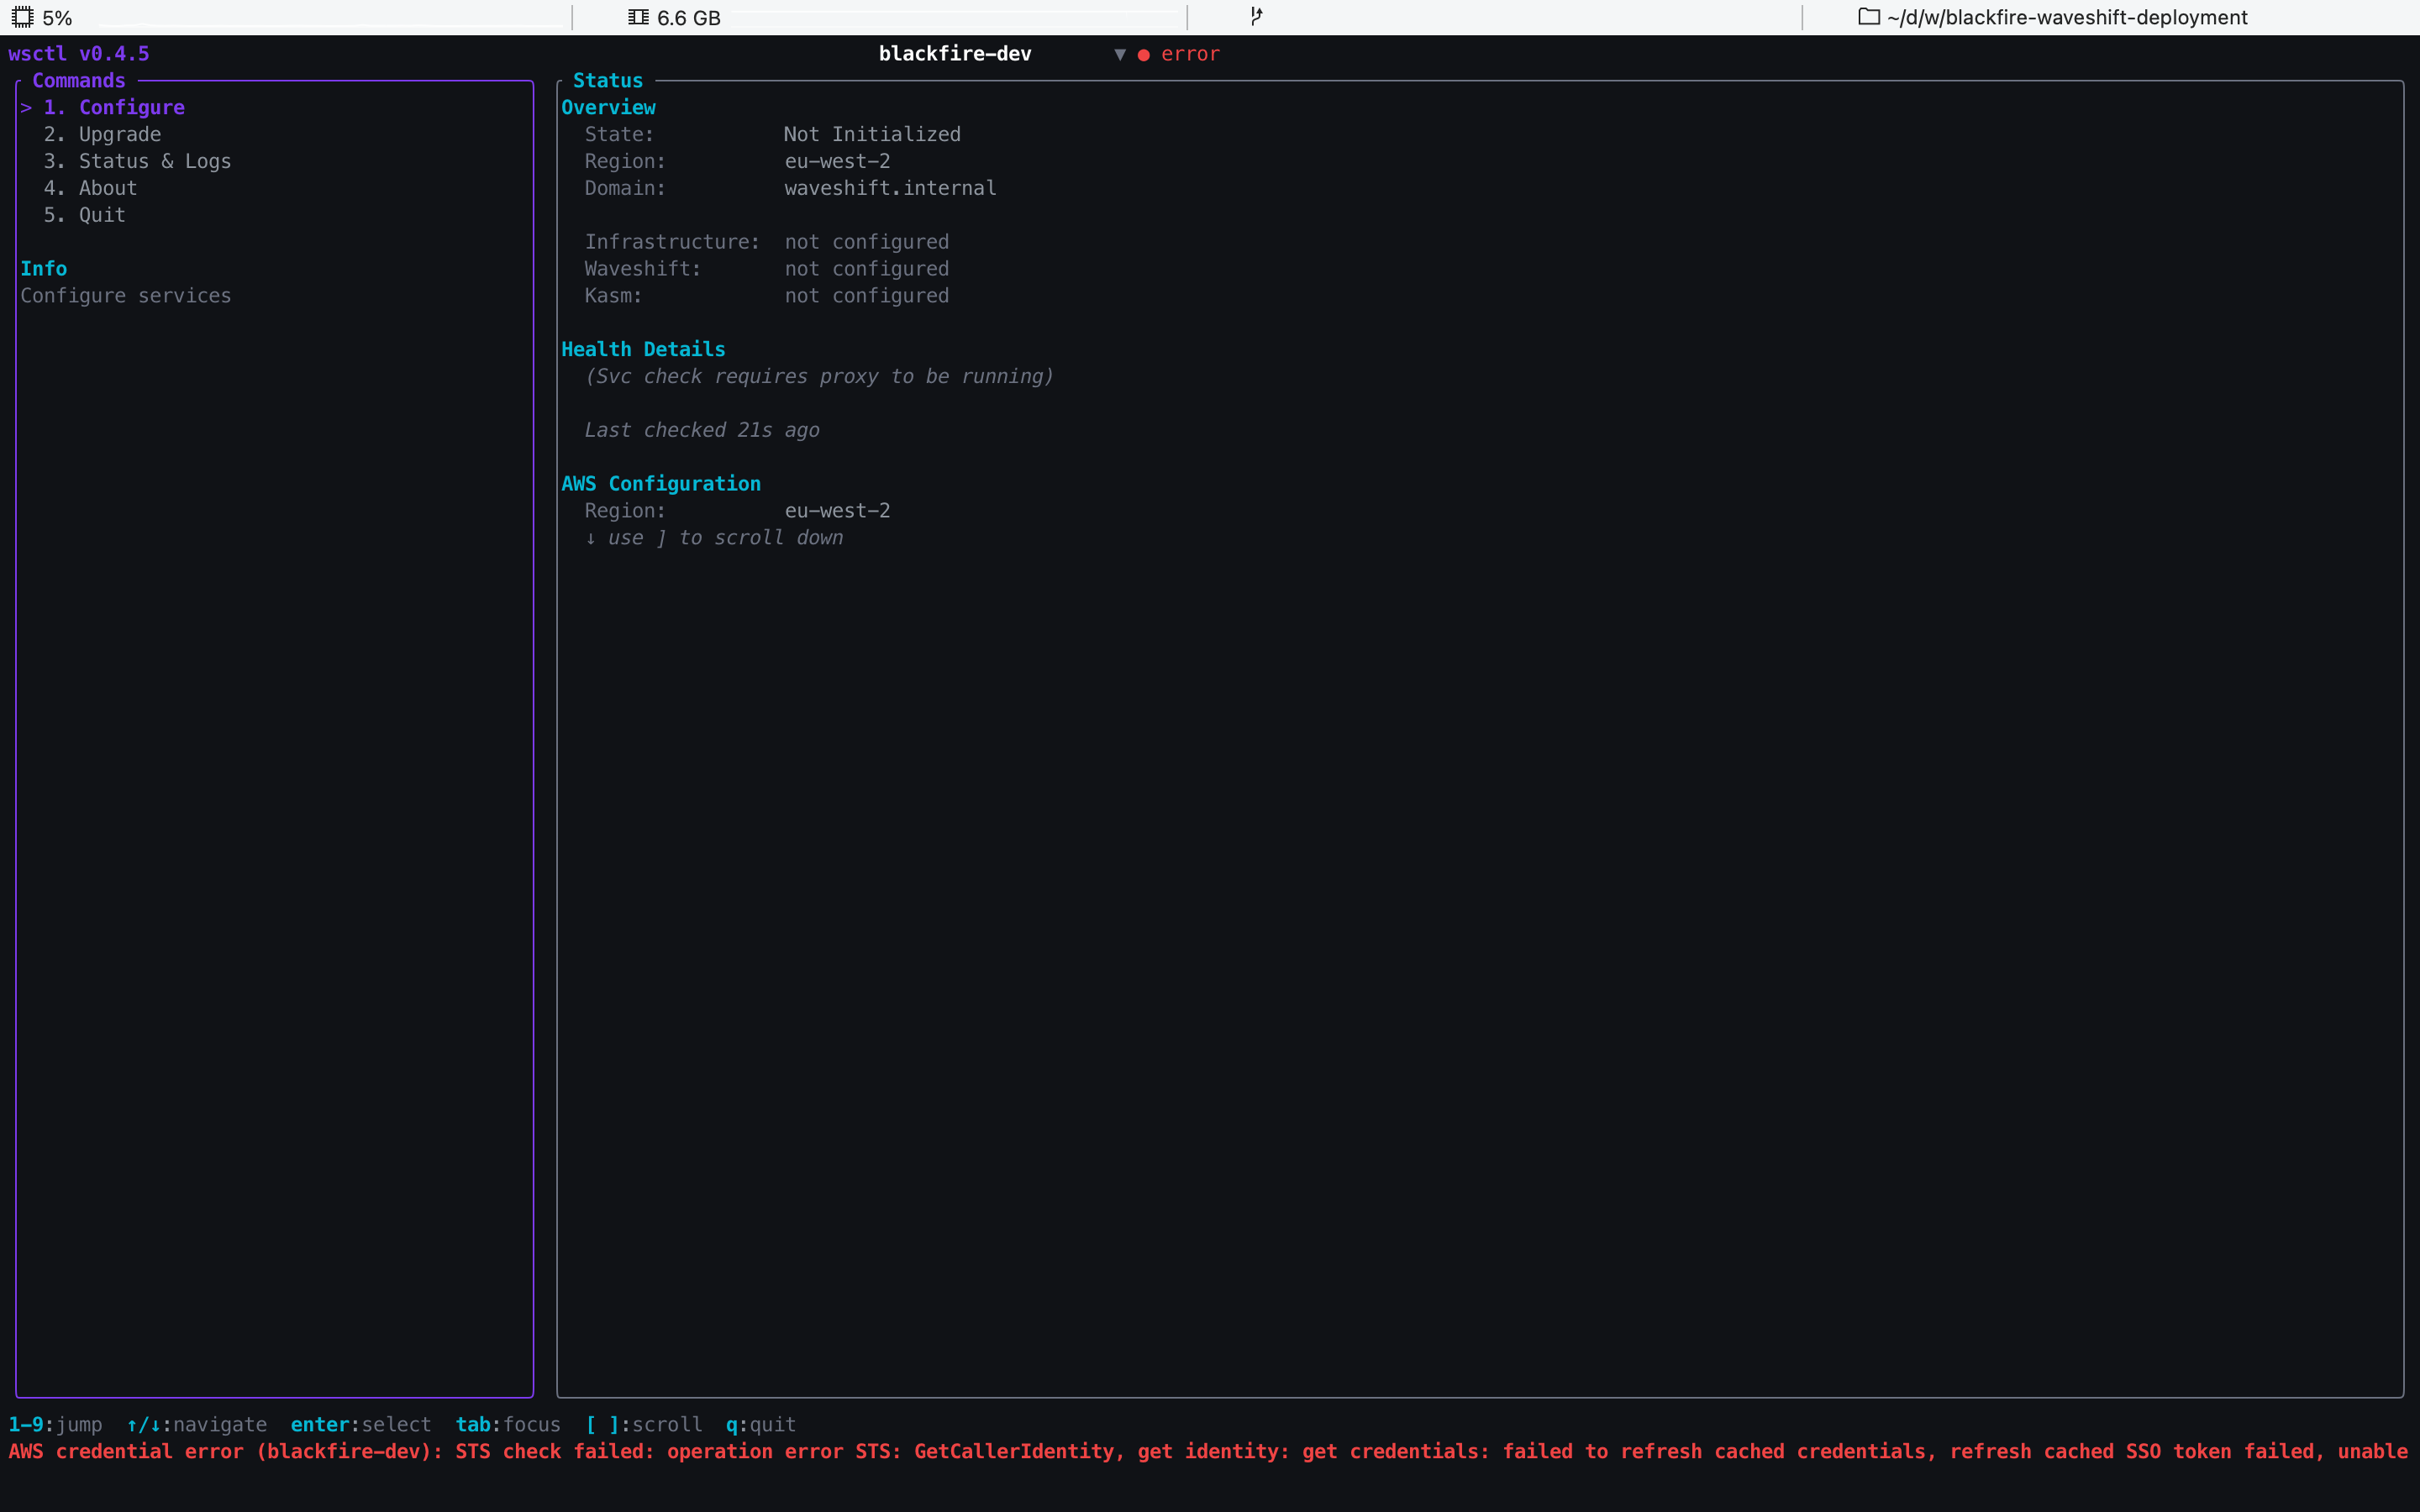
In a fresh directory, wsctl opens to the Status view with
everything not configured. The left-hand panel lists the
top-level commands; the bottom row of key hints (1–9 jump,
↑/↓ navigate, enter select, tab focus, [ ] scroll,
q quit) applies on the main view, and each screen shows its own
hints along the footer. If the AWS profile isn't authenticated yet
you'll see a red error chip in the top bar and an
AWS credential error along the footer.
2. Select an AWS profile
Get there: main menu → focus the AWS Configuration panel → Enter.
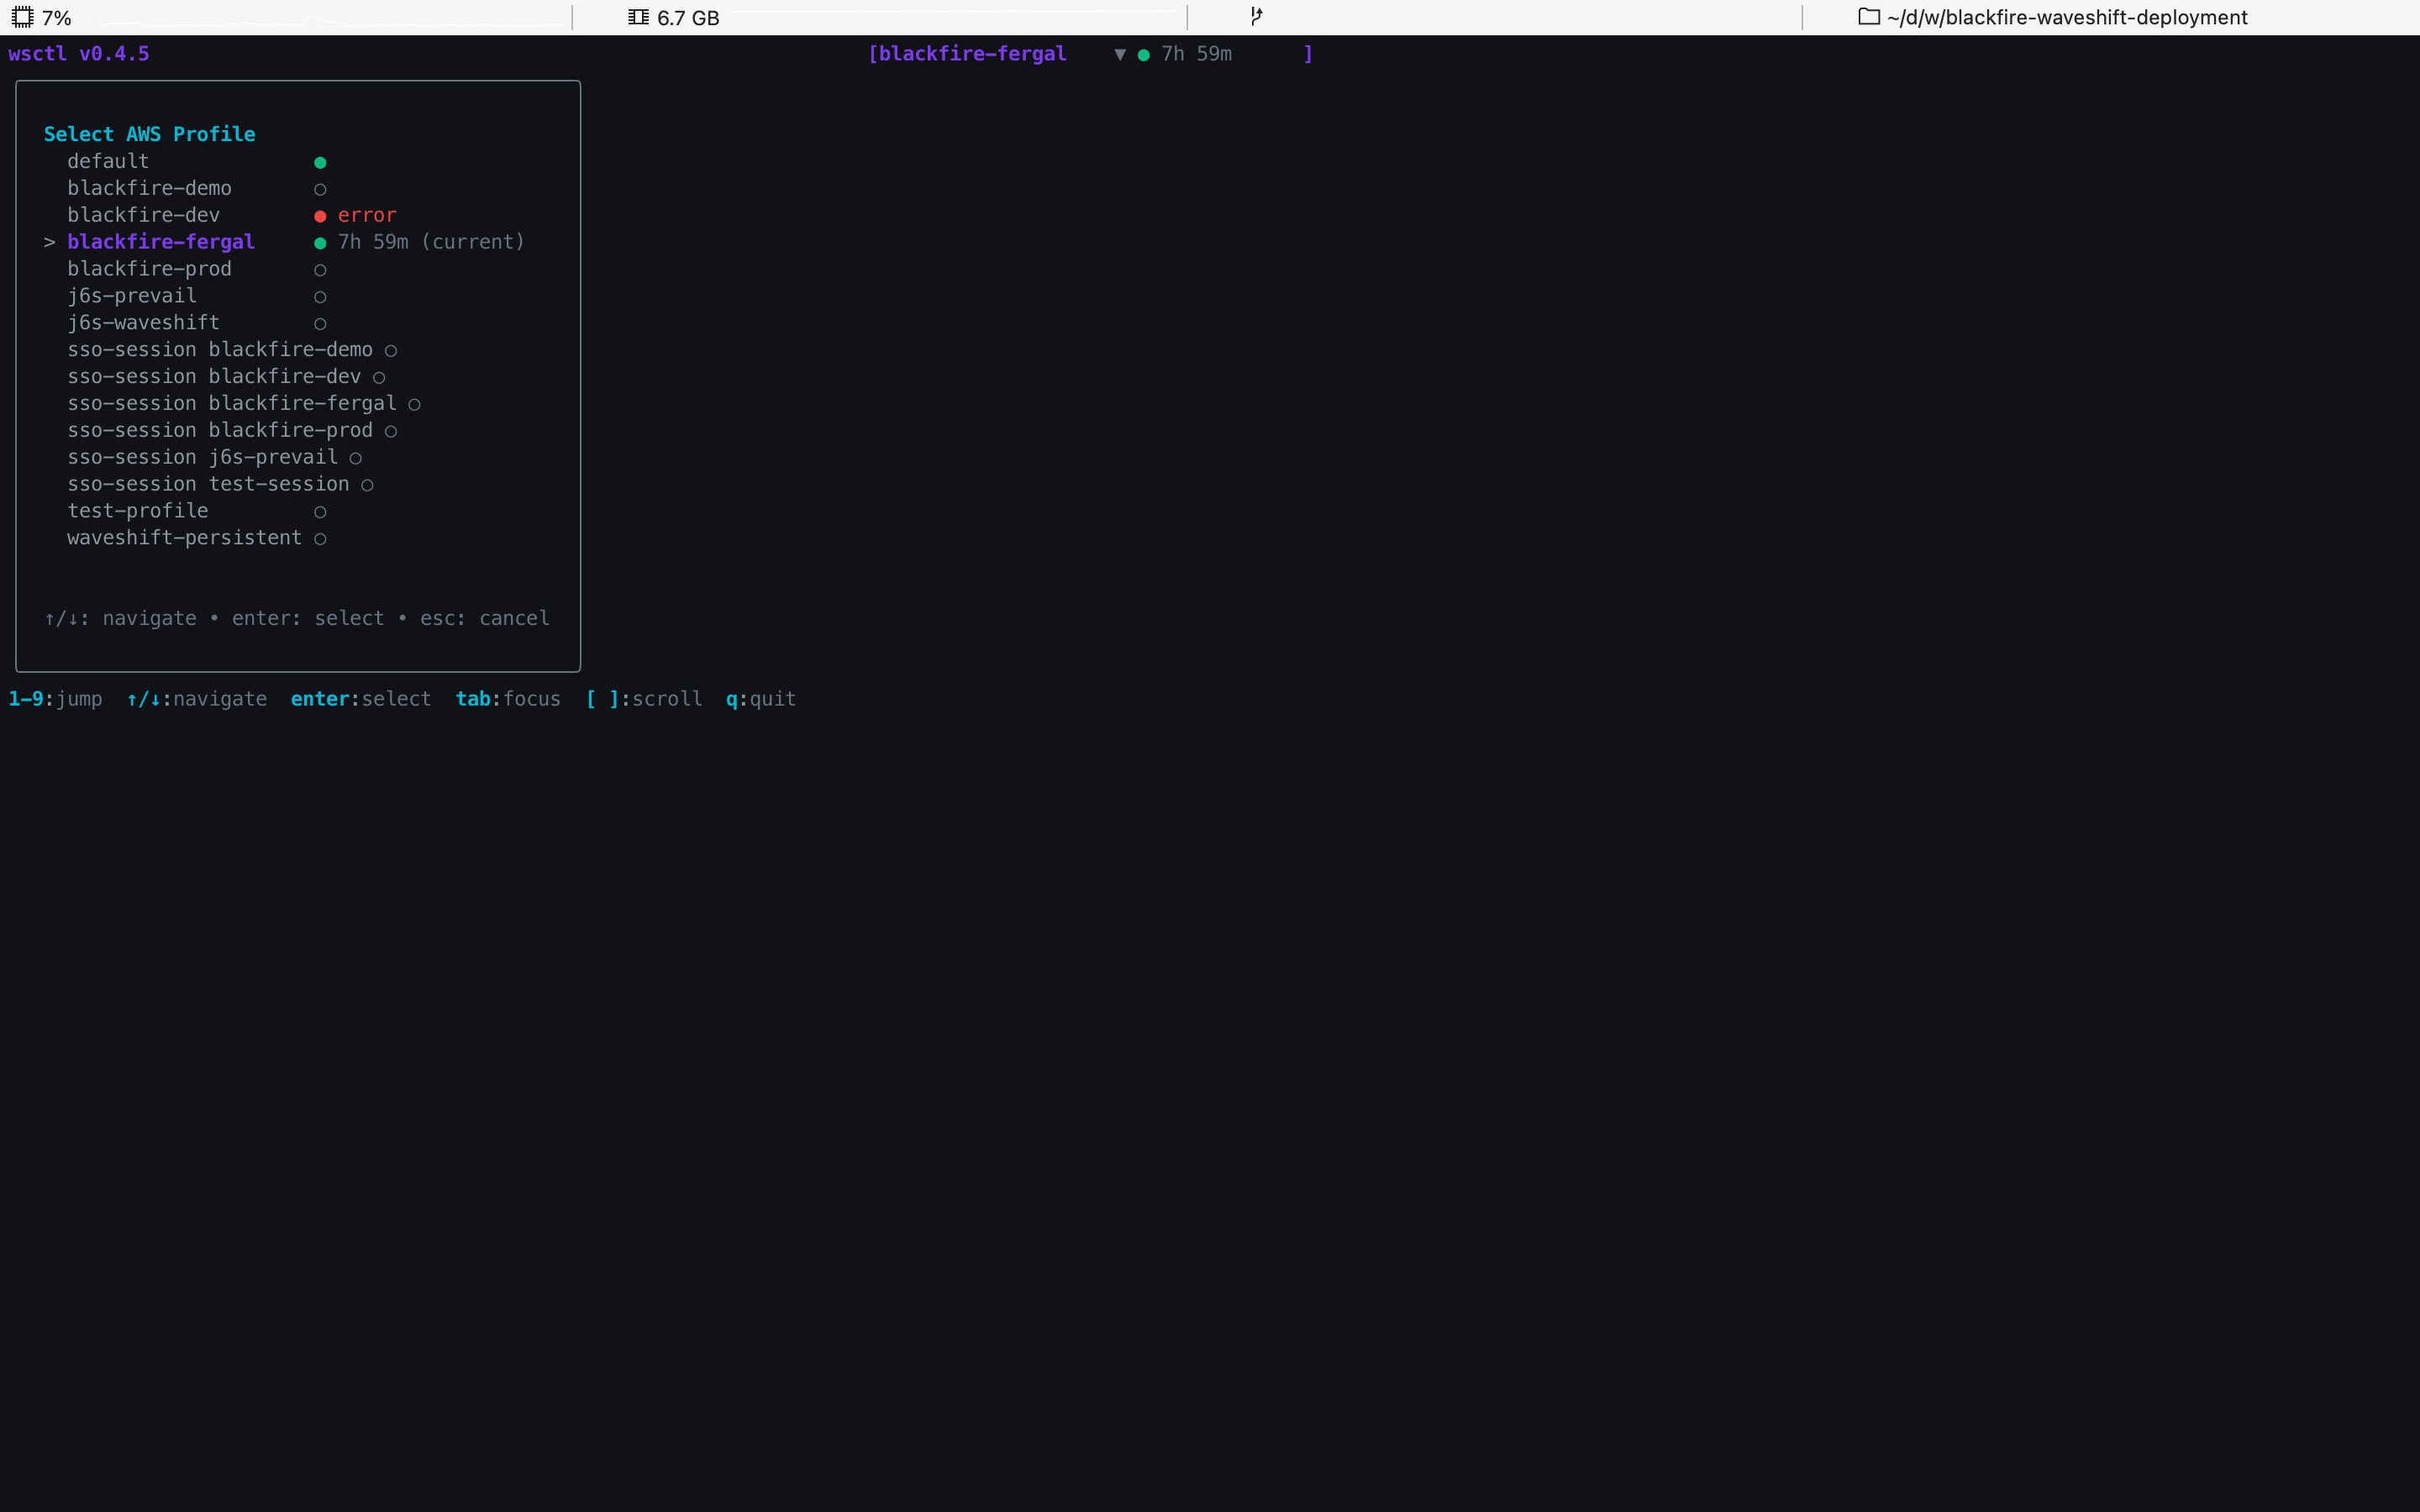
wsctl reads ~/.aws/credentials and ~/.aws/config, then
shows every profile with a session-status dot — green for
authenticated, red for expired credentials, hollow for never
signed in. Pick the one for the customer's AWS account.
3. Configure menu
Get there: main menu → 1 Configure.
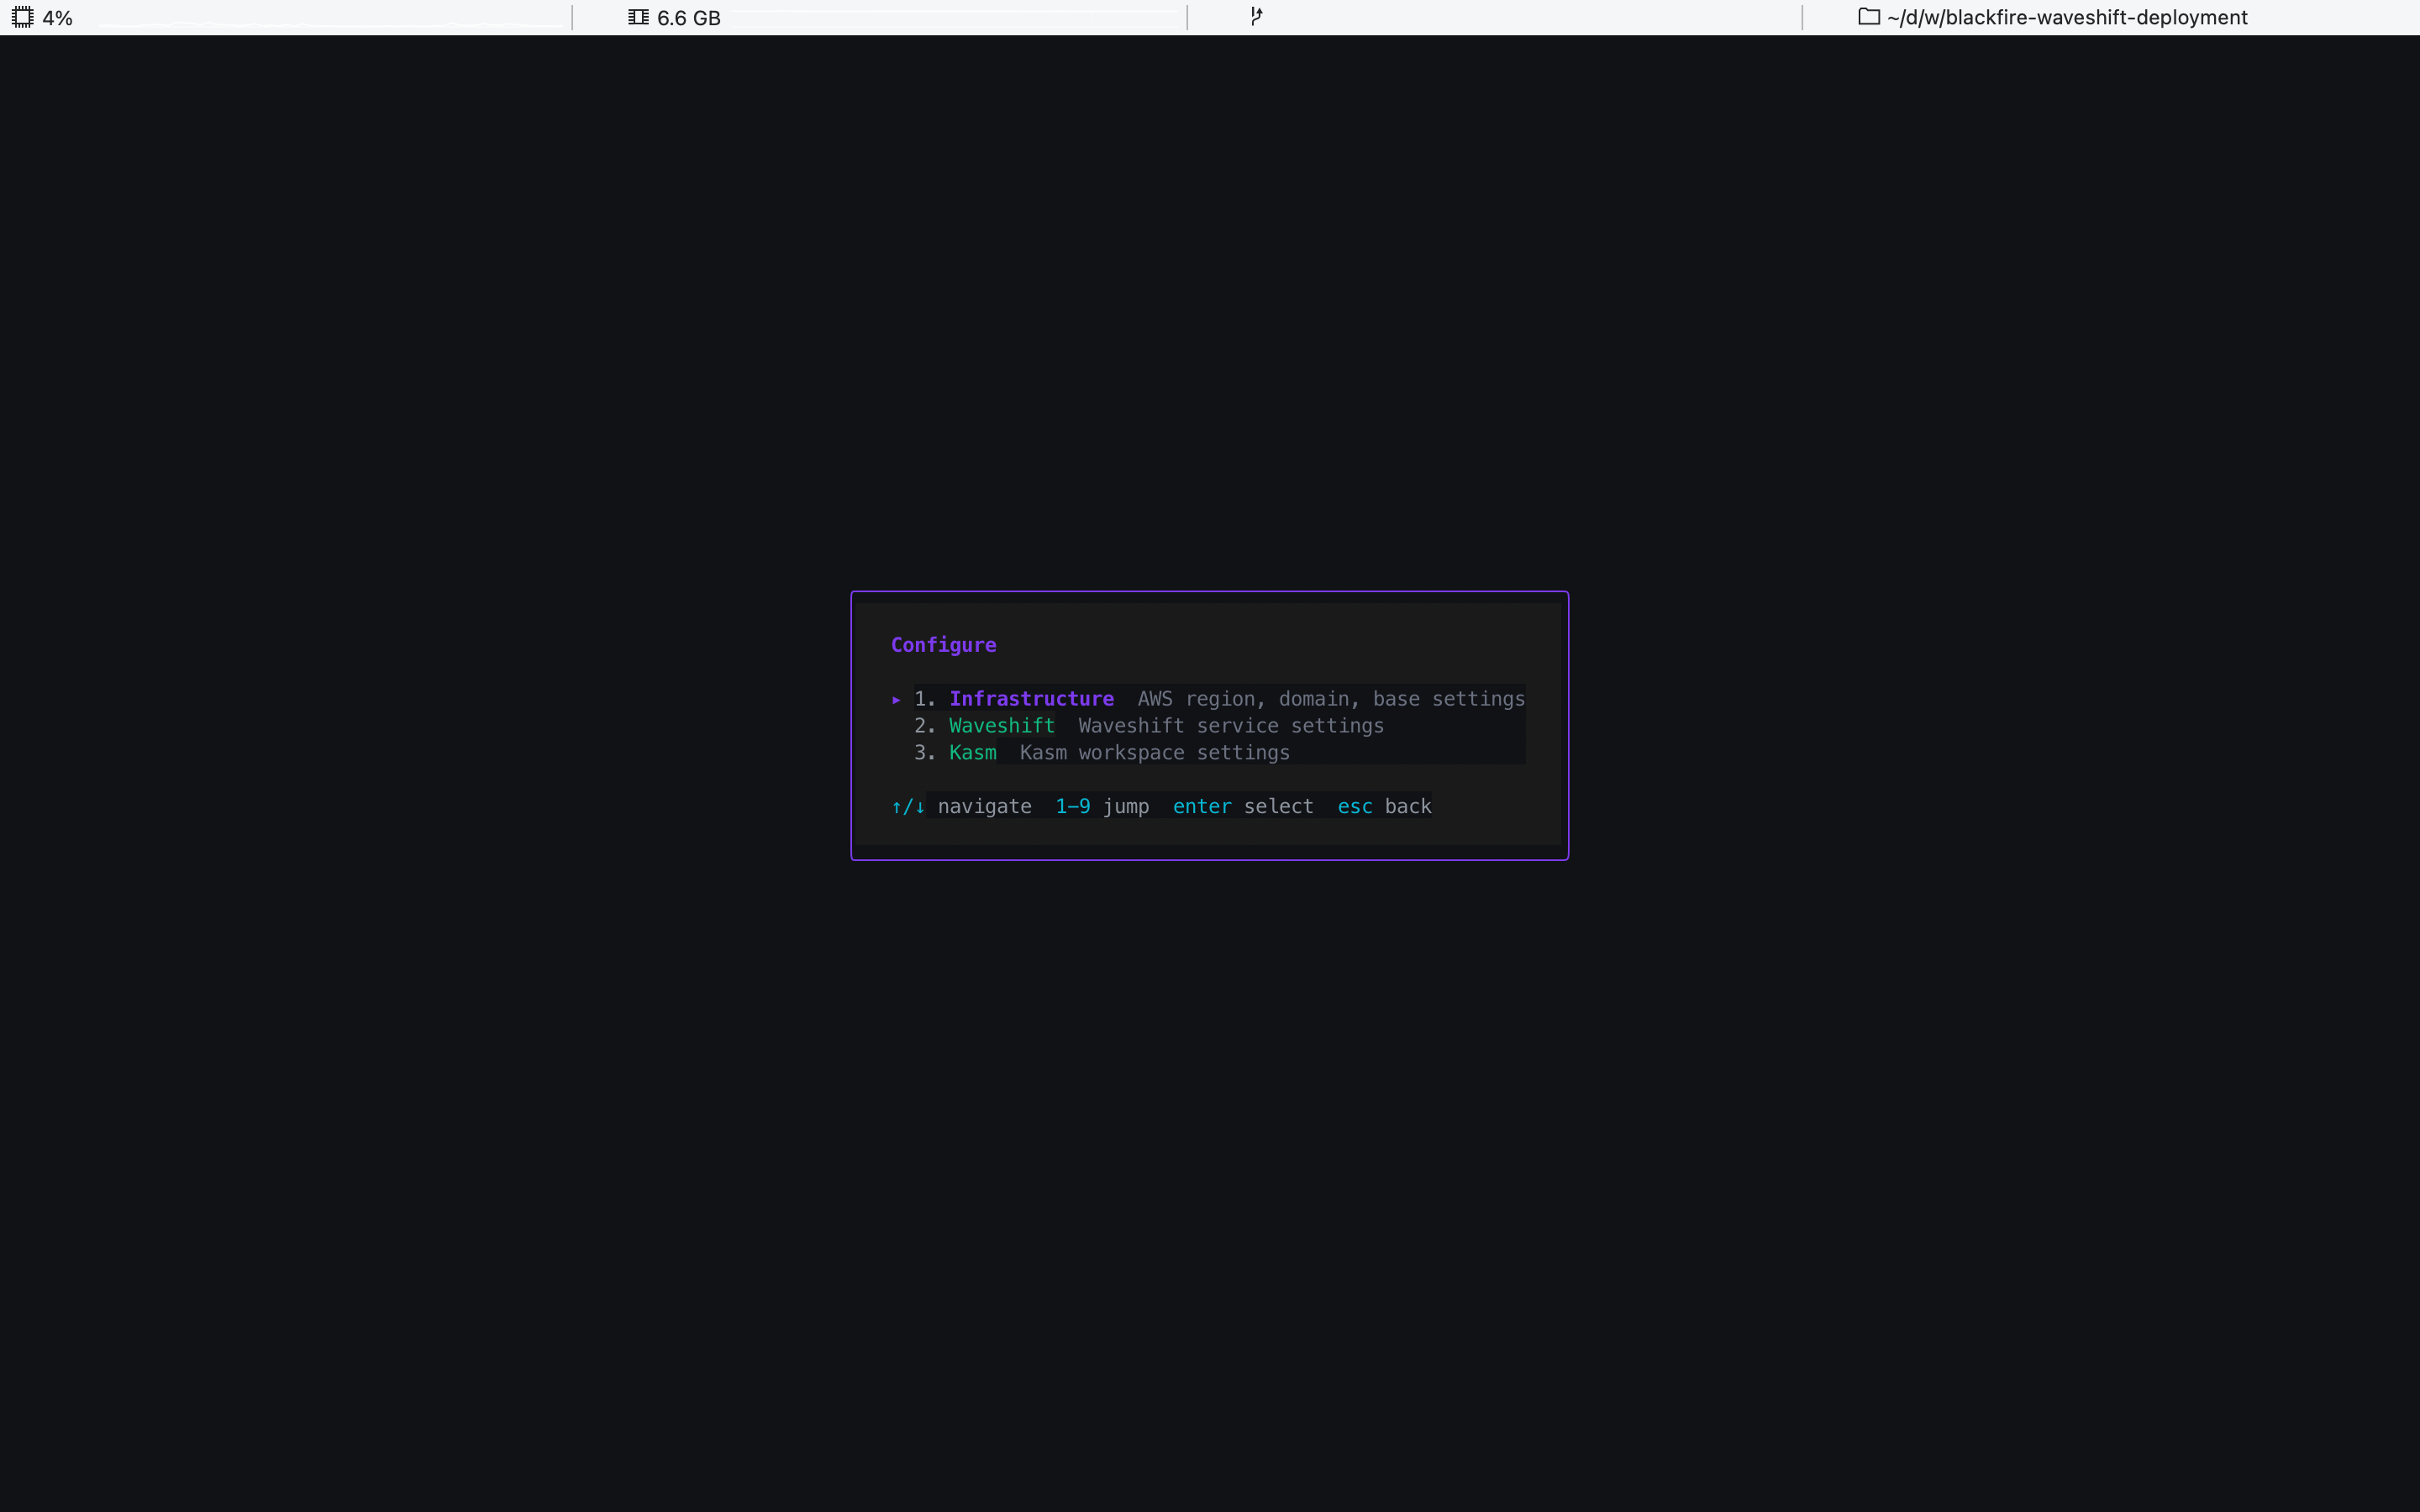
The Configure entry on the main menu opens this submenu — three items, work through them in order, starting with Infrastructure — the Waveshift and Kasm service URLs are built from the domain you set there.
4. Initialise infrastructure
Get there: main menu → 1 Configure → 1 Infrastructure.
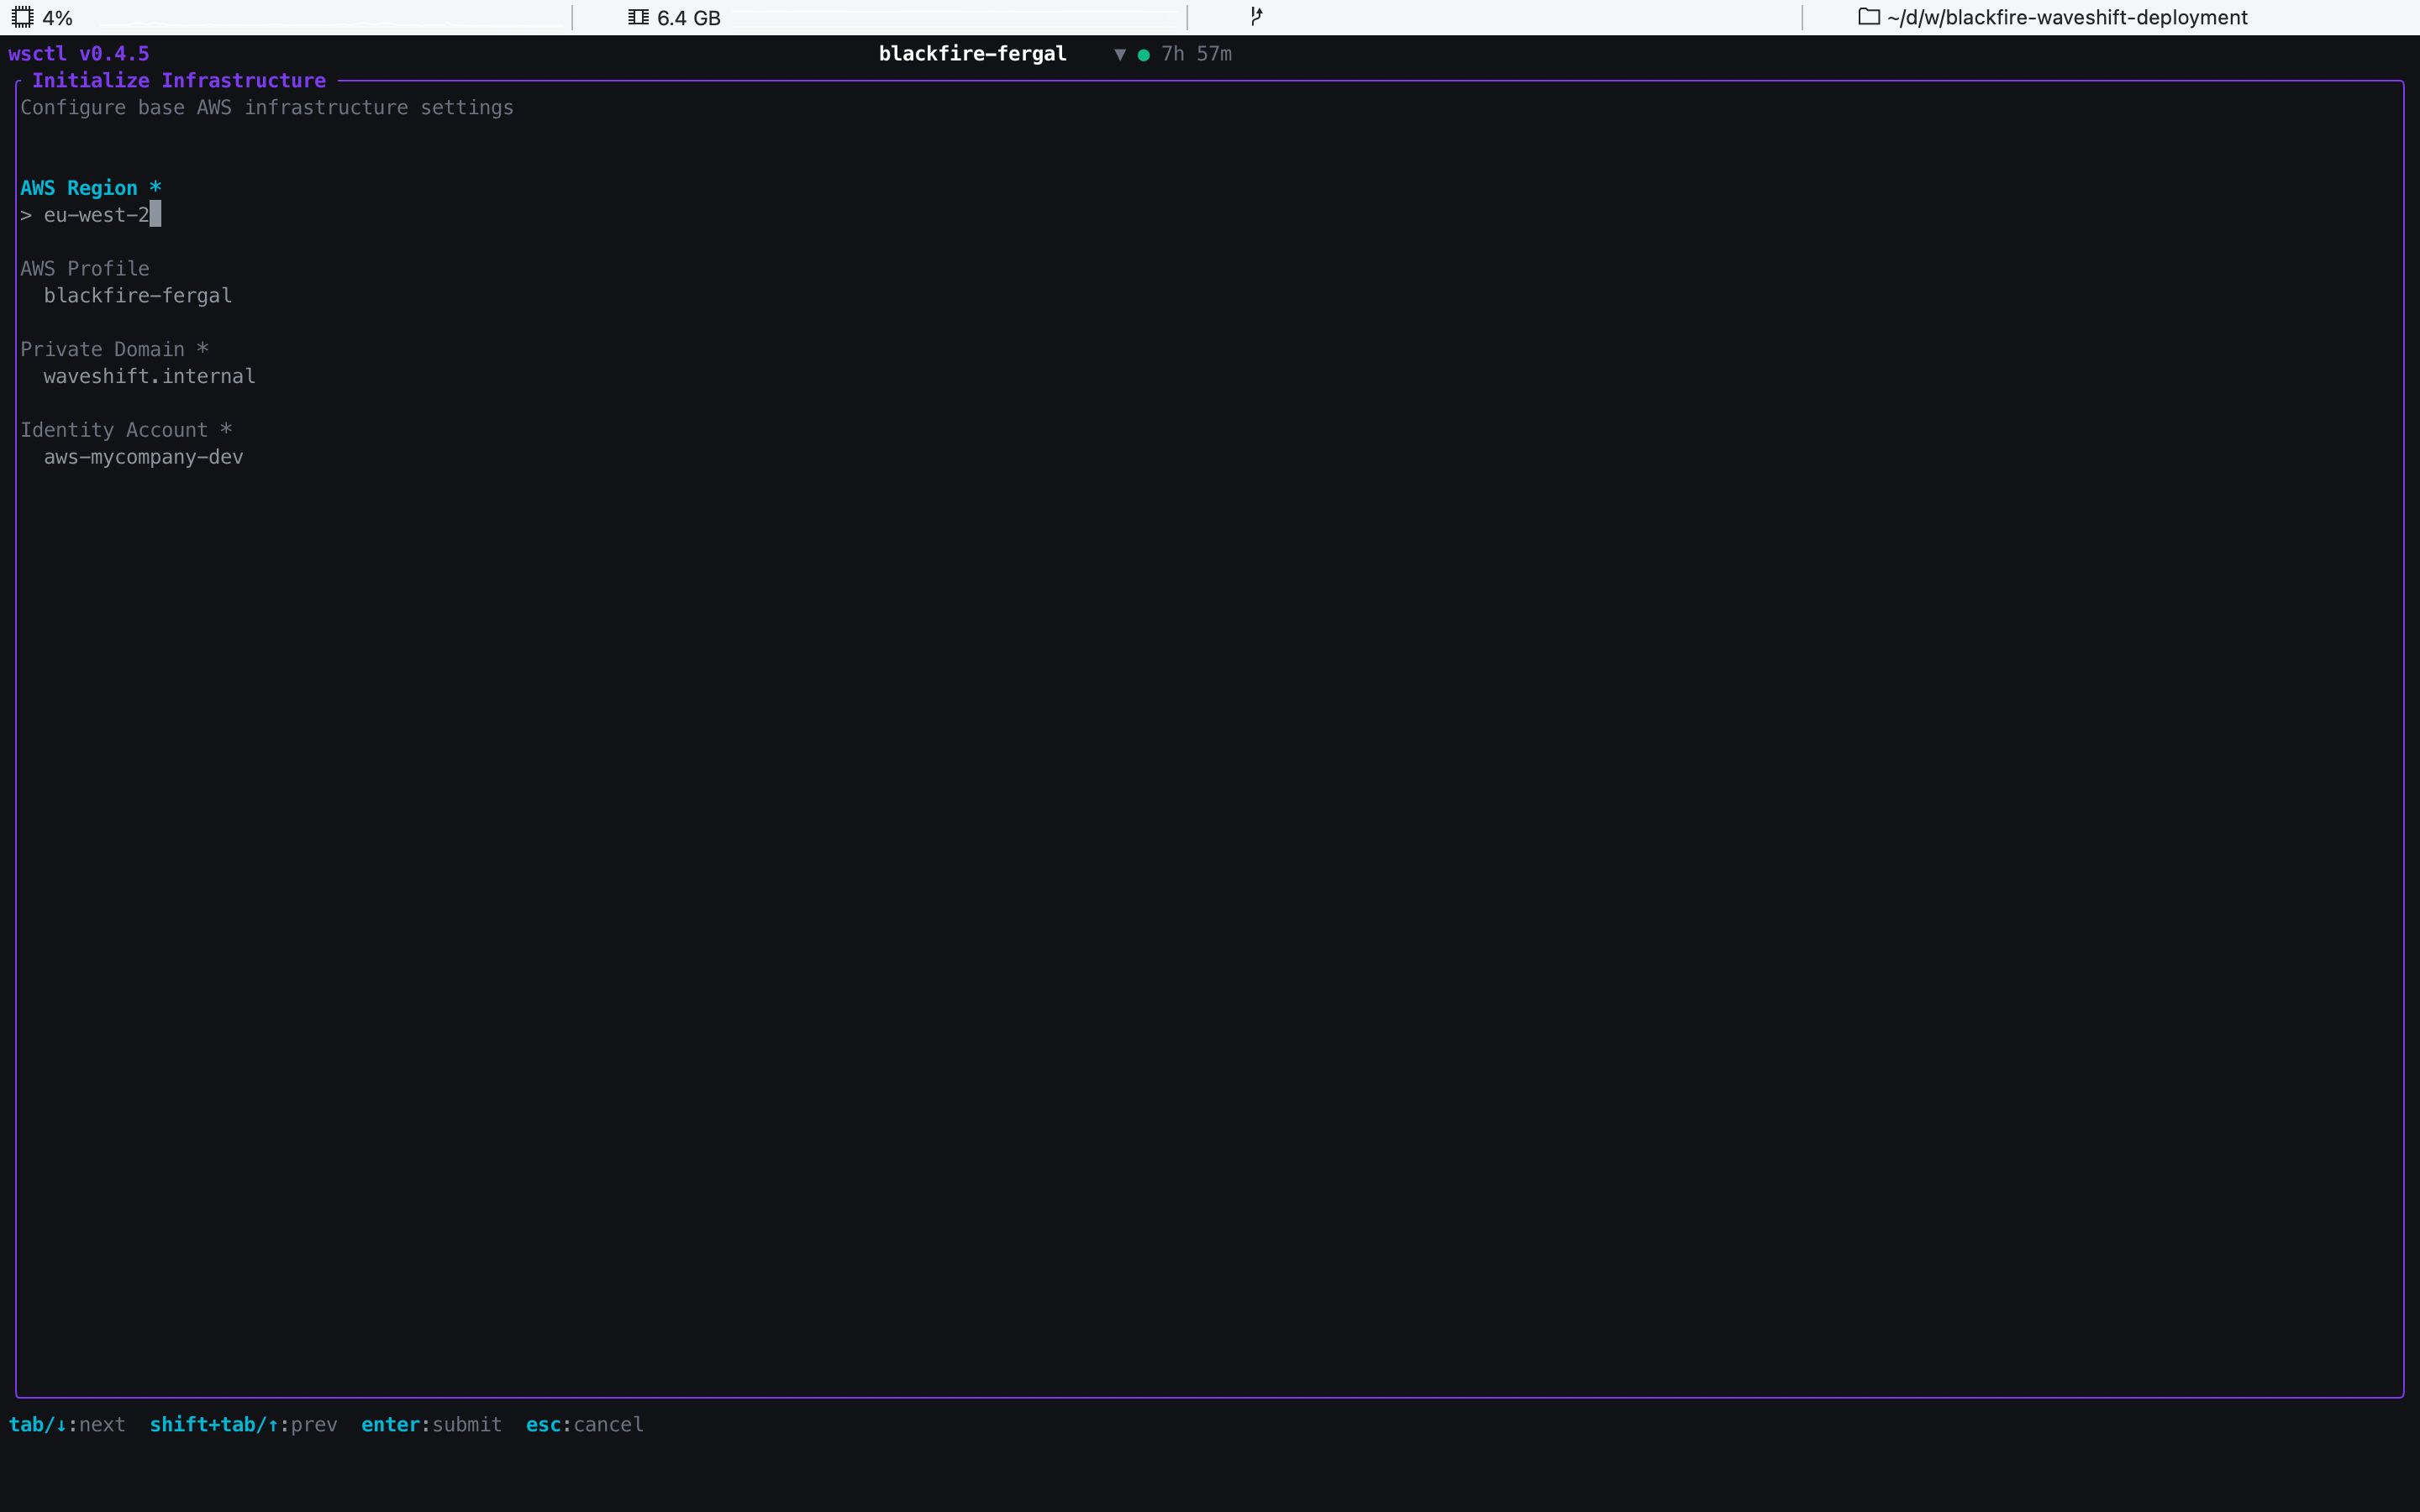
Four fields (all required except the profile):
- AWS Region — where the orchestrator and Kasm host run.
Pre-filled from the profile's region, else
us-east-1. - AWS Profile — pre-filled from step 2.
- Private Domain — the name for the private Route 53
hosted zone Waveshift will create.
waveshift.internalis the default and works for most deployments; the domain only resolves inside the WireGuard network so it doesn't need to be one you own publicly. - Identity Account — the federation account name Blackfire
issued you (e.g.
aws-mycompany-dev).
tab / ↑↓ move between fields, enter submits.
5. Configure the Waveshift service
Get there: main menu → 1 Configure → 2 Waveshift.
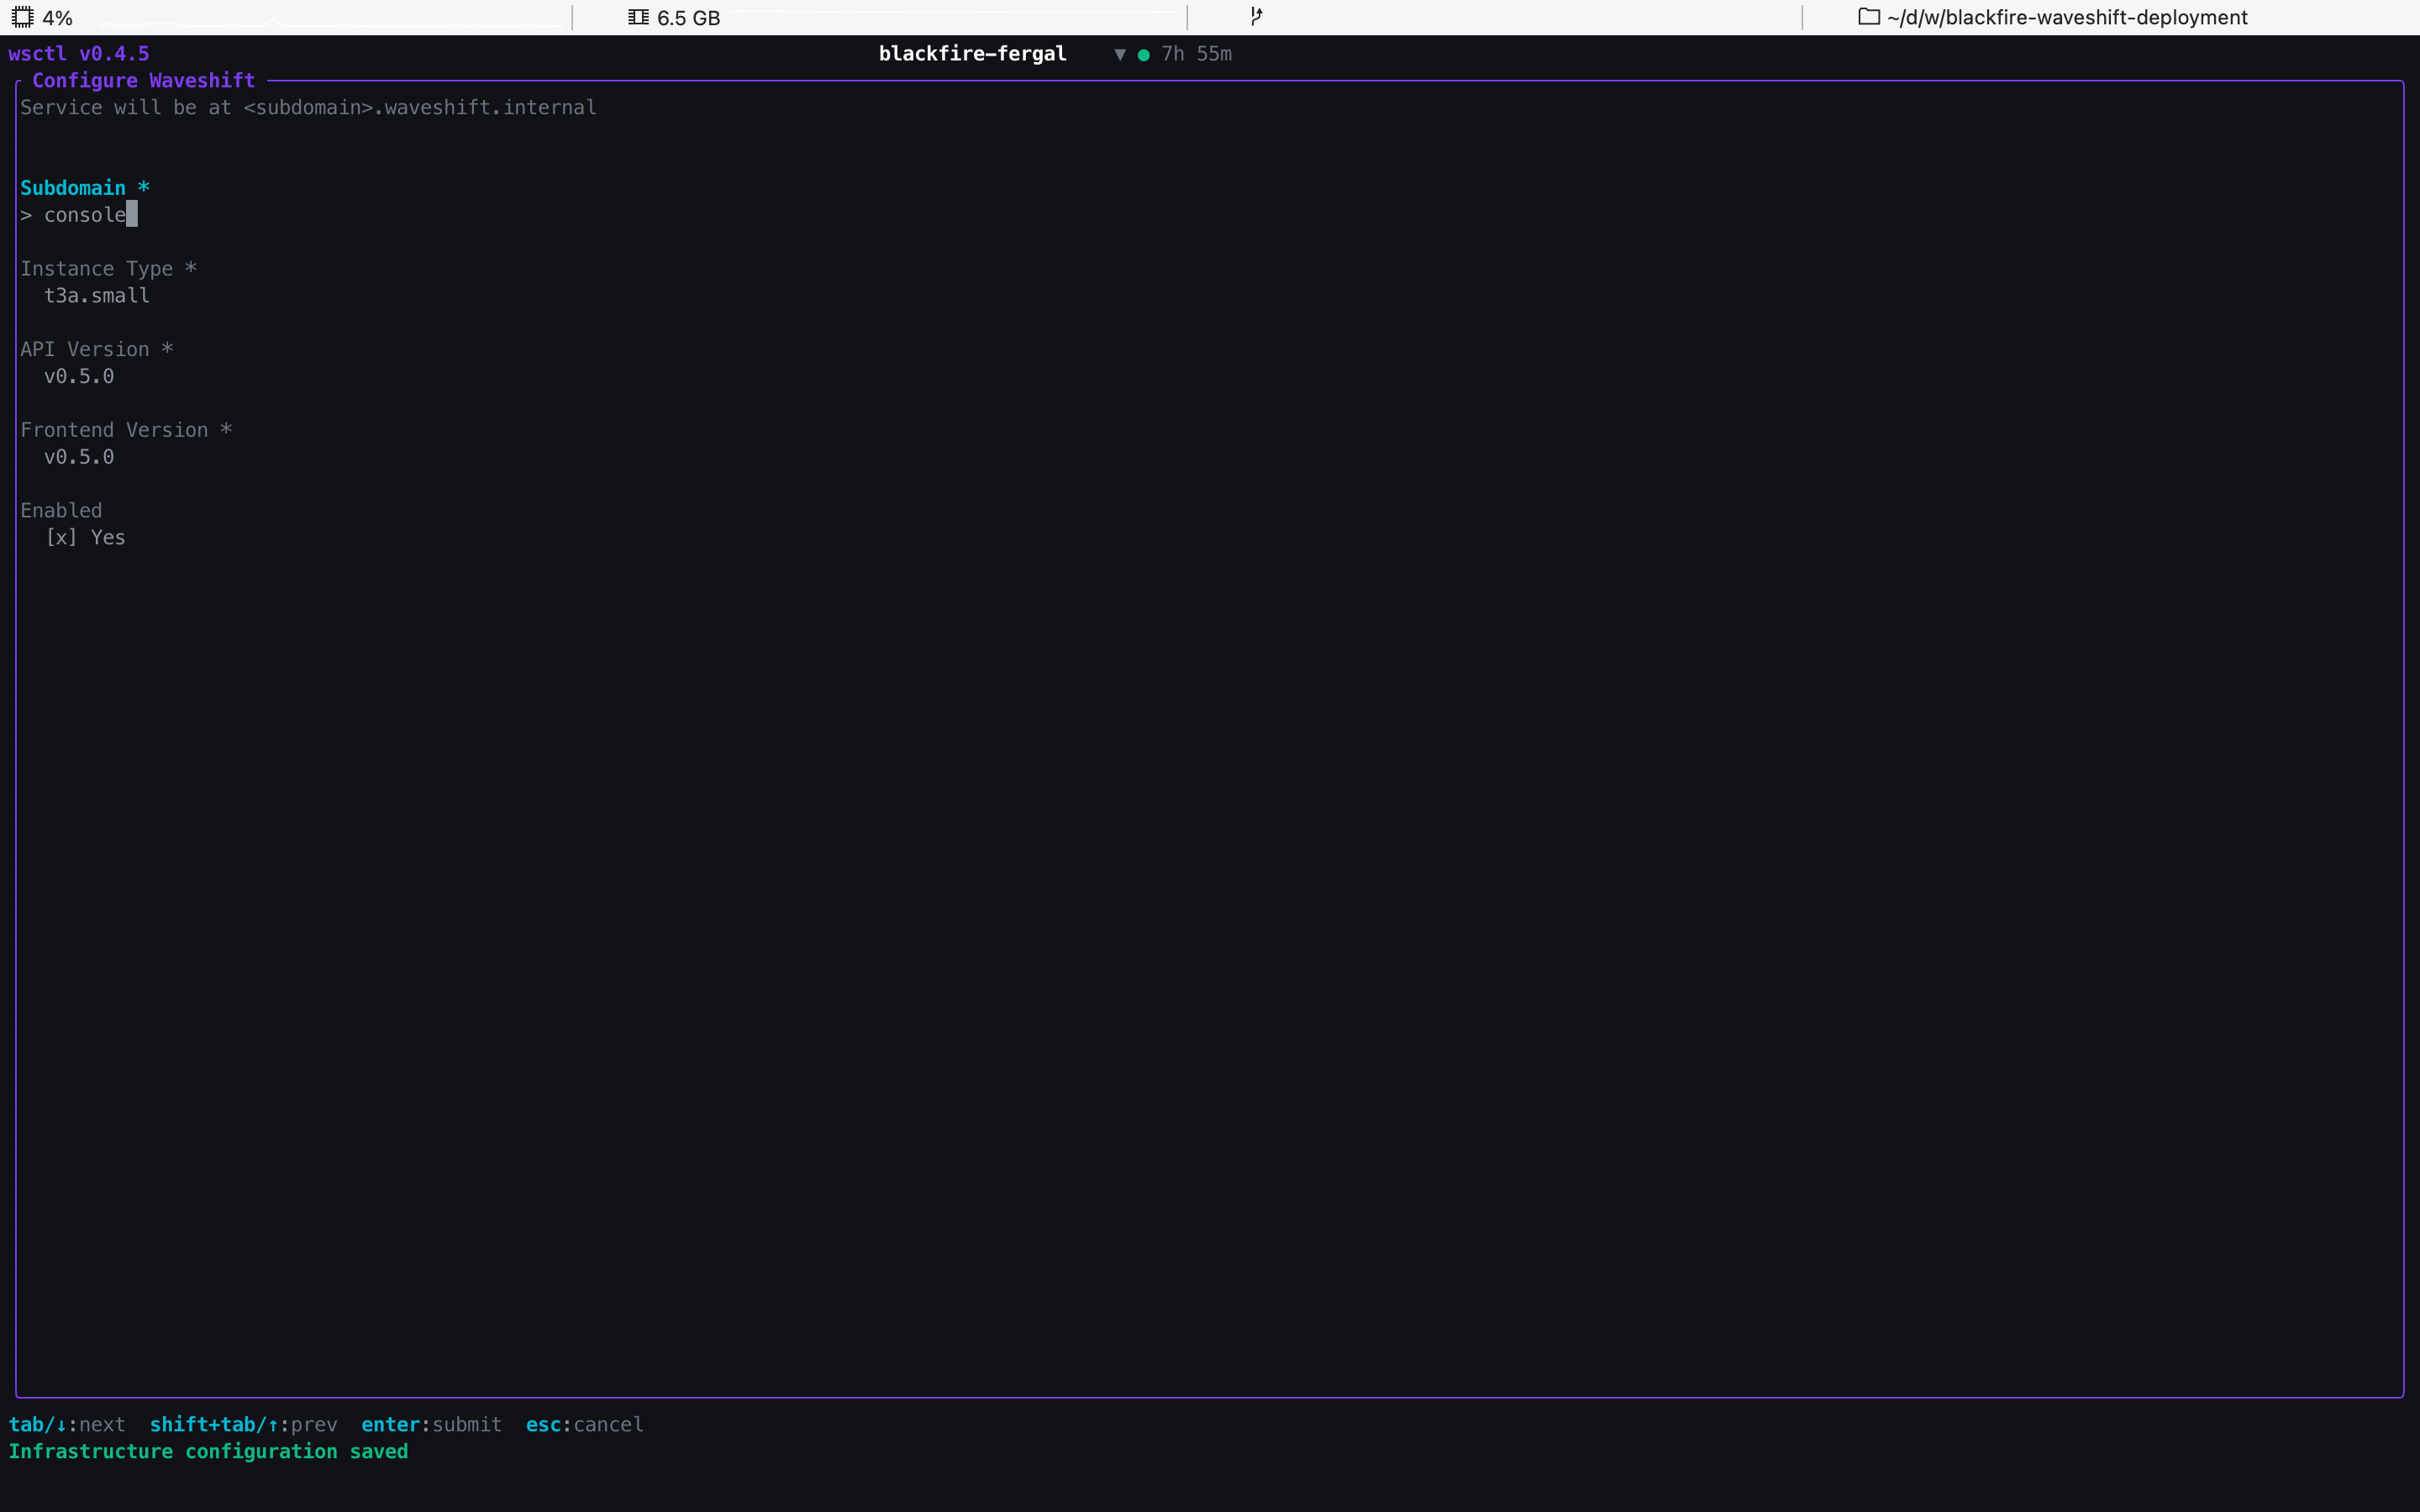
Defaults are fine for most deployments — the subdomain
(console), the EC2 instance type (t3a.small), and the
container image versions (dev-latest), with Enabled
ticked. Override only if you've been instructed to.
6. Configure Kasm Workspaces (optional)
Get there: main menu → 1 Configure → 3 Kasm.
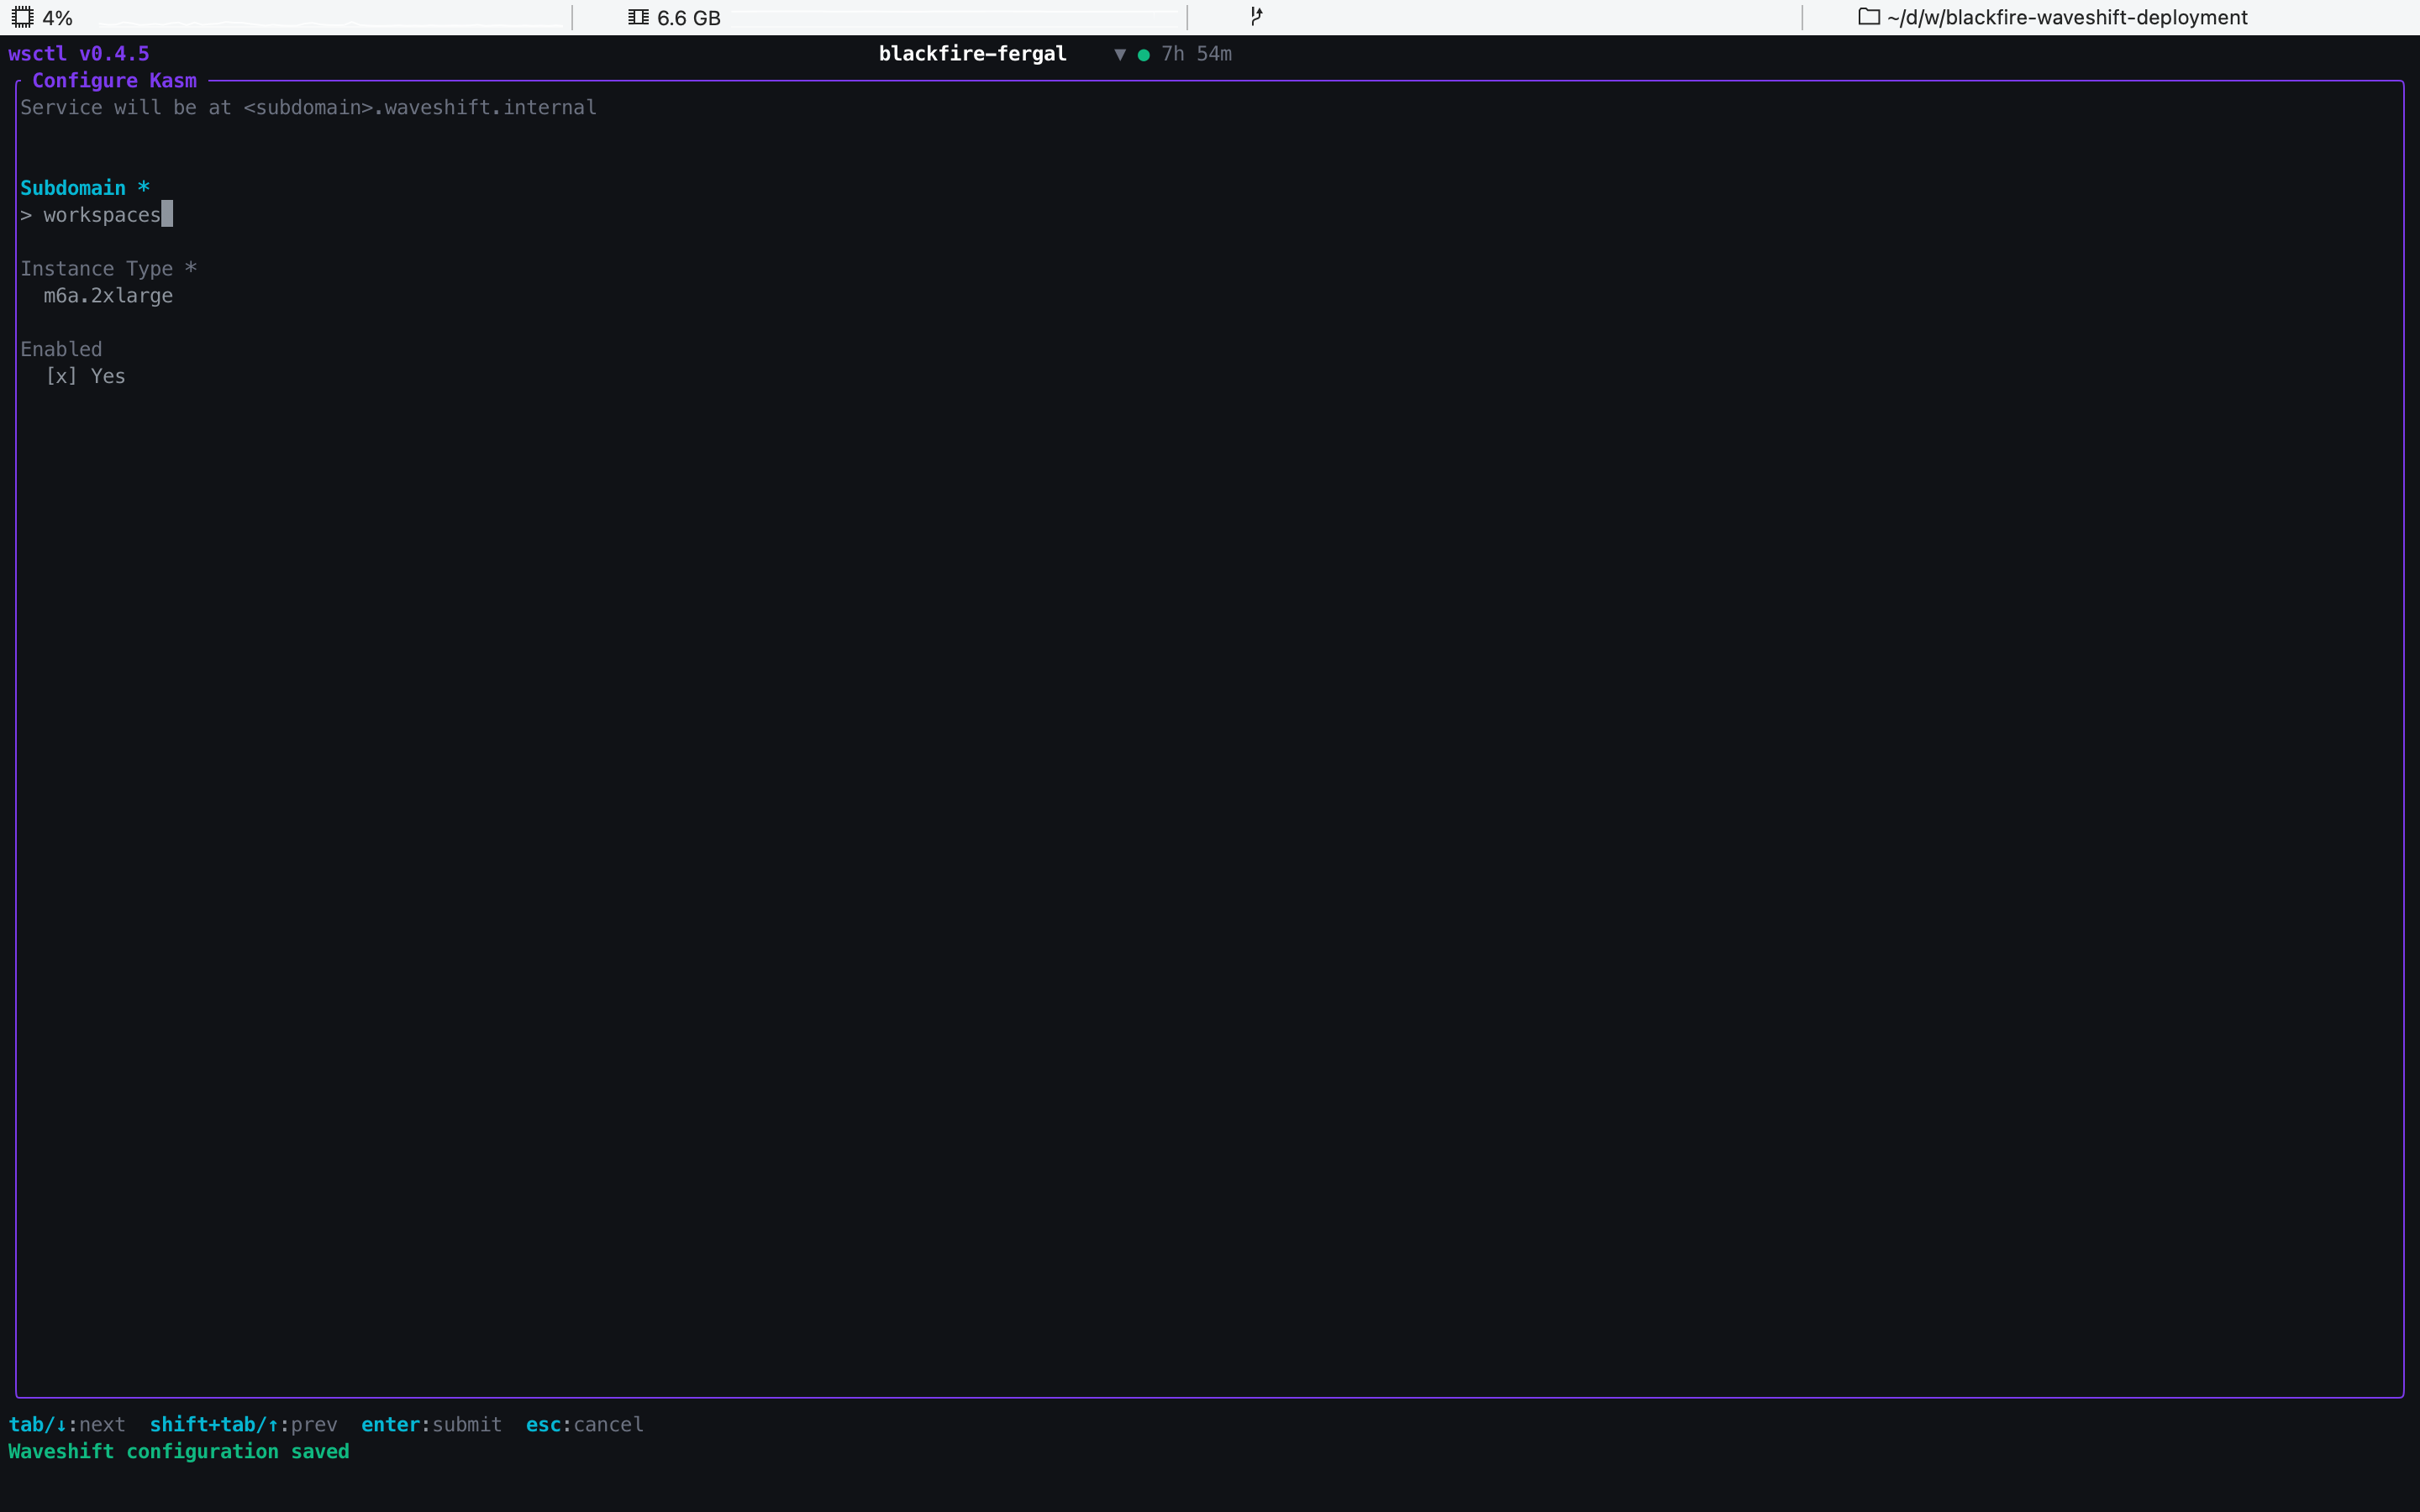
Skip this entire step if the customer's licence doesn't include
Workspaces (or untick Enabled, which leaves Kasm out of
Deploy → All). Otherwise, defaults are fine: workspaces
subdomain, m6a.2xlarge host, Enabled toggled on.
7. Deploy
Get there: main menu → Deploy → 4 All.
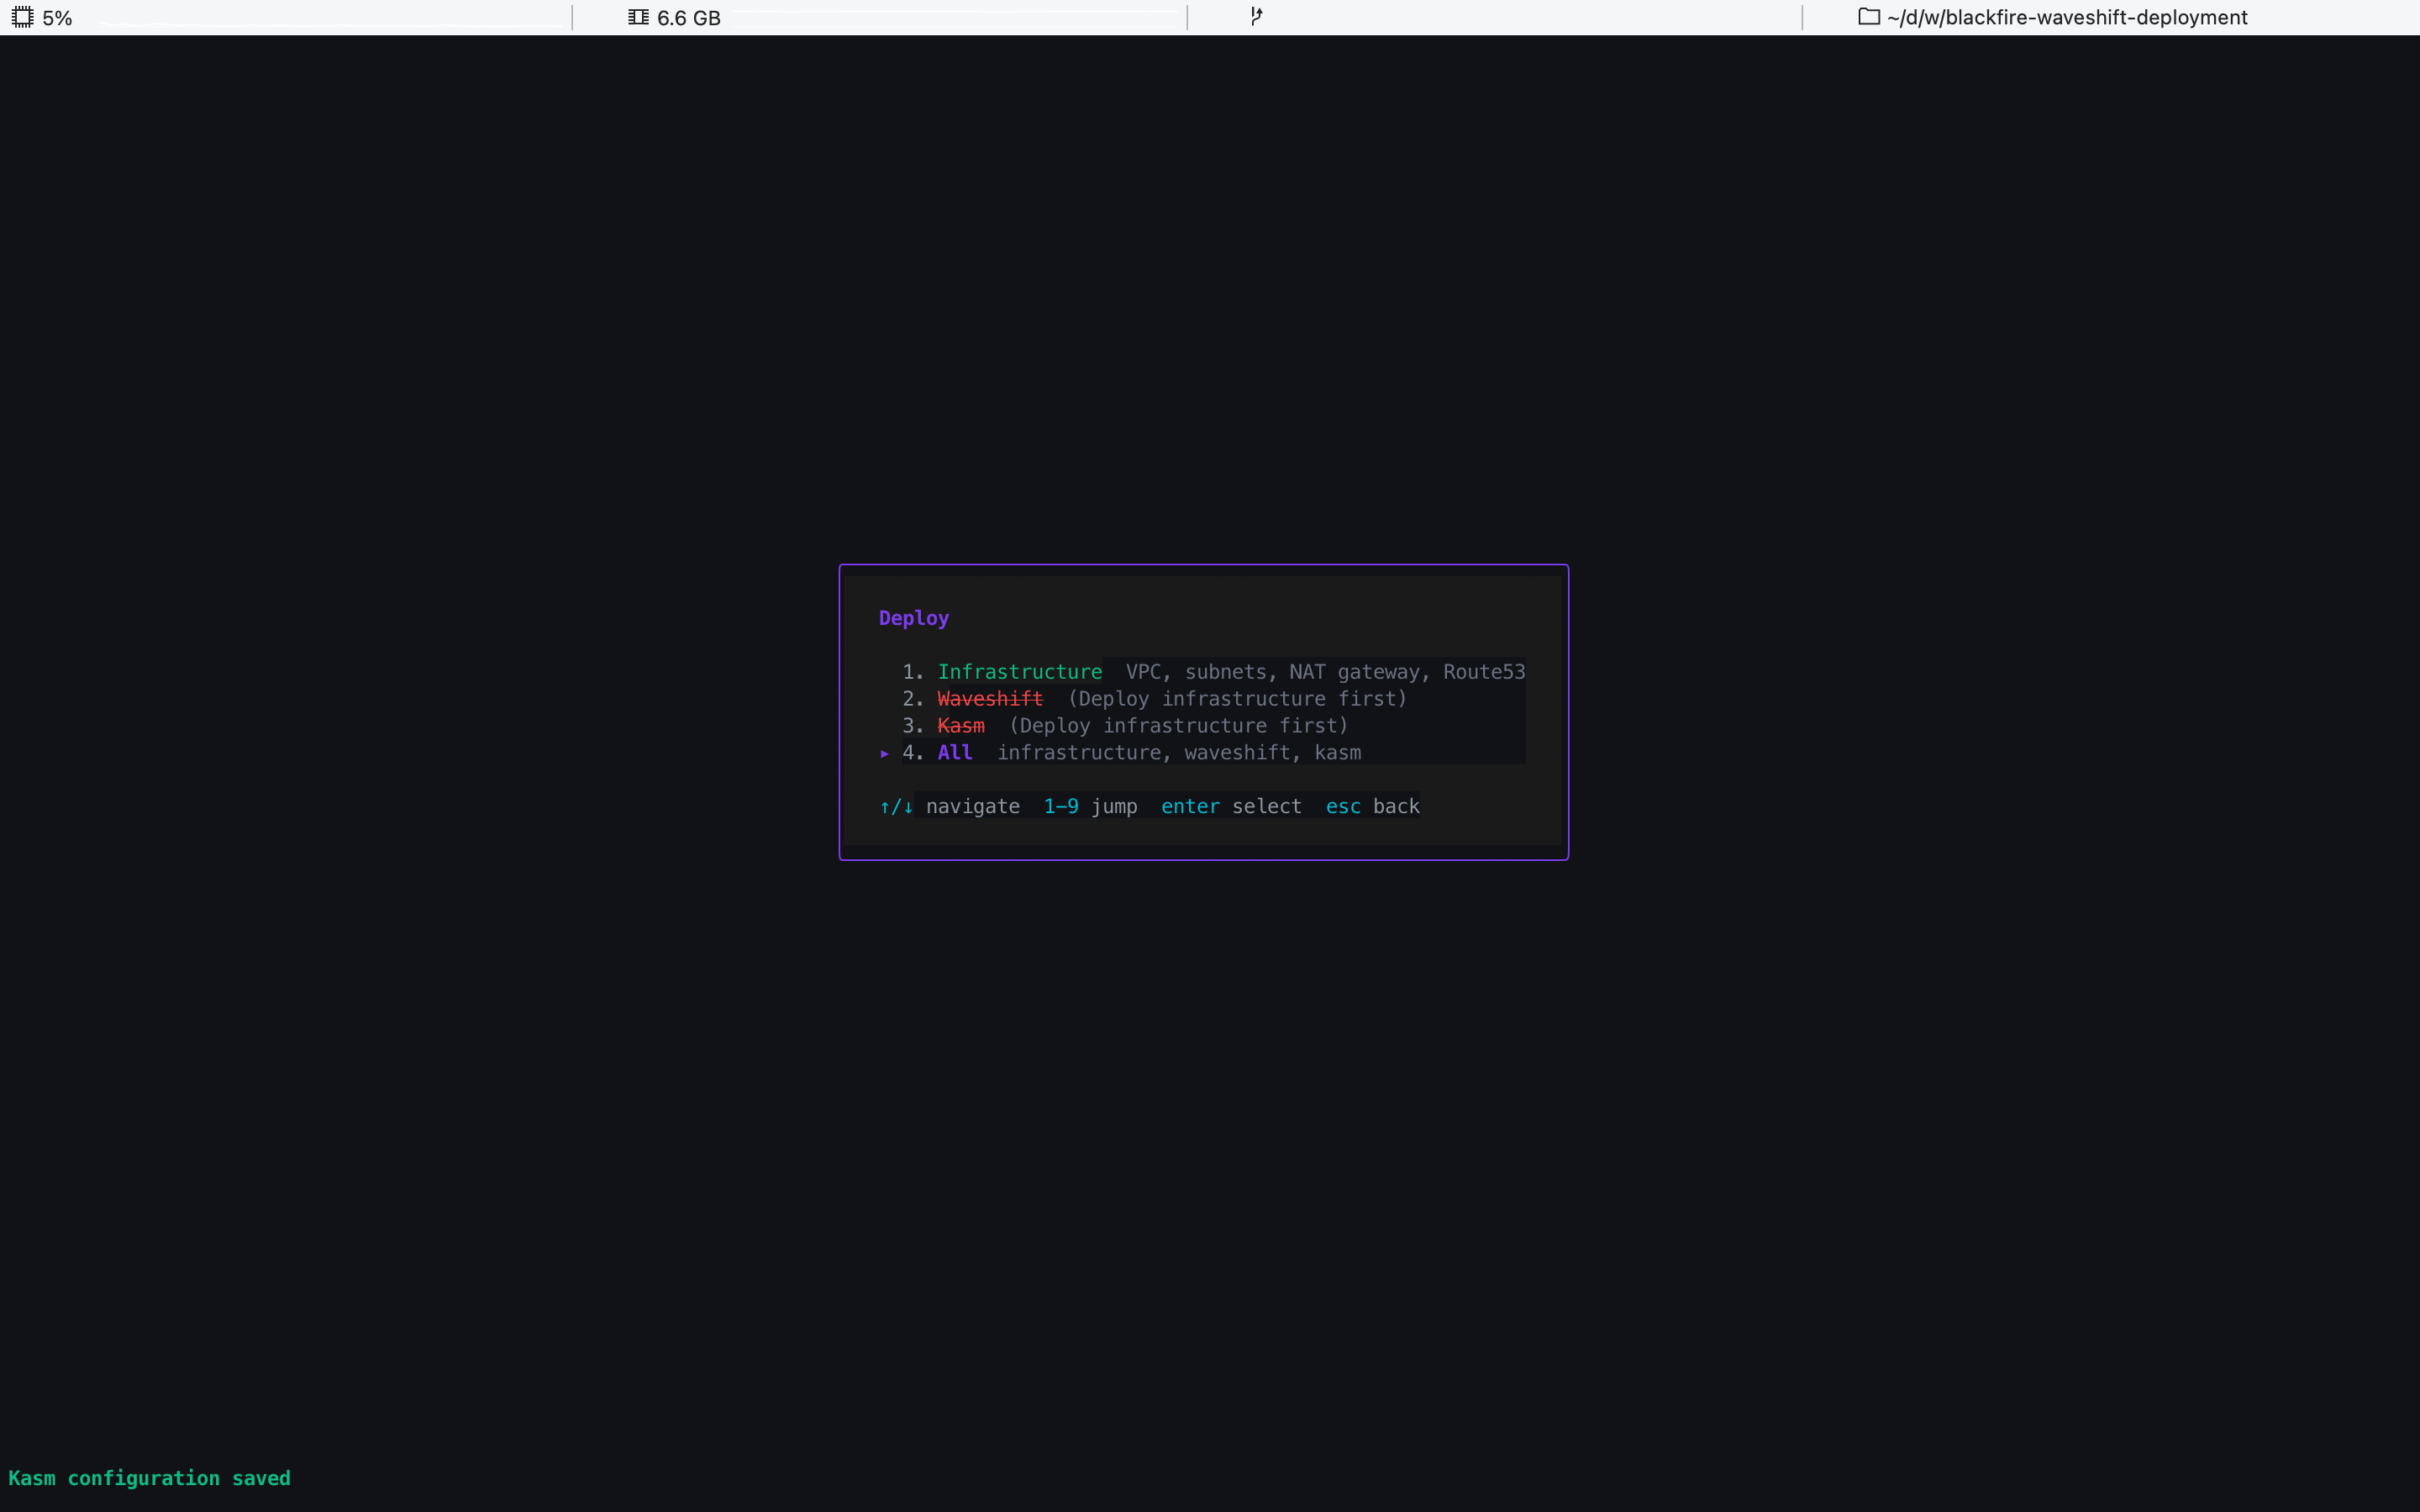
The Deploy submenu lists each configured component that isn't deployed yet, plus All when there's more than one. All runs the enabled components in the right order automatically and is the recommended path; the per-component entries are there for partial redeploys when something specific has gone wrong. (If you skipped Kasm, All is item 3.)
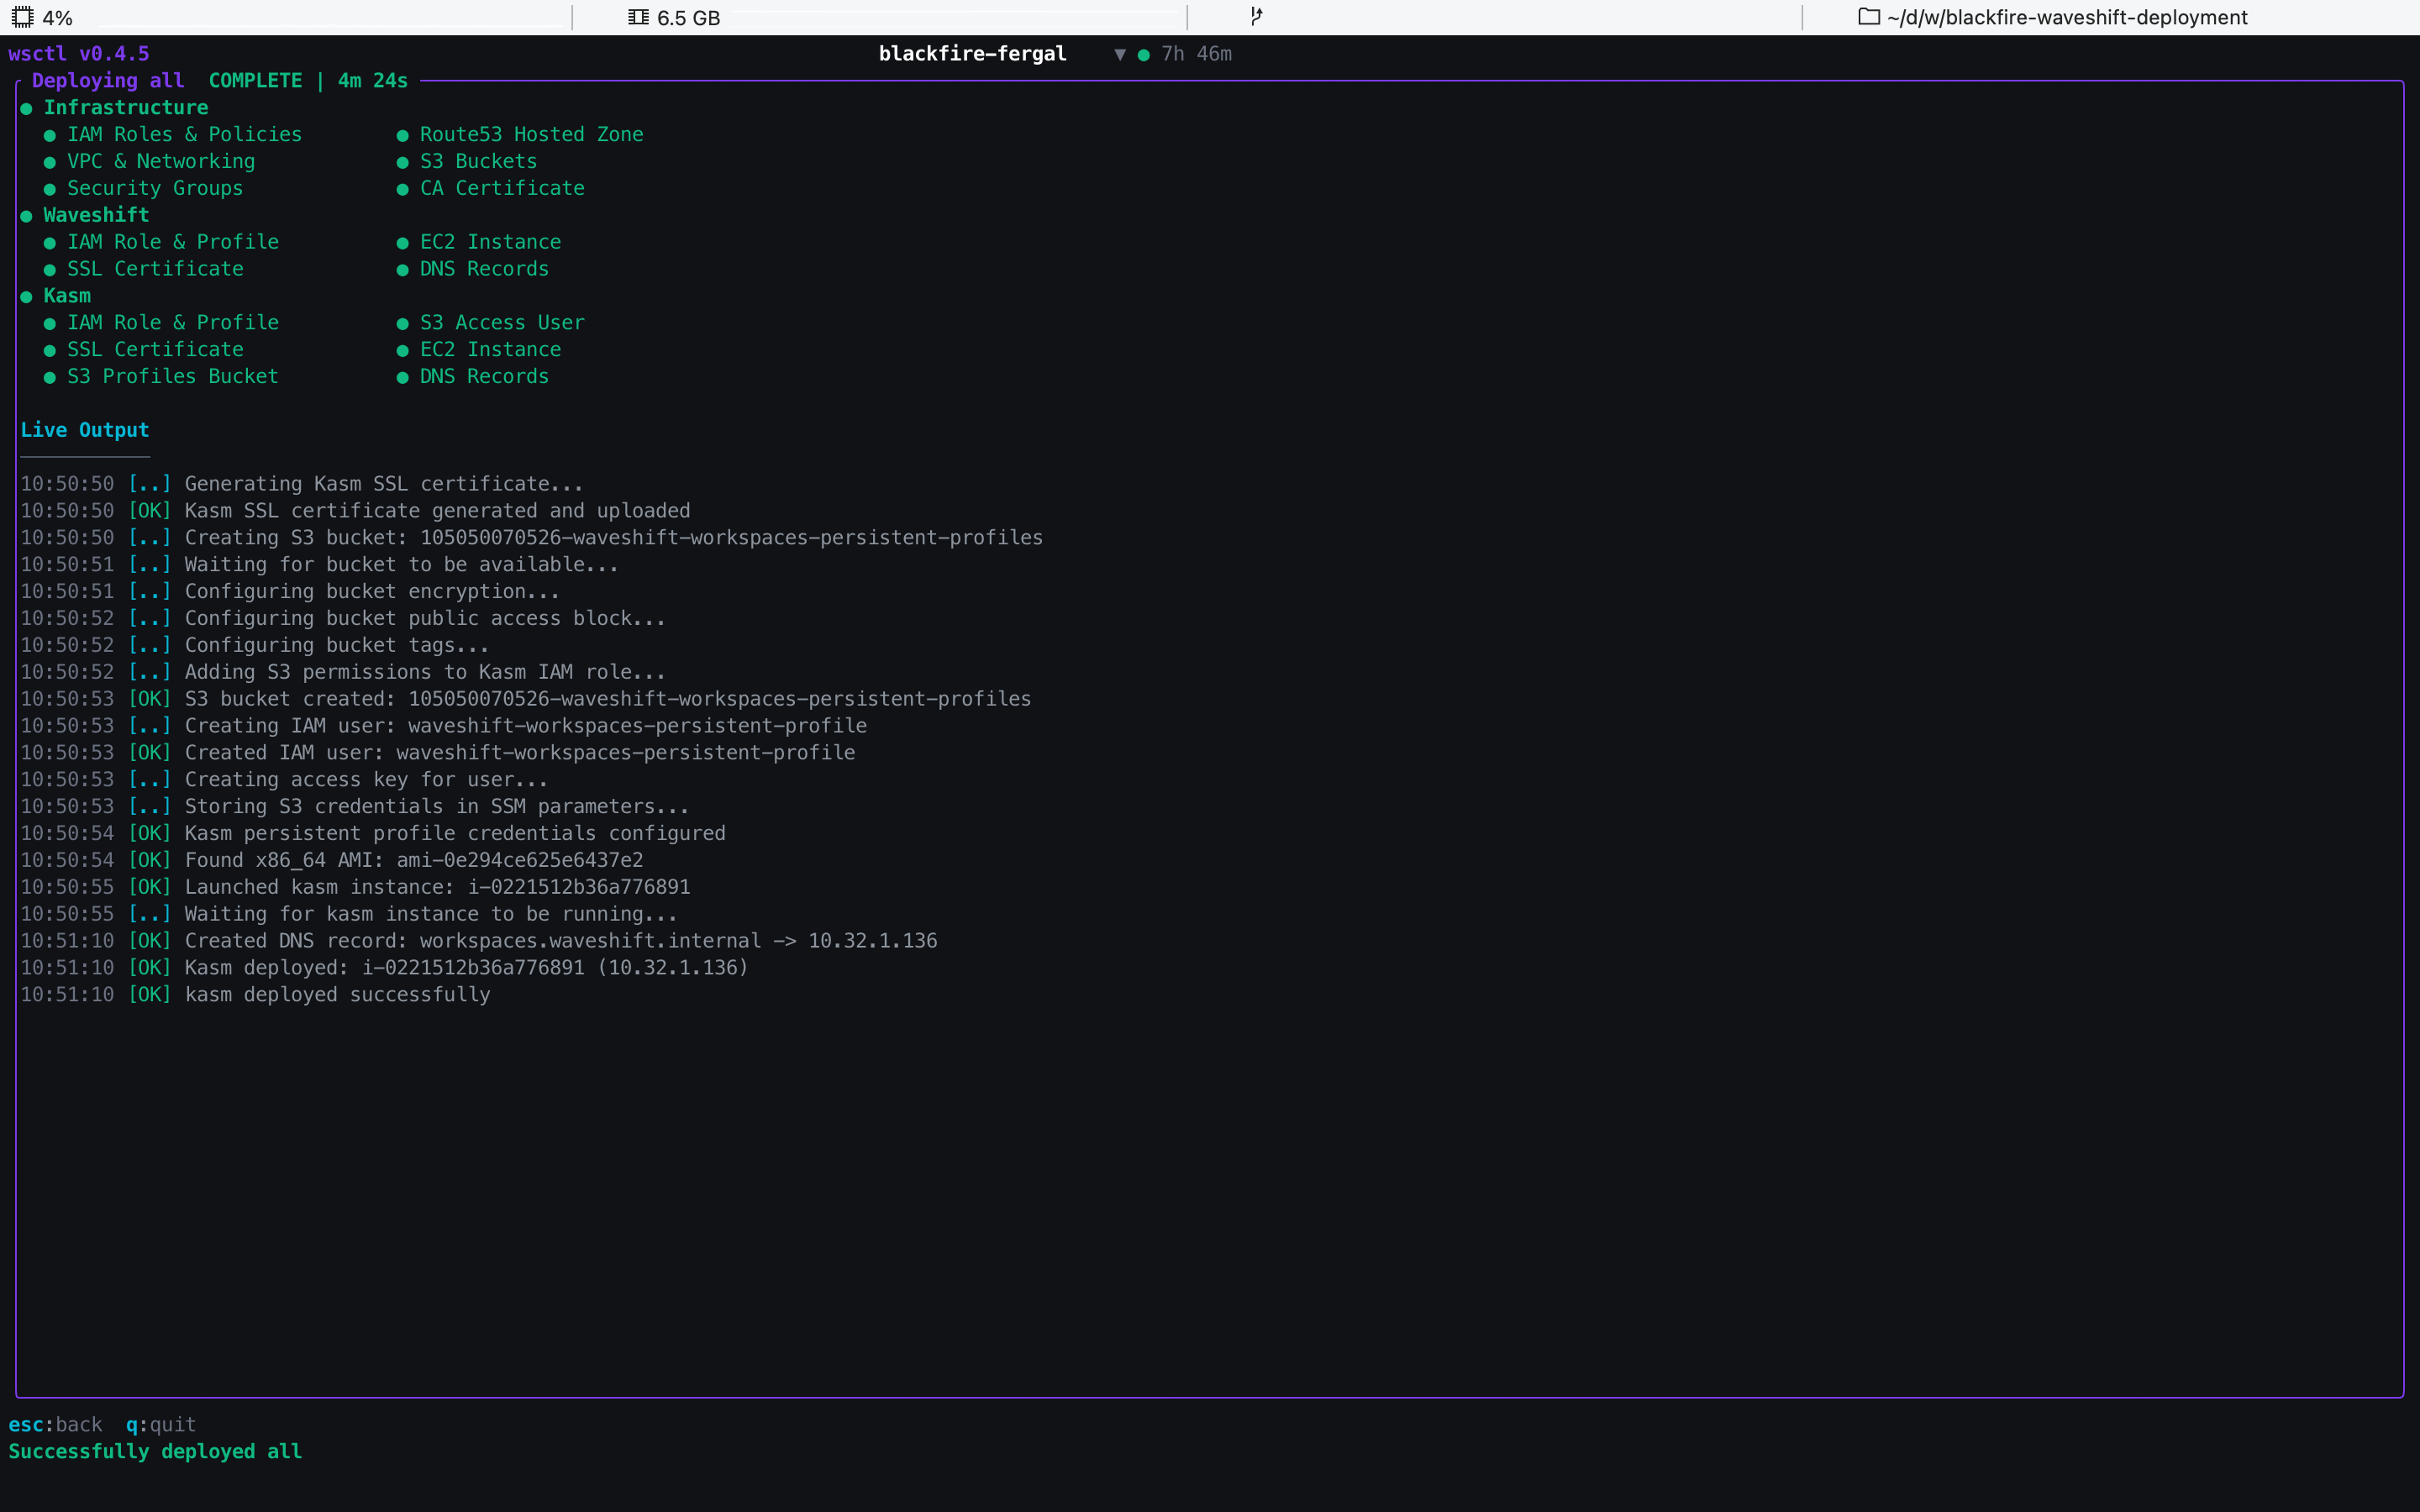
Selecting All drops straight into the live deploy view:
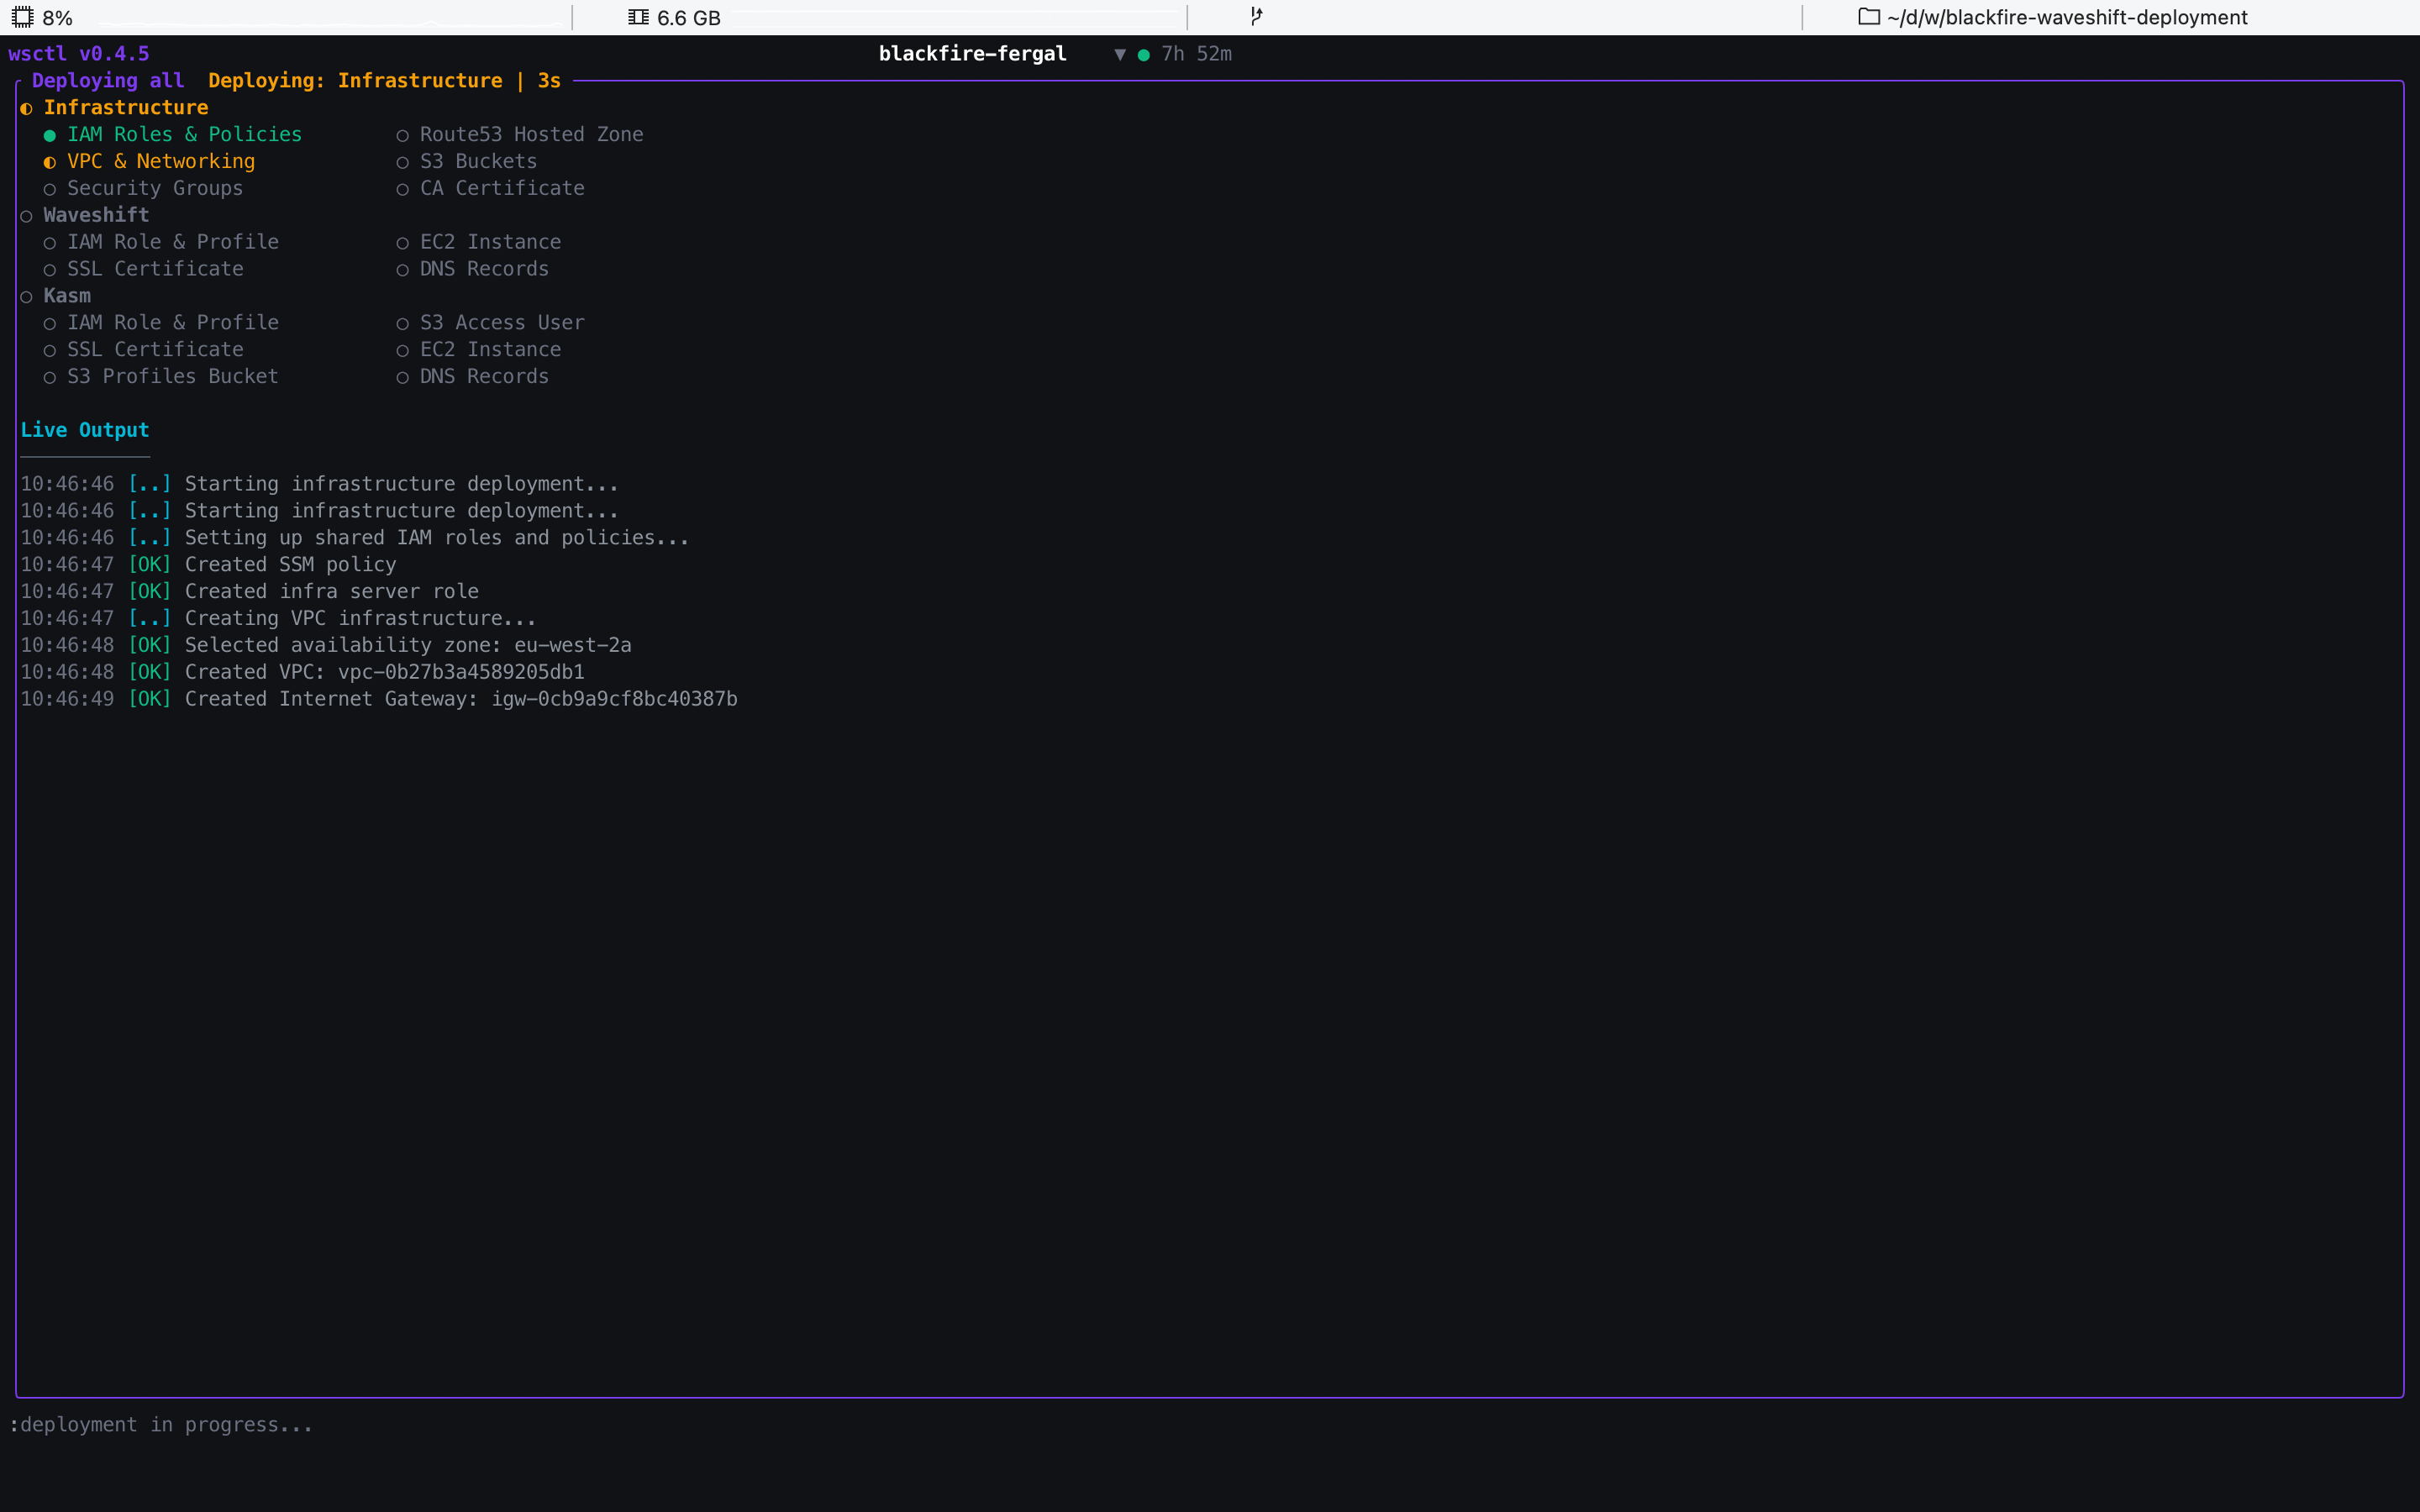
The top of the screen shows every stage with a traffic-light status:
○Hollow circle — not started yet◐Half-filled circle (amber) — in progress●Filled circle (green) — complete●Filled circle (red) — error
The Live Output panel below streams the deploy log as each step runs. A clean deploy takes roughly 10–15 minutes, dominated by VPC and NAT-gateway creation.
When every stage is green and the header reads Deploying all
COMPLETE with the elapsed time, the AWS-side deploy is done. A
small Successfully deployed all chip appears at the bottom of
the screen:
What runs during Deploy → All
The traffic-light stages on the deploy screen are grouped under three components, run in this order:
flowchart TD
    Start([Select All]) --> Infra[Infrastructure]
    Infra --> Wave[Waveshift]
    Wave --> Kasm{Kasm enabled?}
    Kasm -->|yes| KasmRun[Kasm]
    Kasm -->|no| Done([Deployed])
    KasmRun --> Done

    Infra -.- InfraD["IAM roles + policies,<br/>VPC + subnets, IGW, NAT gateway,<br/>security groups, Route 53 private zone,<br/>S3 buckets, Root CA certificate"]
    Wave -.- WaveD["IAM role + profile,<br/>console SSL certificate,<br/>orchestrator EC2, DNS record"]
    KasmRun -.- KasmD["IAM role + profile,<br/>workspaces SSL certificate,<br/>S3 profiles bucket + access user,<br/>Kasm EC2, DNS record"]
Common failure points: Infrastructure typically trips on AWS quotas (VPC count, NAT gateway count, Elastic IPs); Waveshift and Kasm check the configured instance type is offered in the region before launching, so a typo or unavailable type fails fast; Kasm legitimately stays amber for 5–10 minutes post-deploy while the host self-configures — that is not a failure.
8. Back at the main view
Get there: Esc from any submenu returns to the main view.
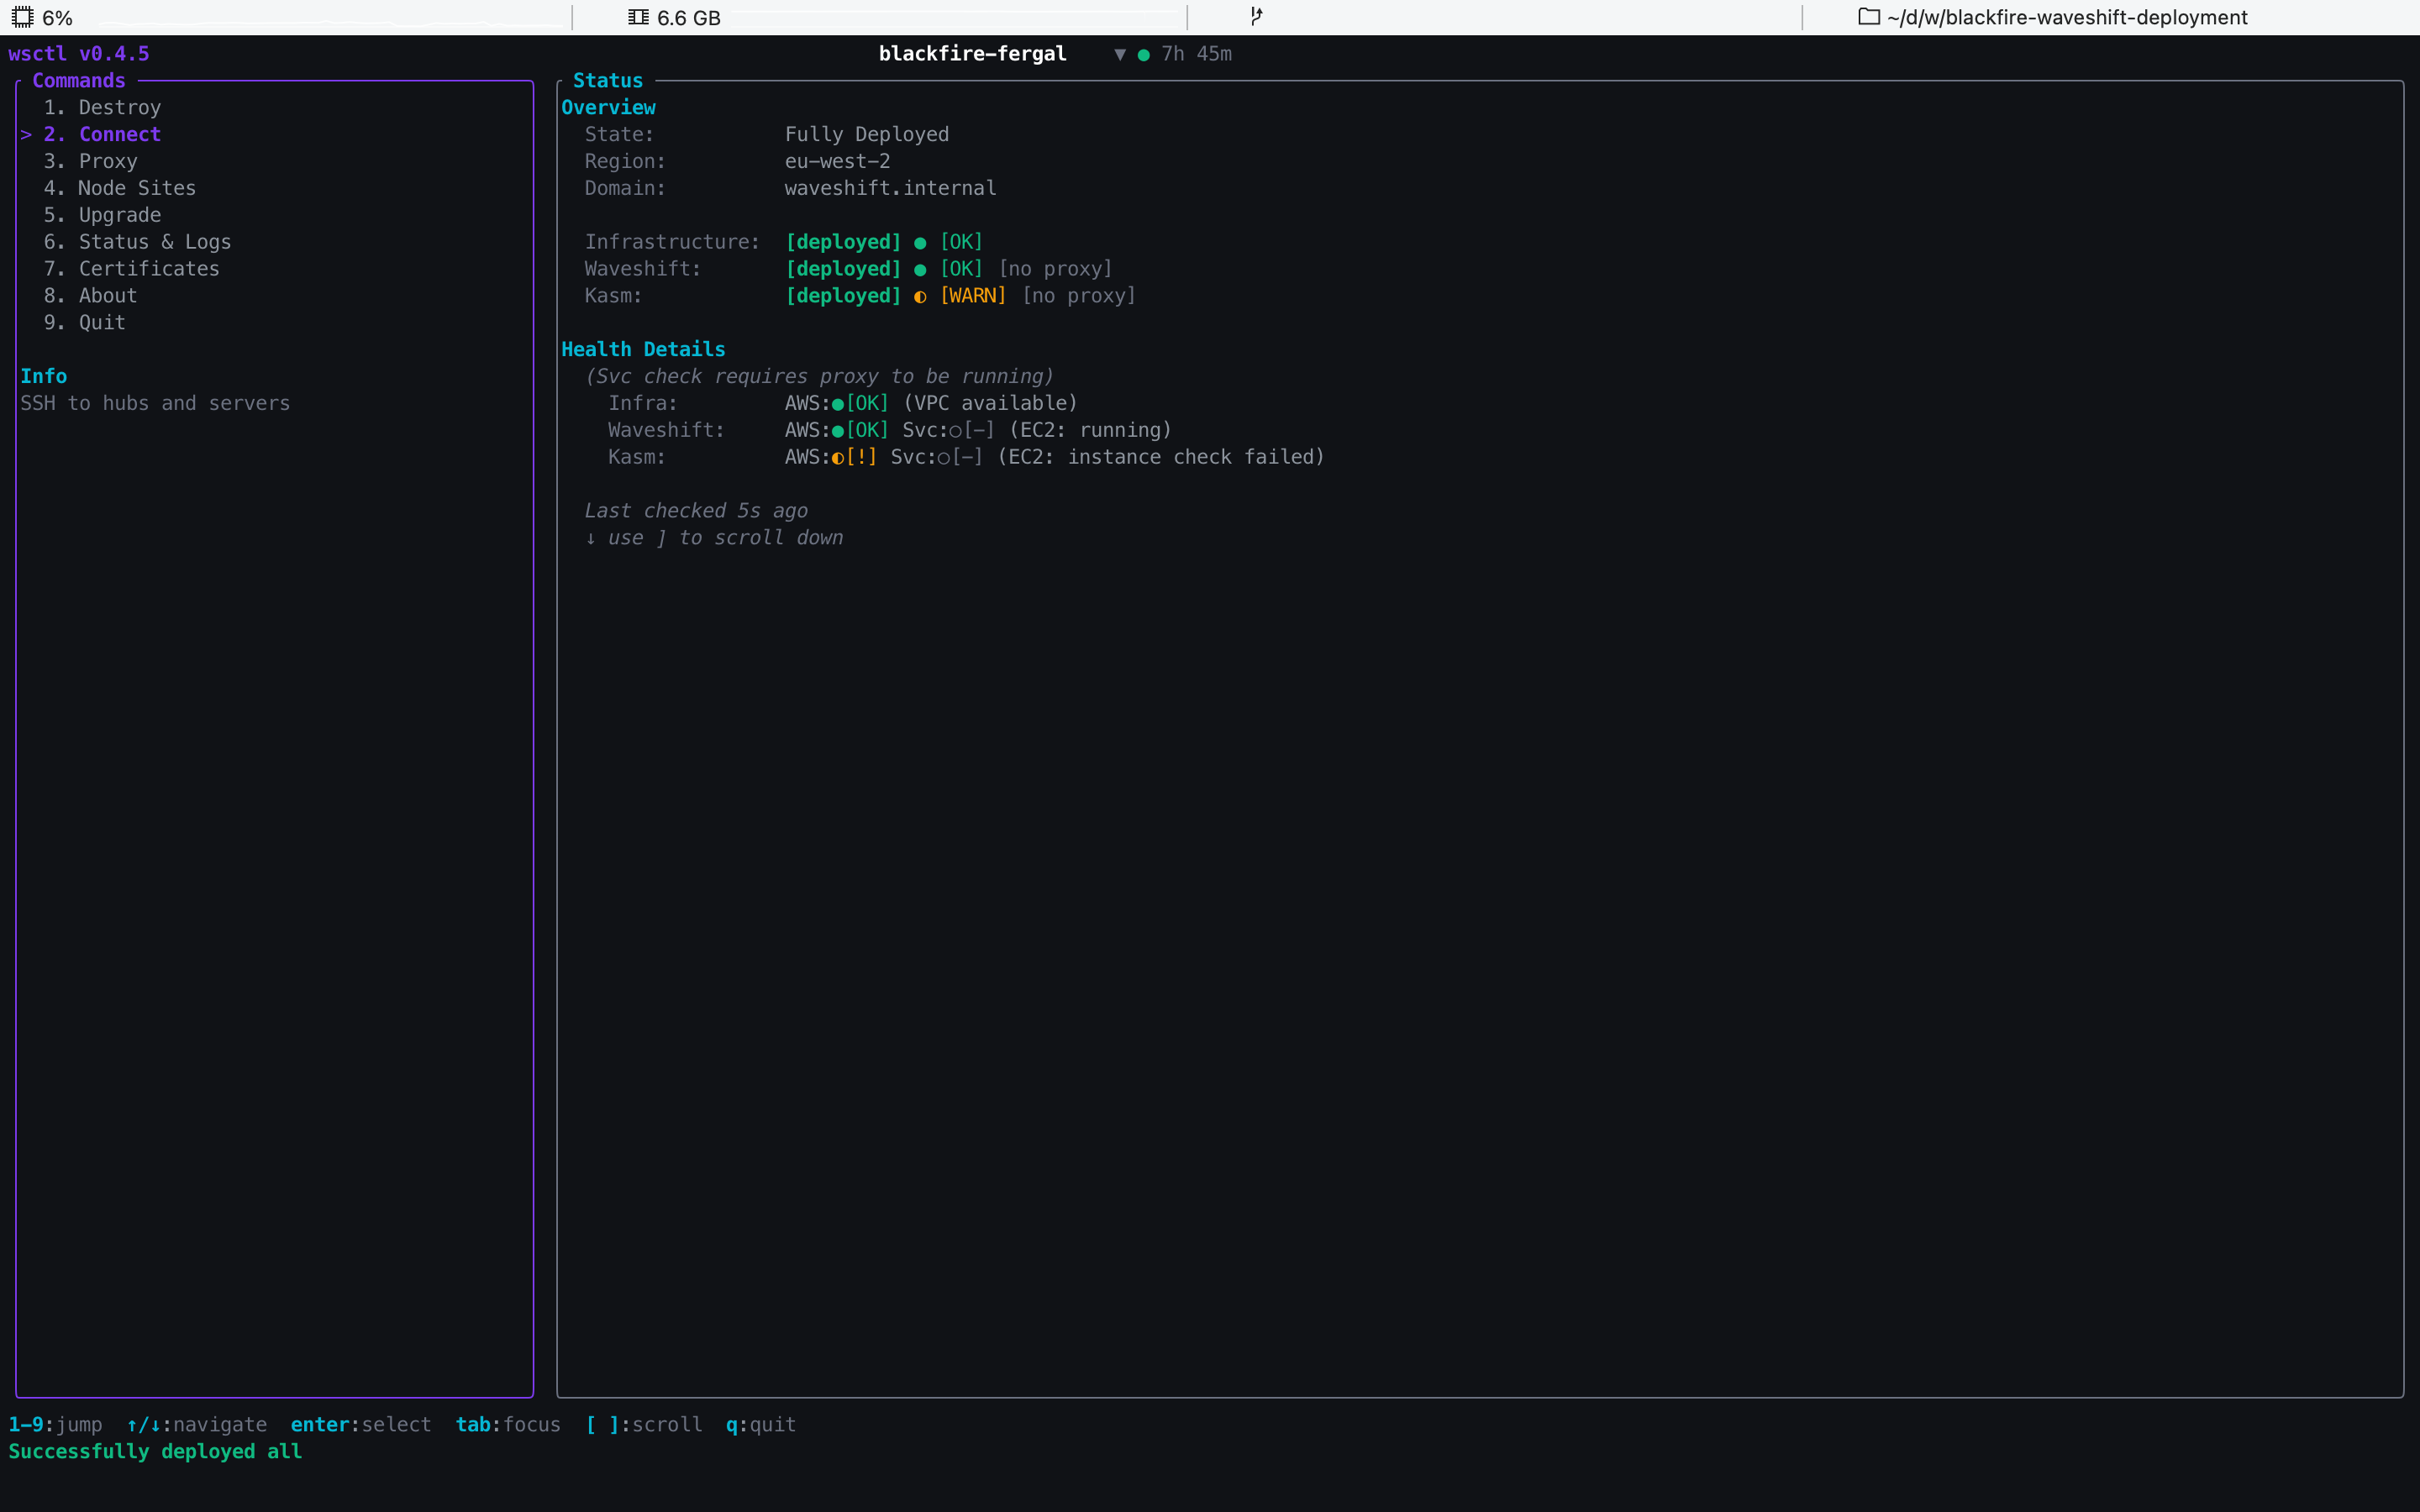
Press esc to return to the main view. State should now show
Fully Deployed (or Waveshift Deployed if you skipped Kasm). Kasm may show a WARN chip for a few
minutes while the host finishes configuring itself in the
background — that's normal; come back in 5–10 minutes and it'll
flip to OK.
9. Verifying the infrastructure details
Get there: main view → ↓ or ] to scroll the right pane.
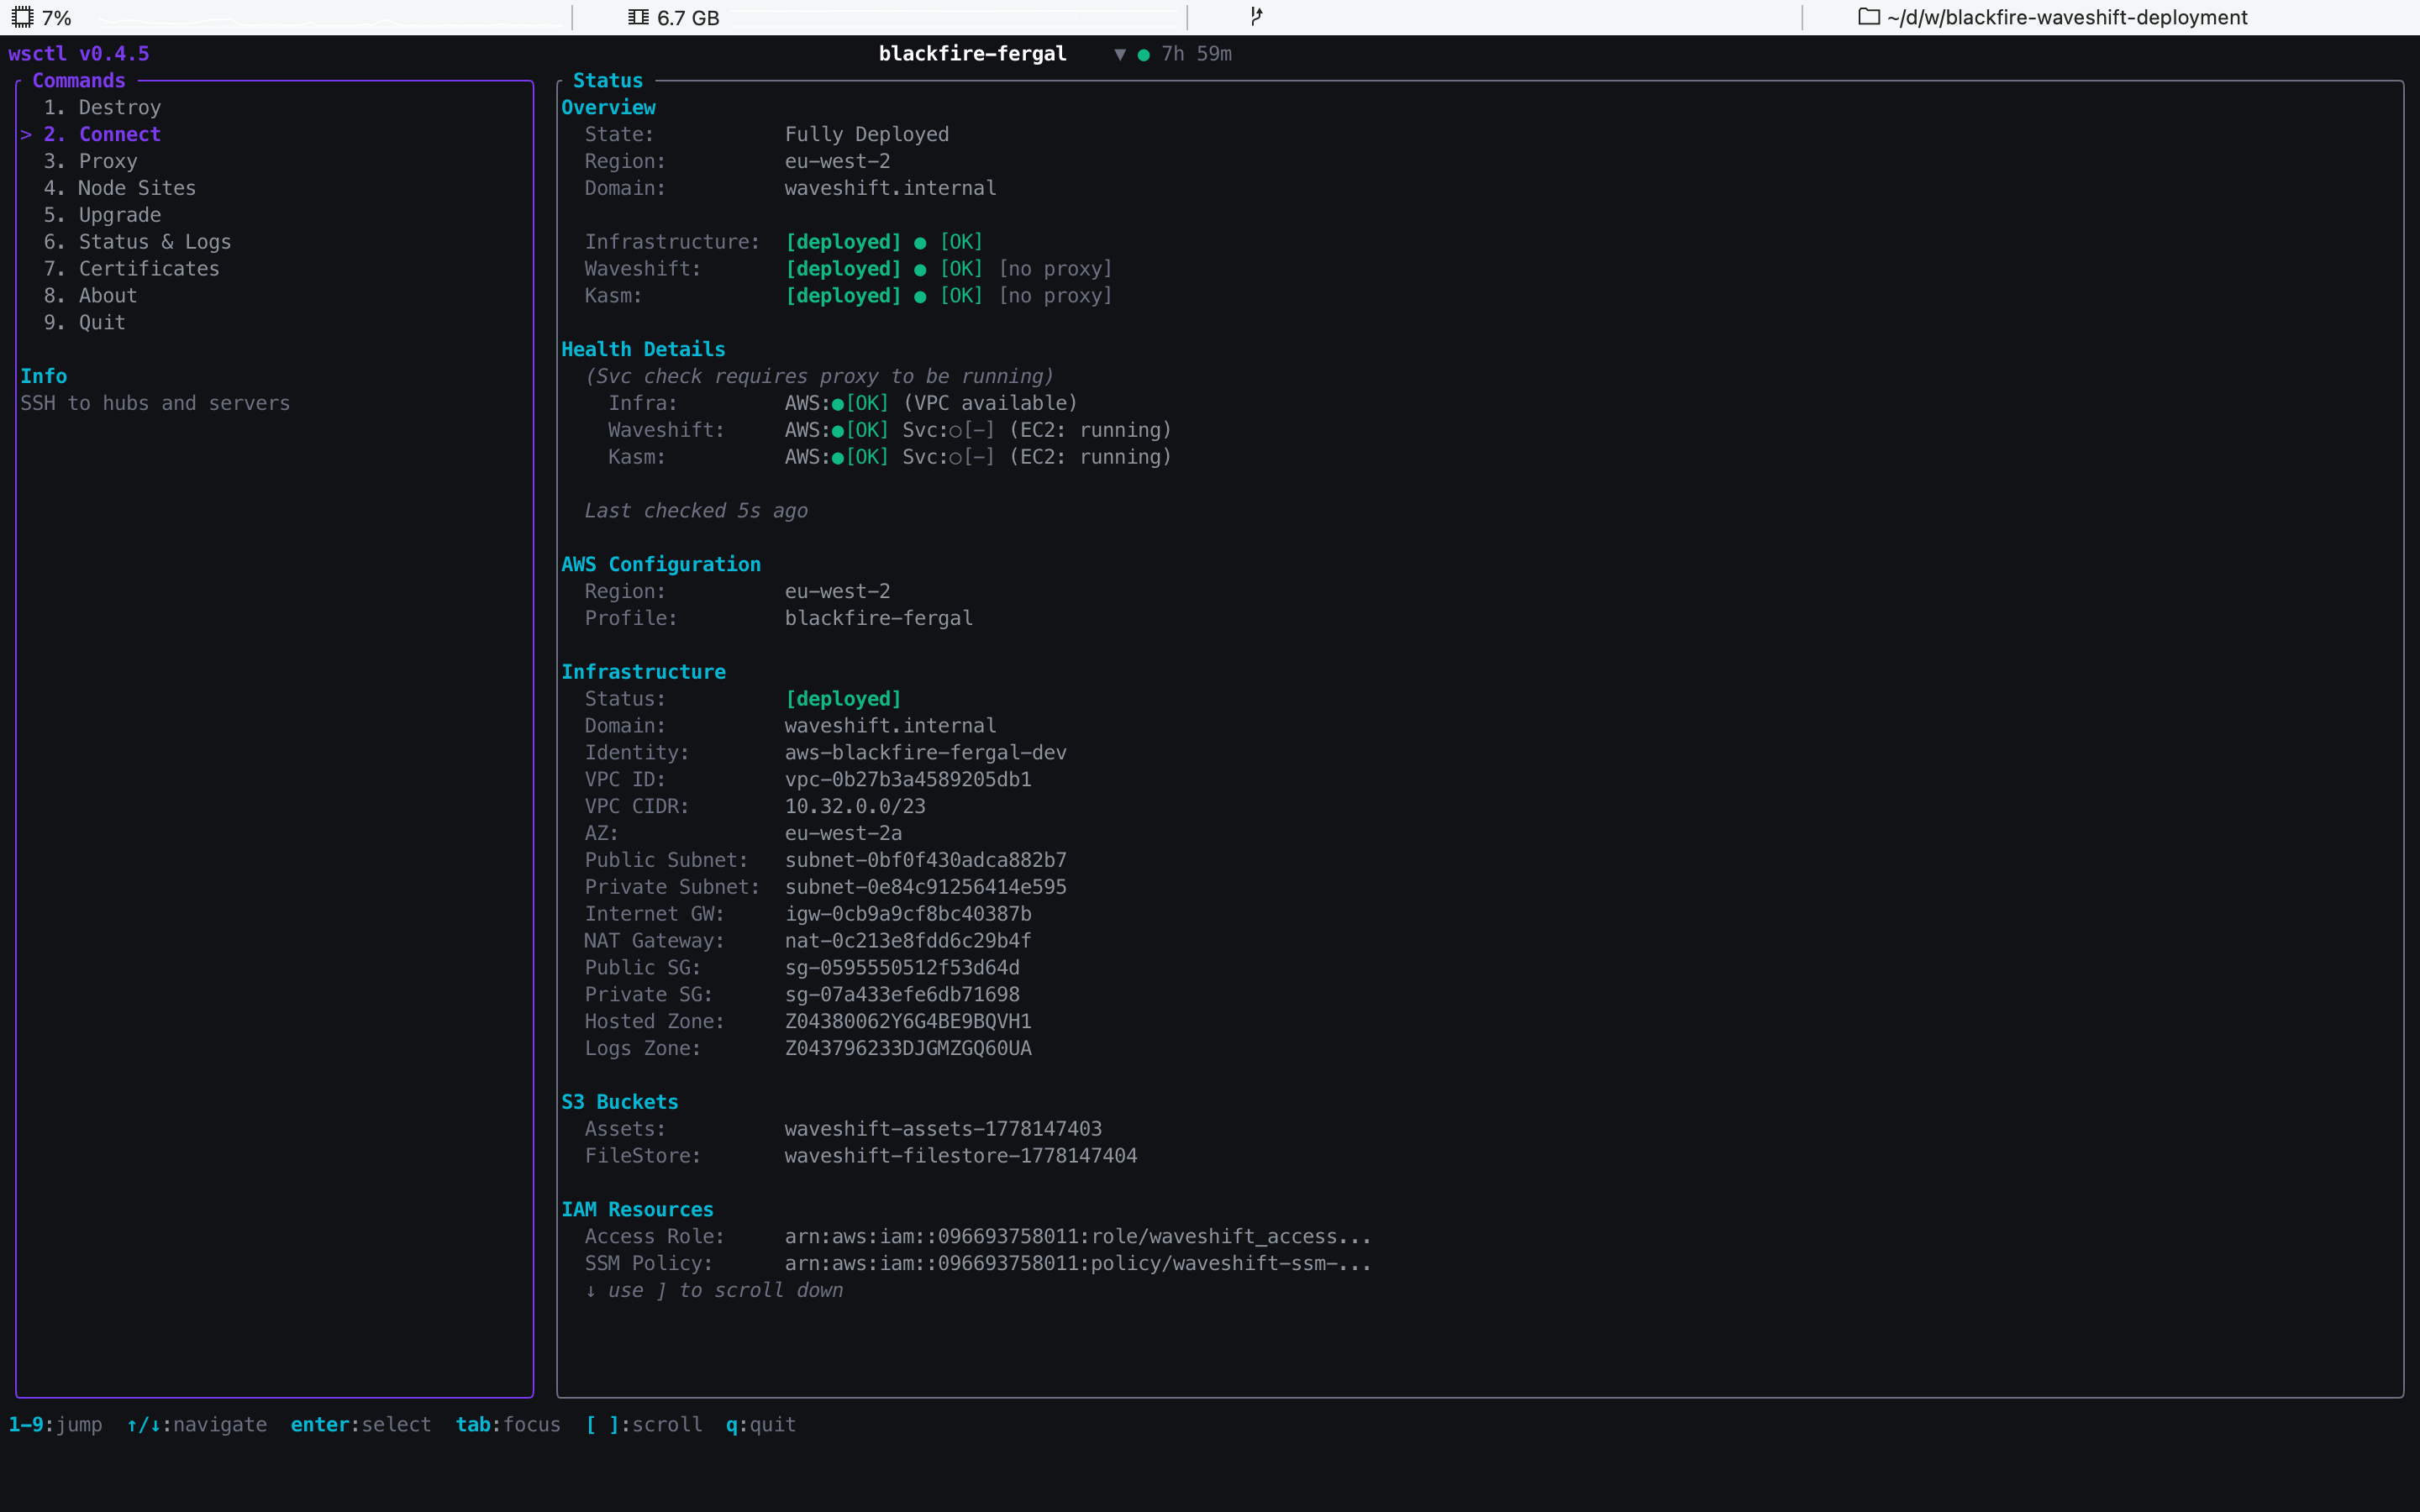
Scroll down (] or ↓) to see the full breakdown — VPC ID,
subnet IDs, NAT gateway, security groups, S3 buckets, IAM
resources. Worth a quick check that everything looks sane
before you hand the deployment over.
Post-deploy operations
The flow above lands you with a working deployment. Most of the time you'll keep using the TUI for the partner-side ops on top of it — verifying it from a browser, adding hardware Sites, flashing Hubs, etc.
Service Proxies — verify the deploy from your laptop
Get there: main menu → 3 Proxy.
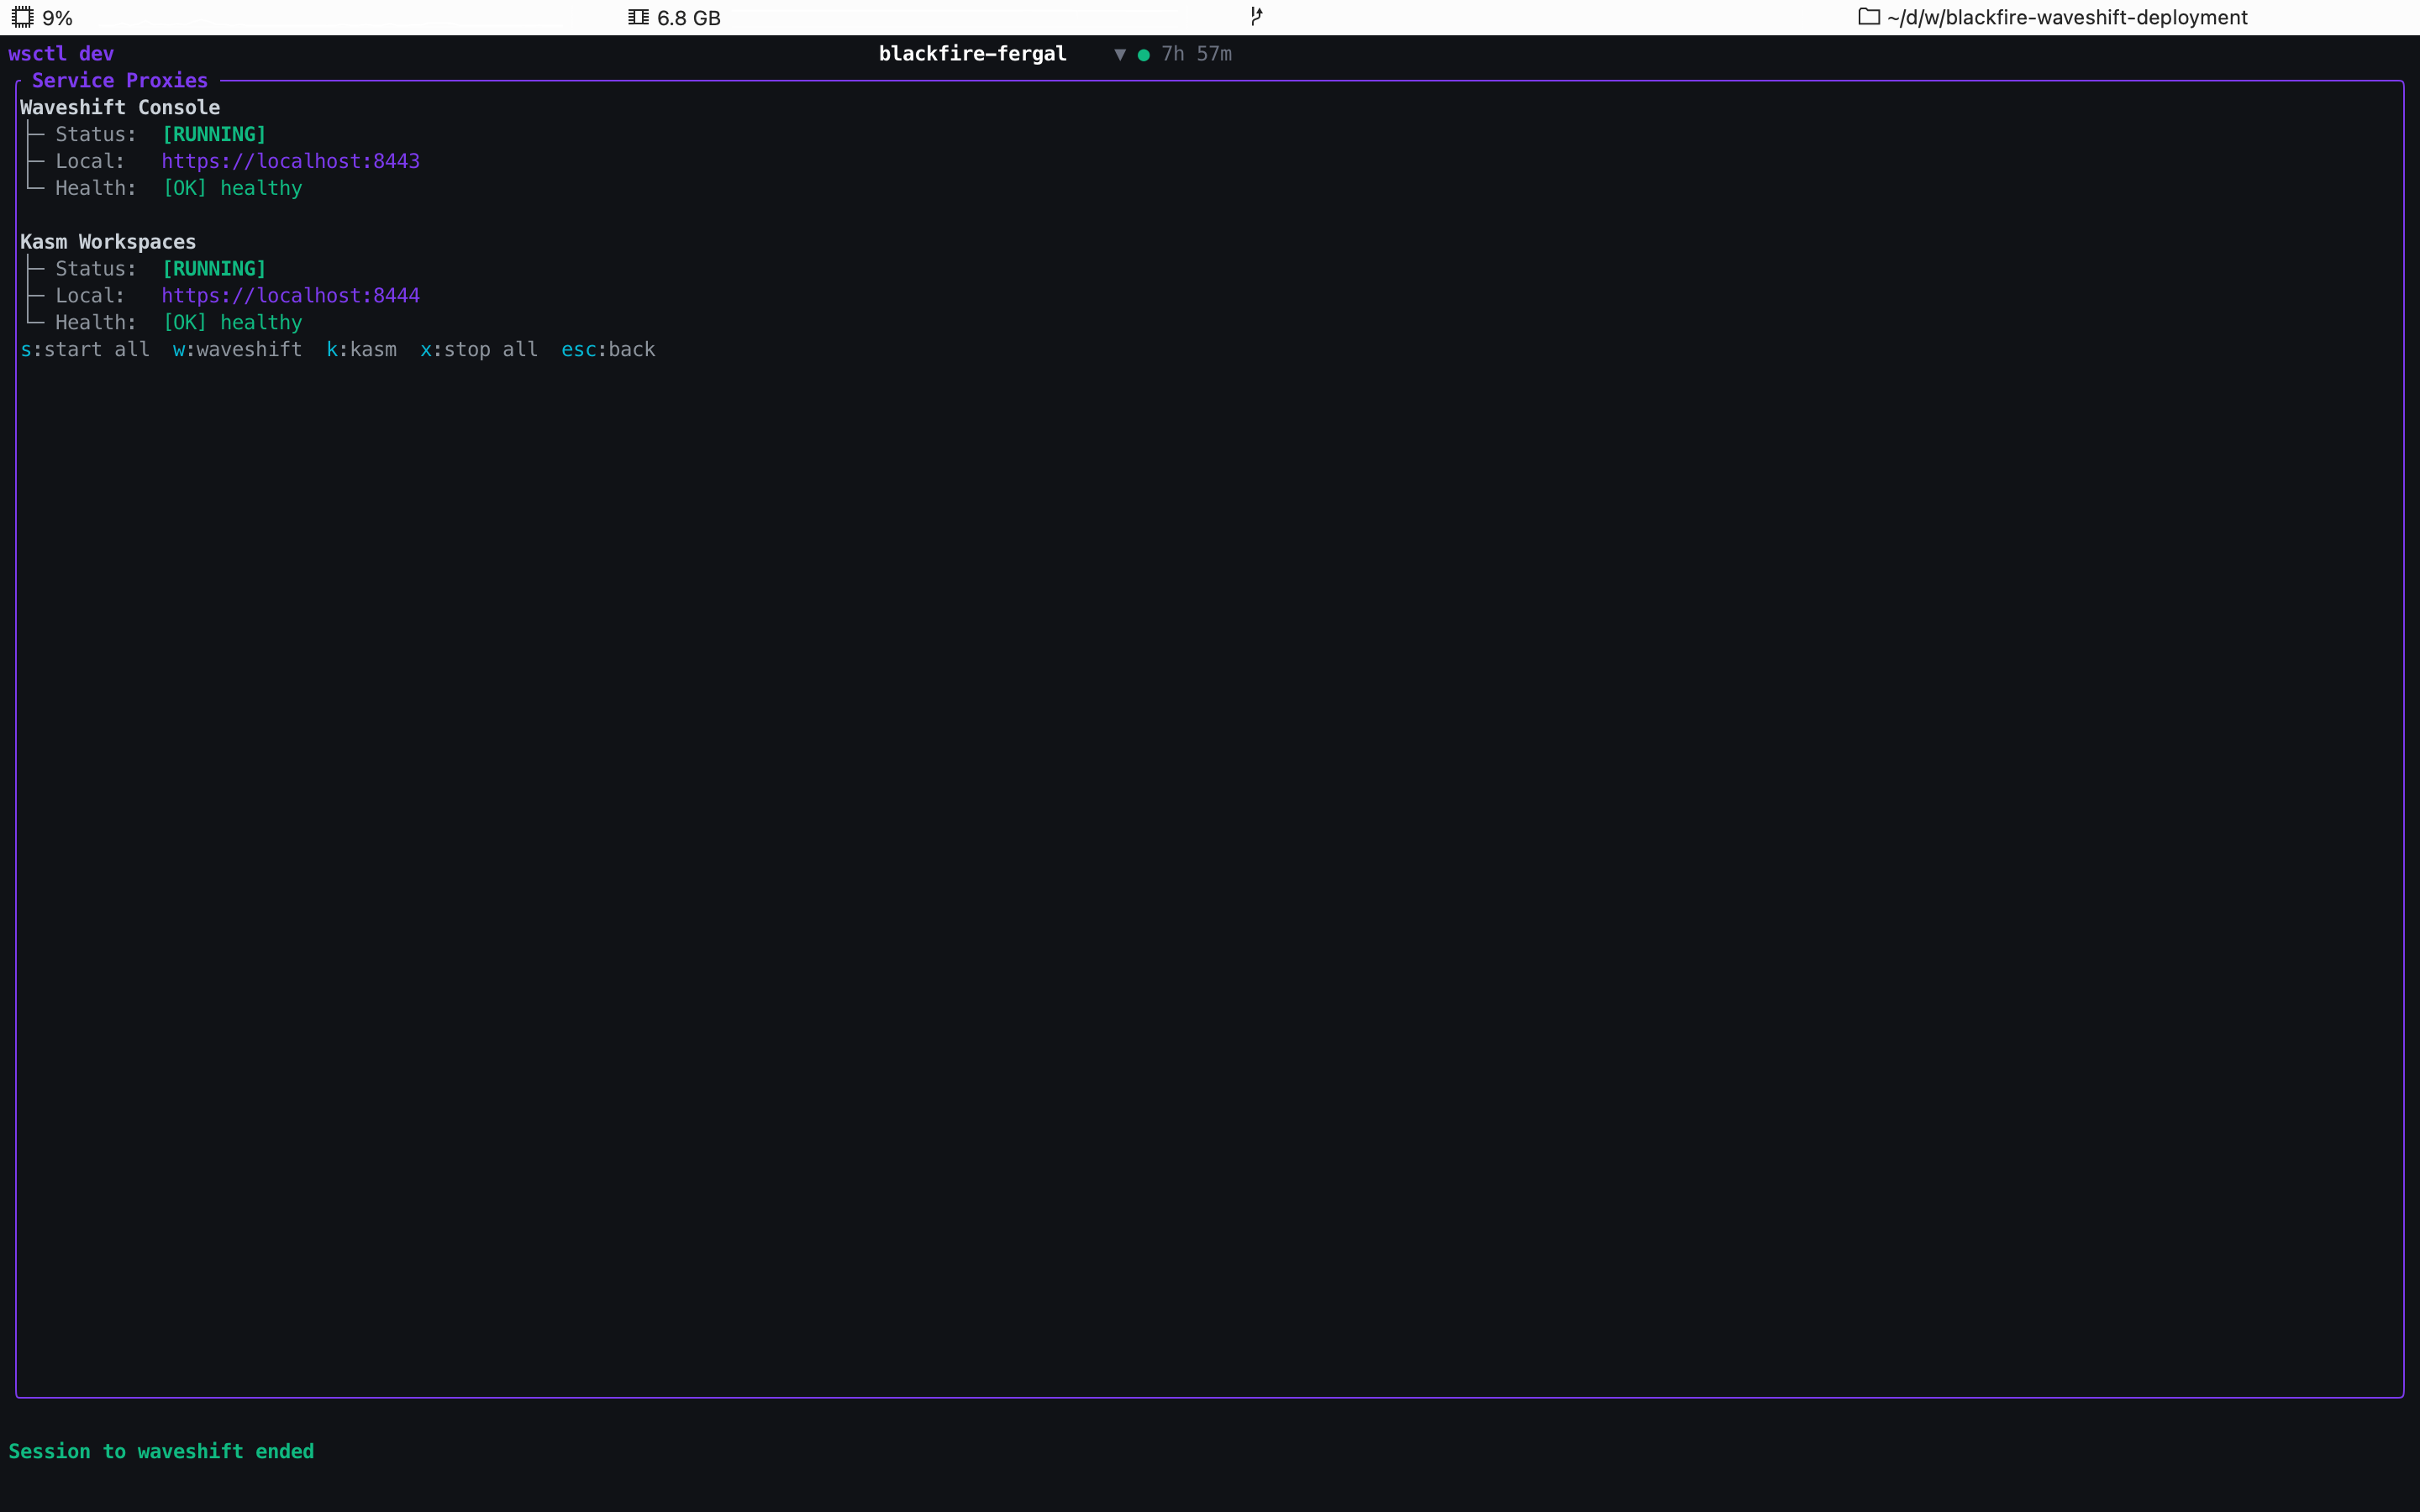
Open the Proxy entry on the main menu to start SSM-backed
local proxies for each service. The Waveshift Console binds to
https://localhost:8443 and Kasm to https://localhost:8444,
each with a [RUNNING] status and [OK] healthy chip.
This is the fastest way to confirm a fresh deploy is up before the deployment has any WireGuard clients pointed at it — the proxies tunnel through SSM directly to the EC2 instances, so they don't require a Hub, Node, or WireGuard config to be configured yet.
Keys: s start all, w waveshift only, k kasm only, x
stop all, esc back.
Connect — SSM into the EC2 hosts
Get there: main menu → 2 Connect.
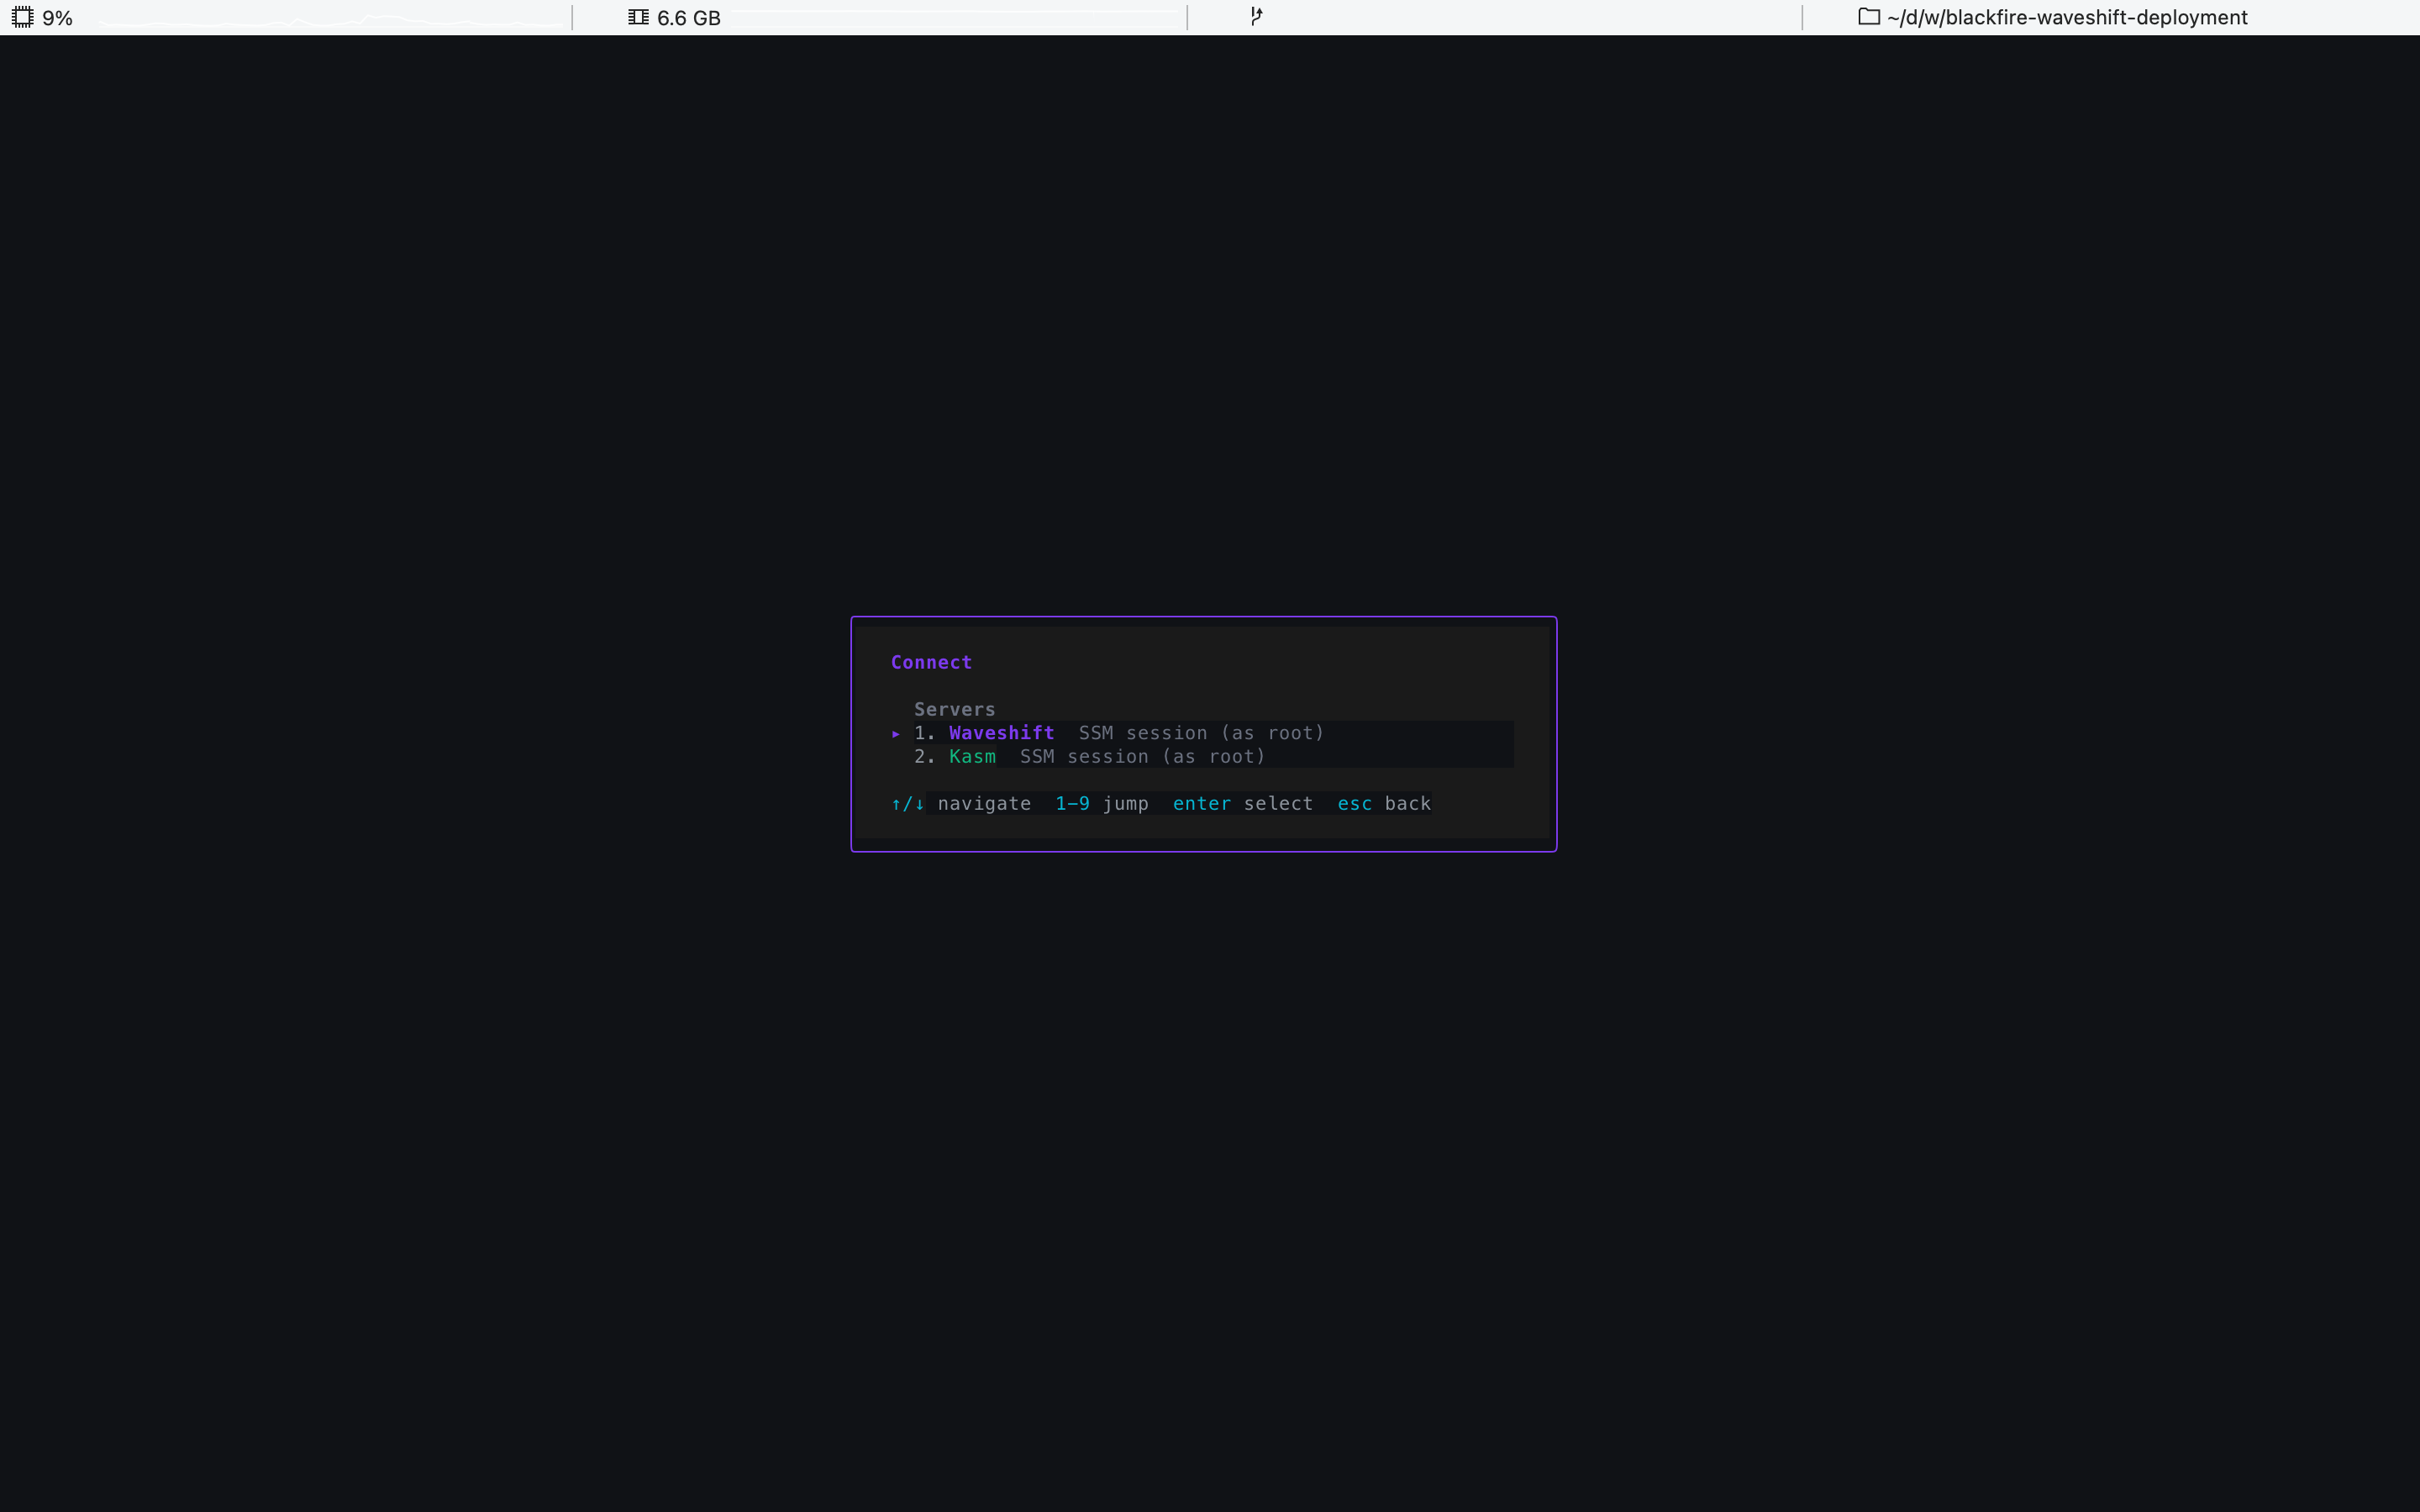
The Connect entry lists every host you can open a shell on.
Under Servers, it opens an interactive SSM session as root
against the Waveshift orchestrator EC2, the Kasm host, or any
Infrastructure Server. No SSH keys, no bastion — AWS SSM tunnels
straight in over the SSM agent on the instances. Under Hubs,
it lists each configured Hub router by MAC address (reachable
ones marked [OK], others [OFFLINE]) and opens an SSH session
to it.
Useful when you need to look at journal logs, restart a service, or poke at a config on the box without going through the Console.
Status & Logs — live deployment health
Get there: main menu → 6 Status & Logs.
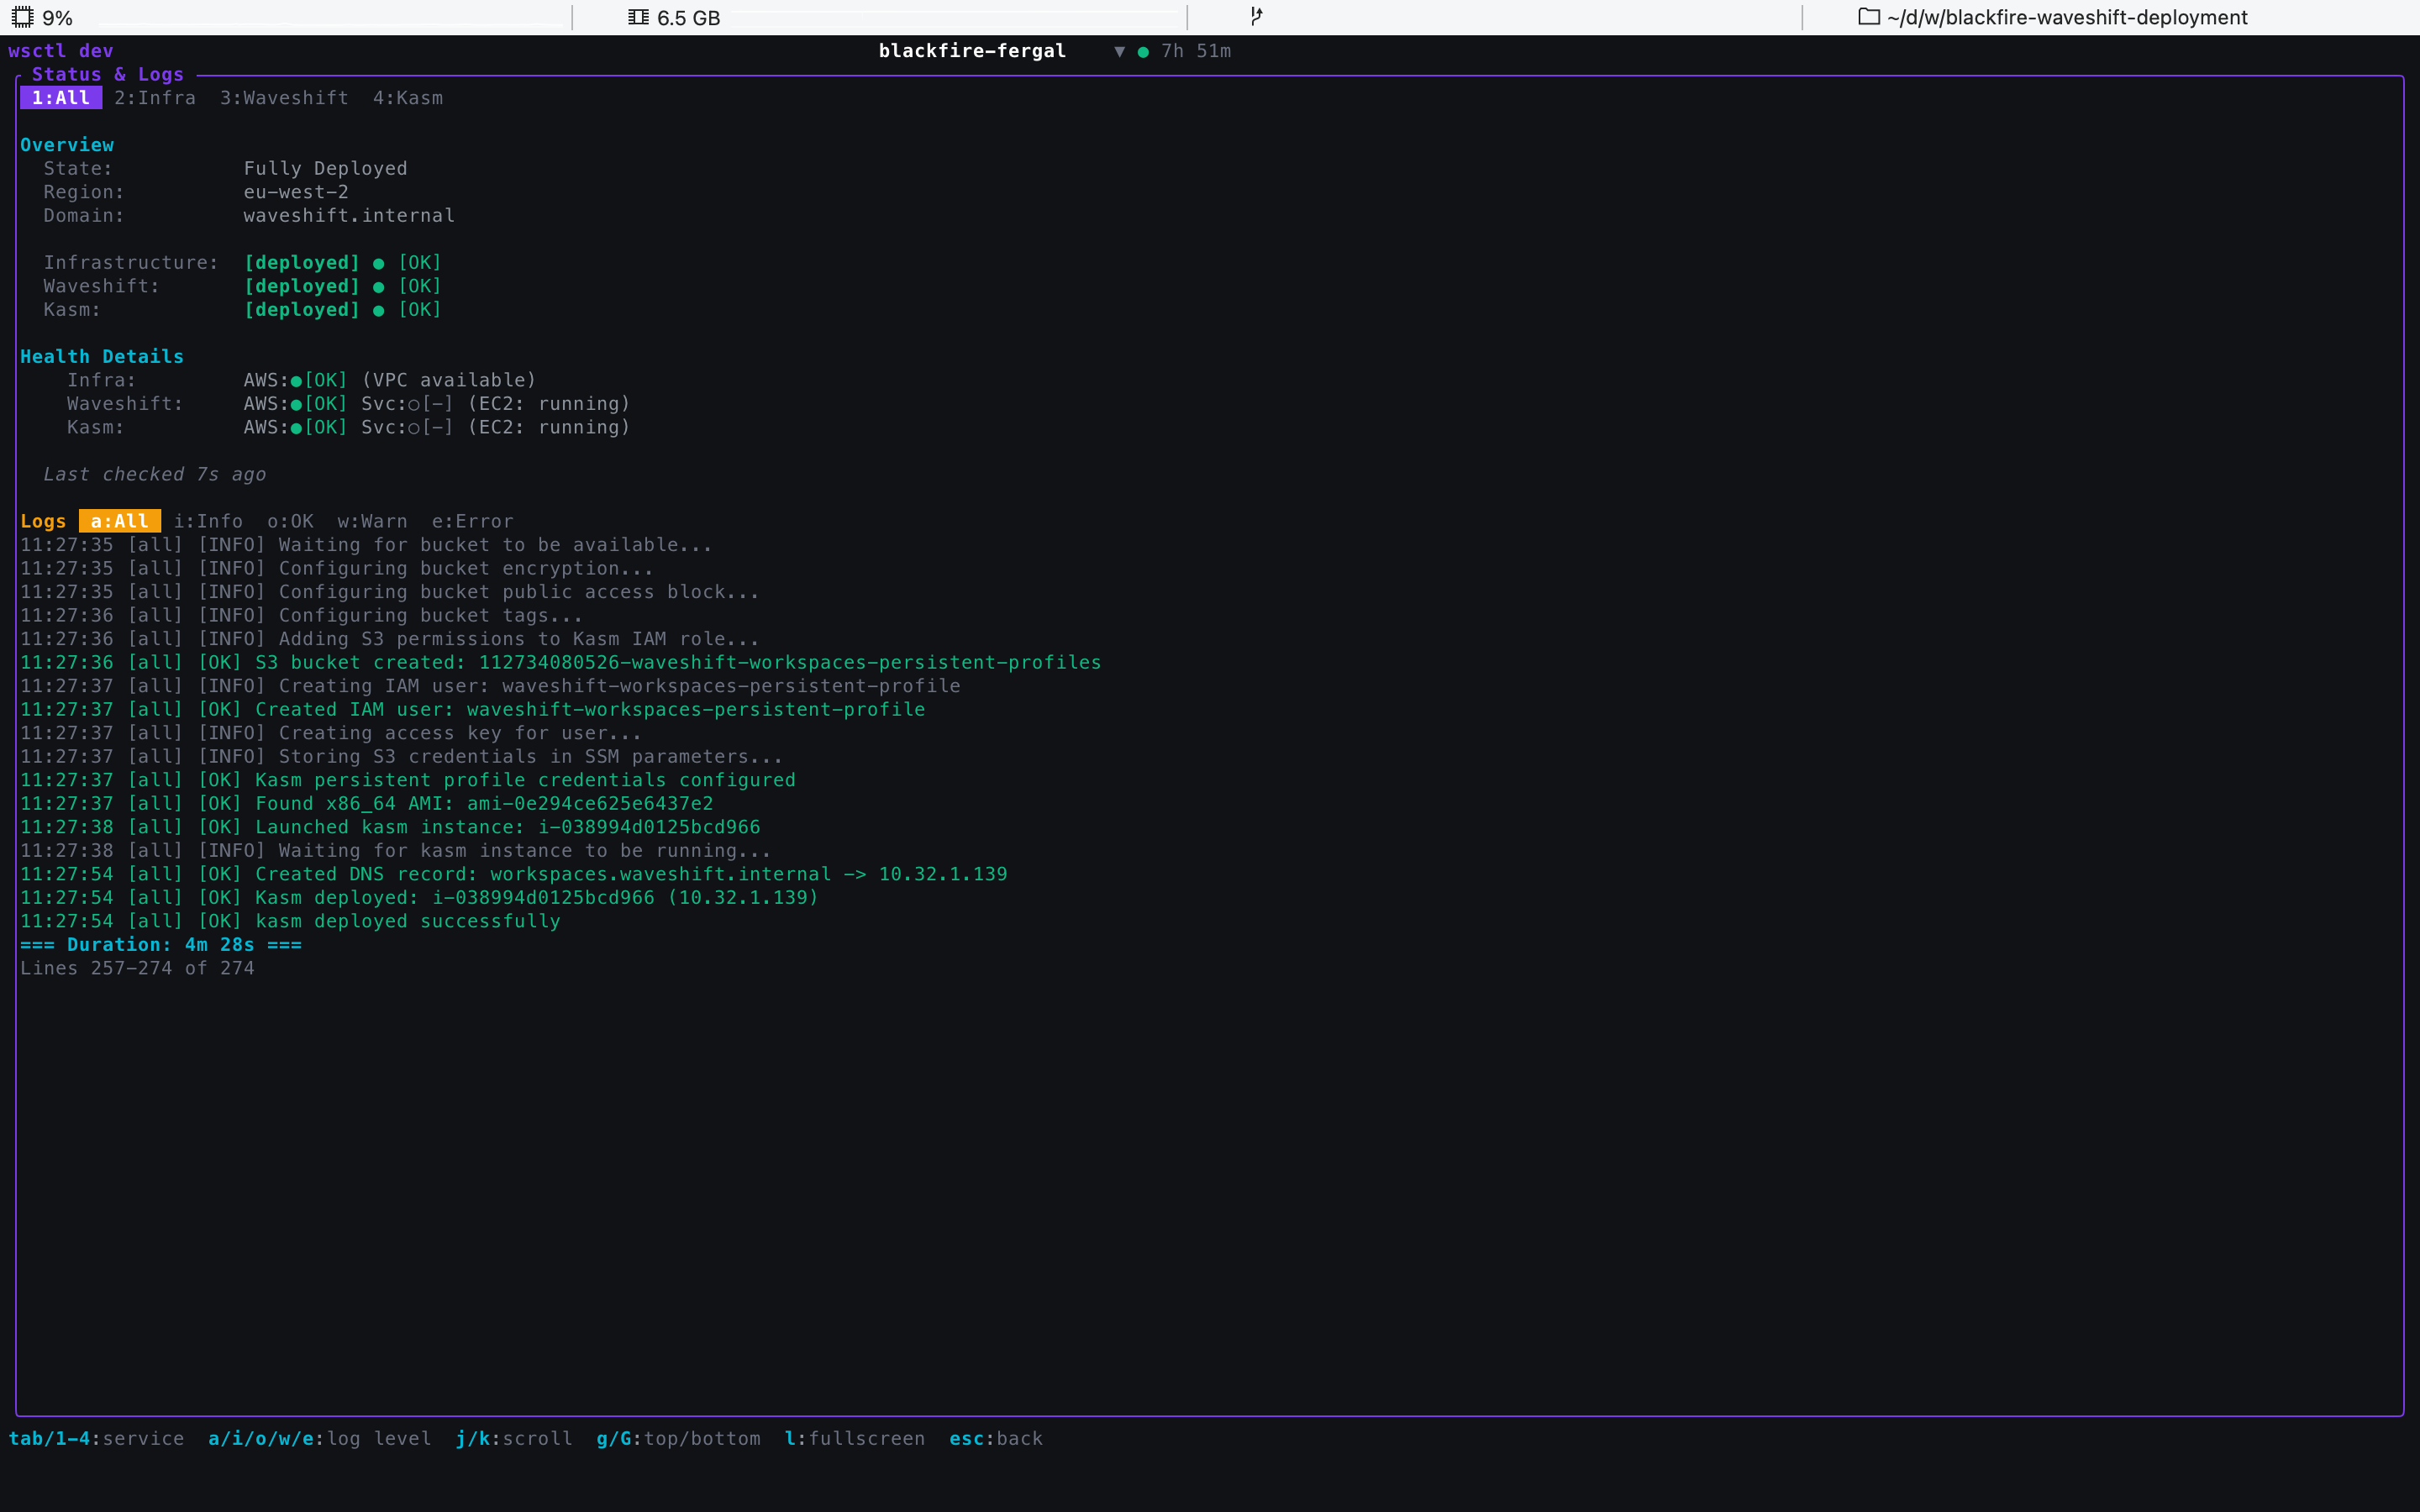
A condensed view of the same Status panel from the main screen,
plus a streaming Logs tail from the deployment sagas. The
tabs along the top (1:All, 2:Infra, 3:Waveshift, 4:Kasm)
filter the log stream to a single component (tab or 1–4),
and a / i / o / w / e filter by level. j/k scroll, g/G
jump to top/bottom, l opens the log fullscreen.
This is the first stop when something looks off post-deploy — the status panel shows whether the orchestrator and Kasm health checks are returning OK, and the log tail almost always tells you which step failed if a deploy didn't run clean.
Certificates — trust the Root CA on mobile devices
Get there: main menu → 7 Certificates.
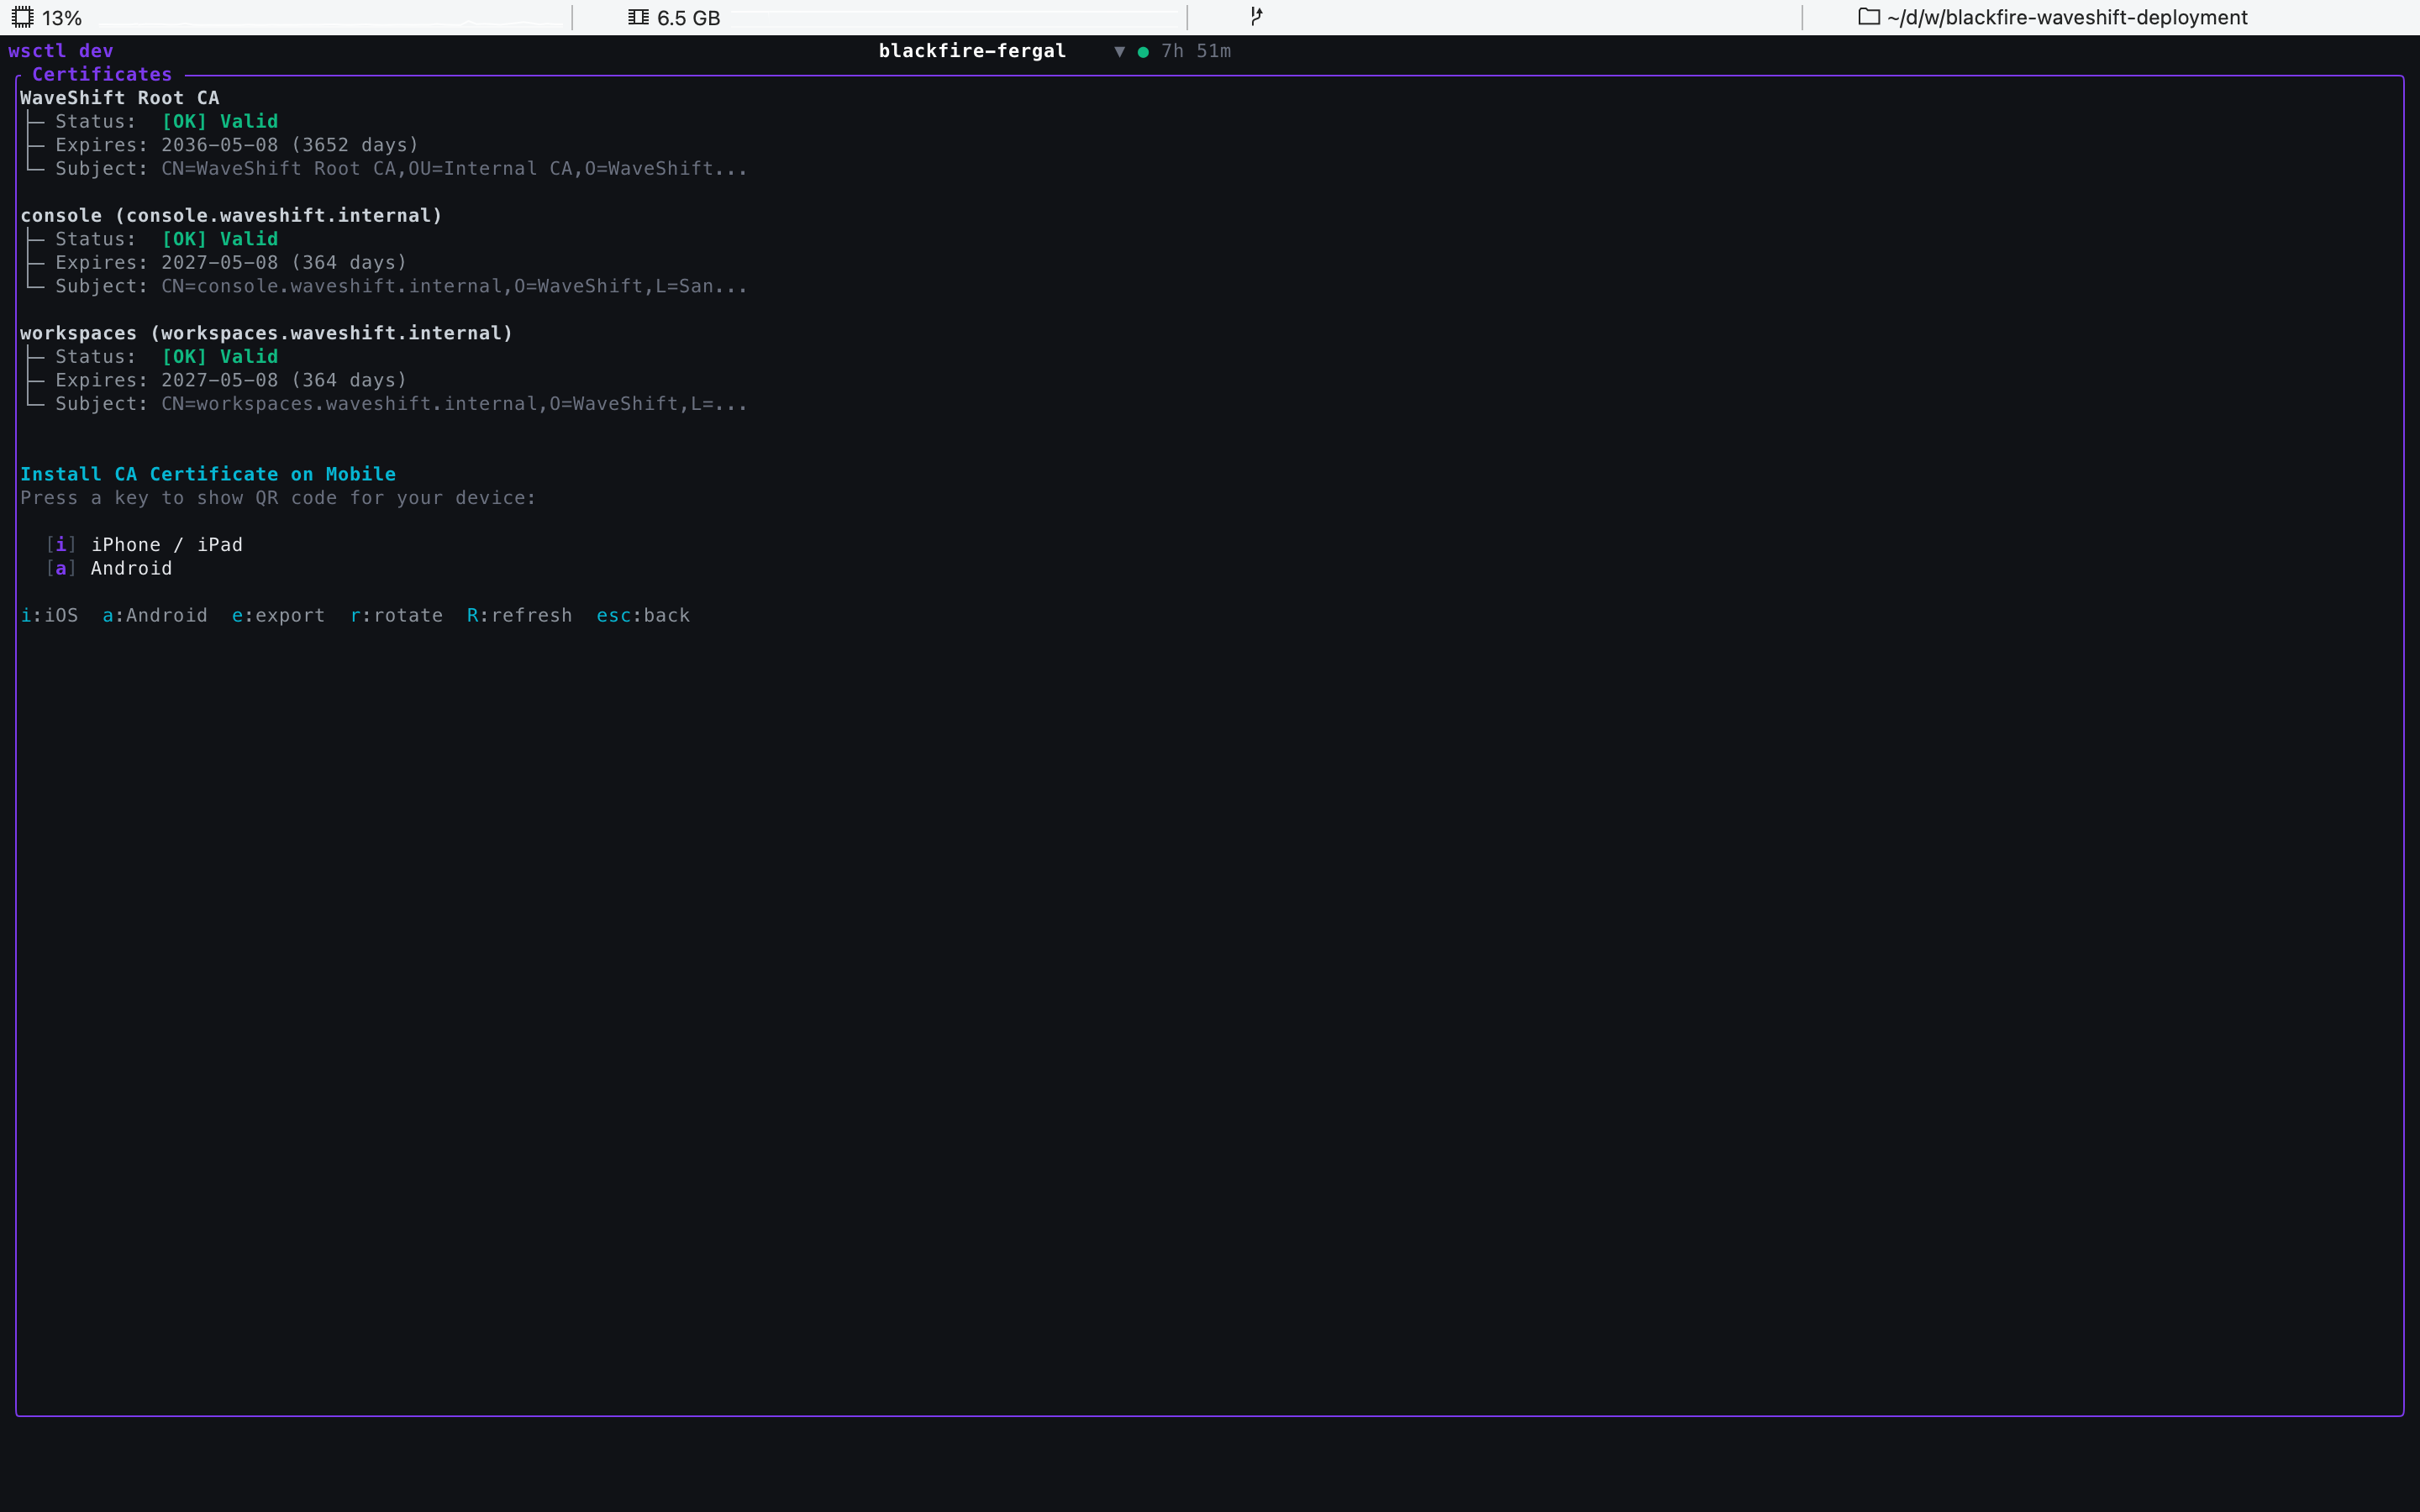
wsctl runs its own certificate authority for the deployment.
The Root CA is valid for ten years; the leaf certs for
console.<domain> and workspaces.<domain> are valid for one
year. They don't renew themselves — press r on this
screen (or run wsctl cert rotate --service all) to reissue
them before they expire.
The bottom half of the screen pushes the Root CA to mobile
devices so browsers there trust the Console and Kasm without
warnings. i selects iPhone / iPad (a .mobileconfig
profile); a selects Android (a .cer file). Either
path opens this dialog:
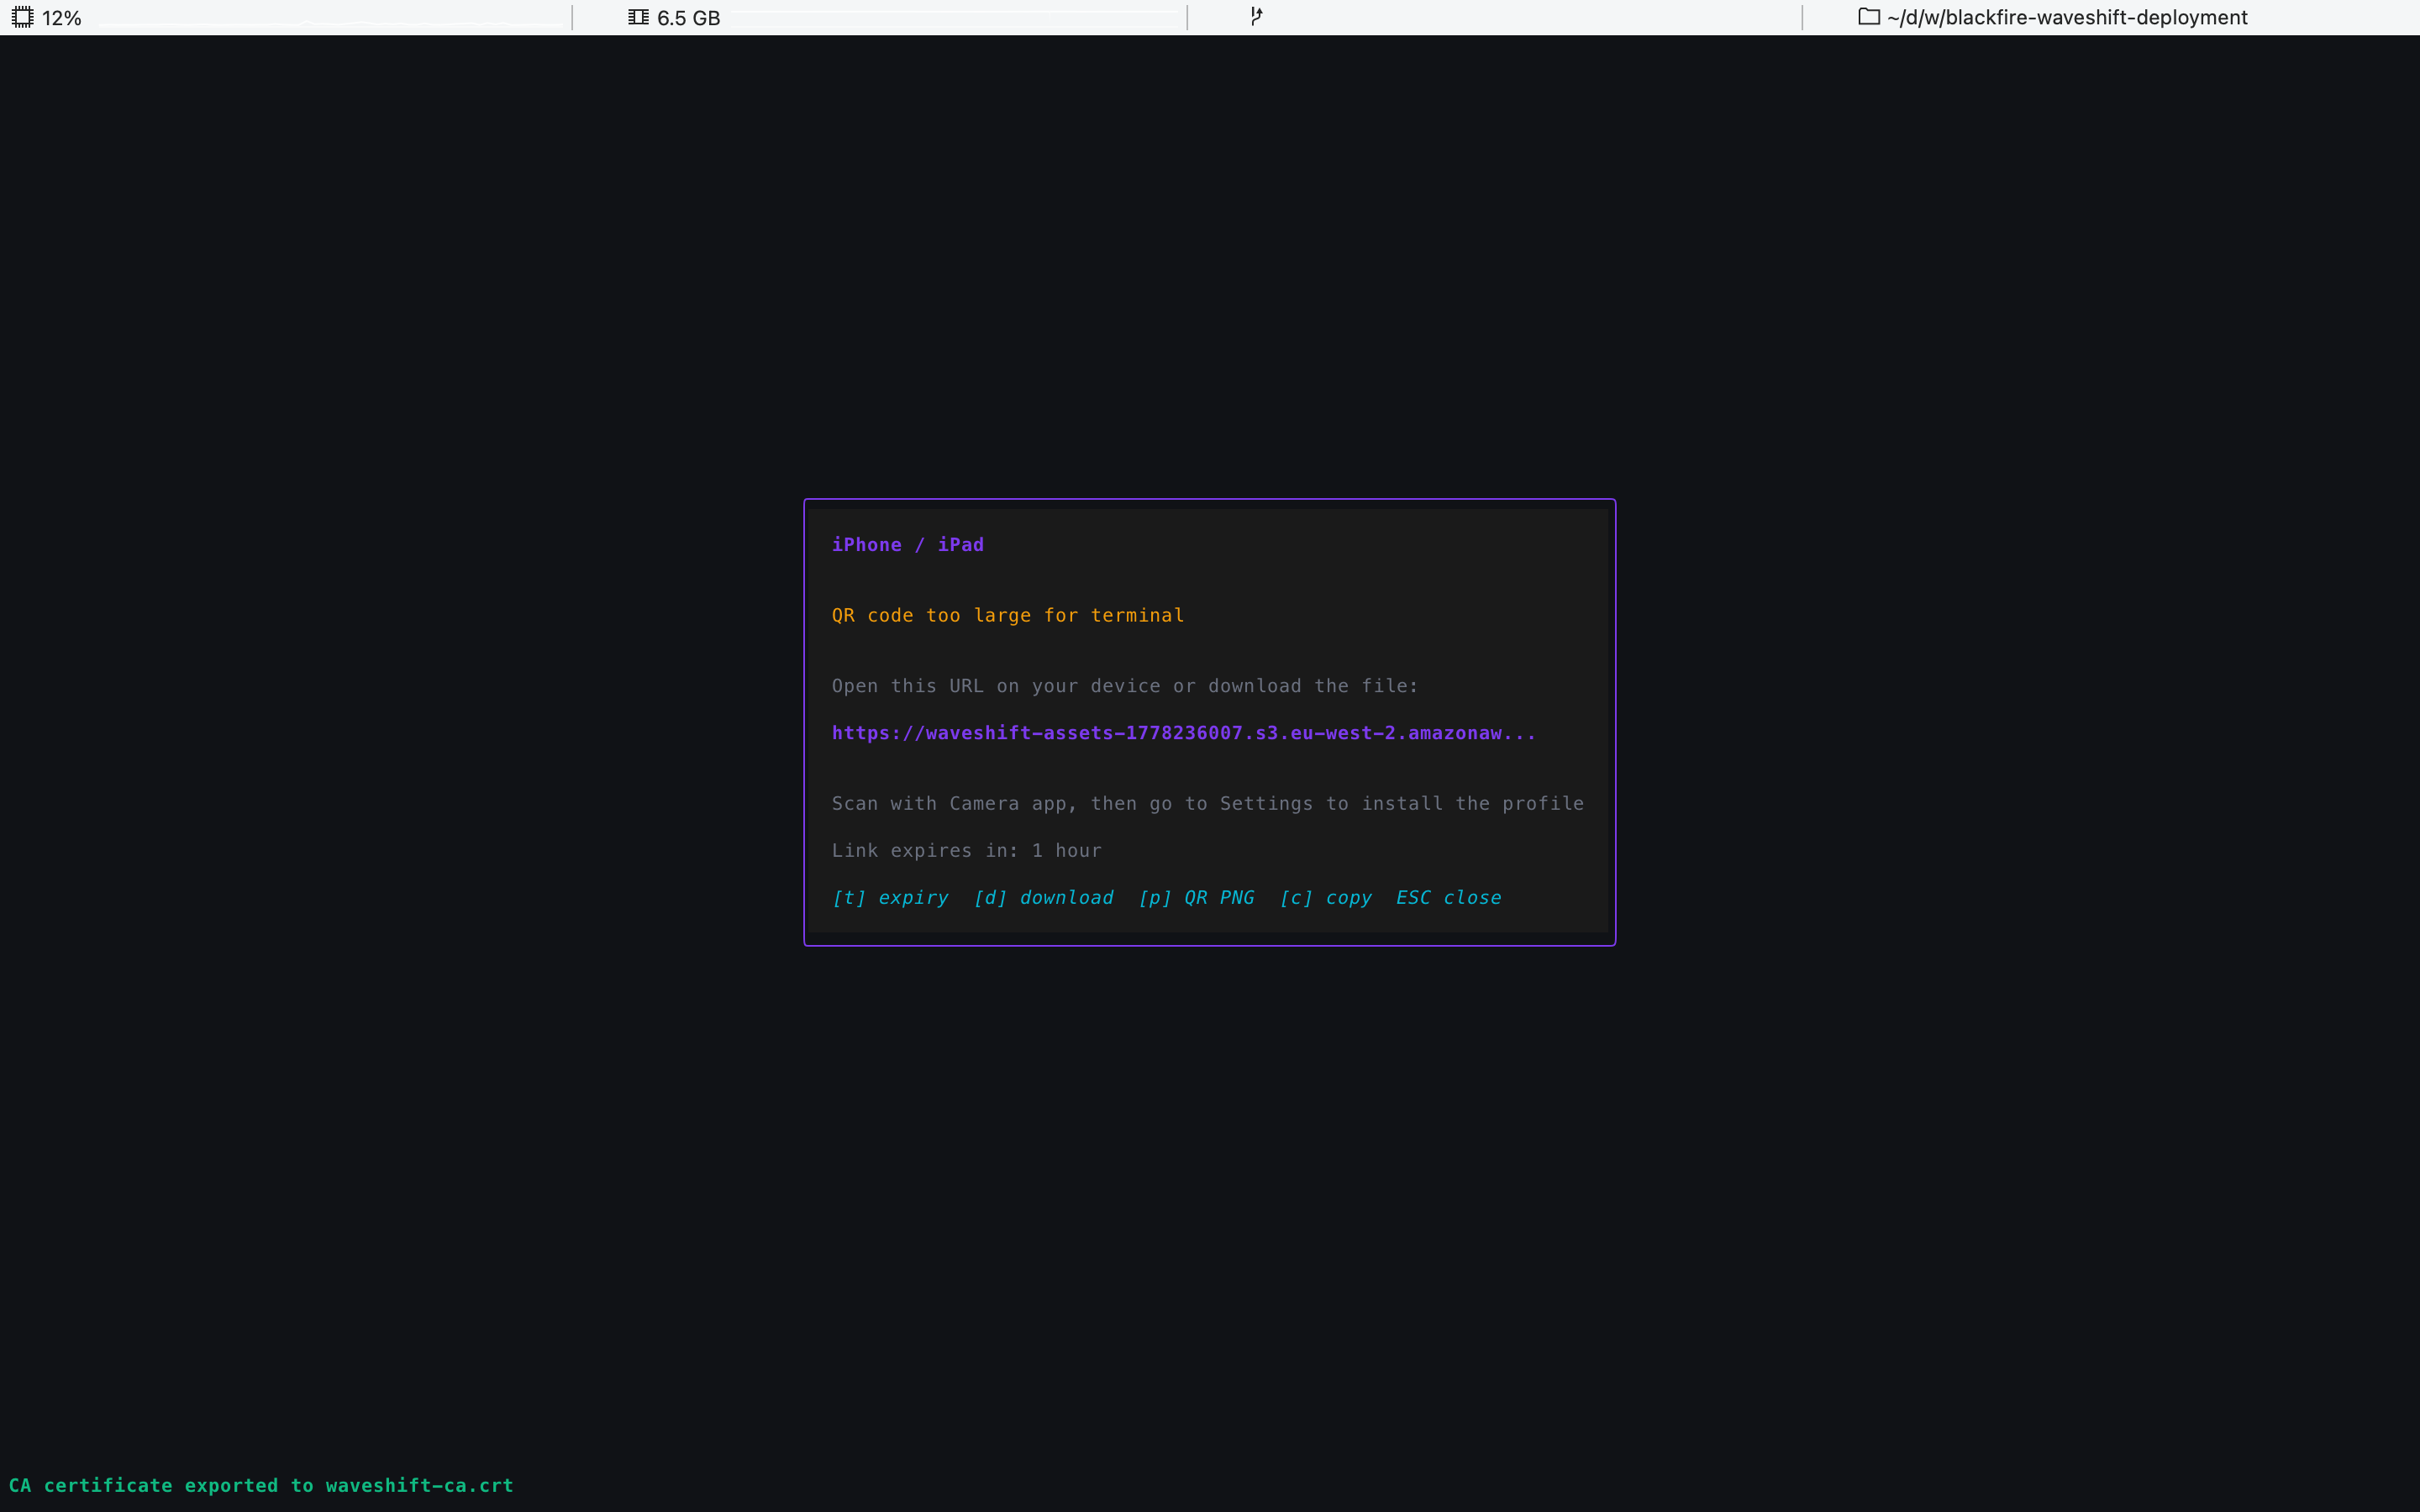
wsctl exports the cert to an S3 object behind a pre-signed
URL (default expiry 1 hour).
Can't see a QR code? Zoom your terminal out
By default wsctl renders the signed URL as a QR code
inline. A QR for a long S3 URL needs around 80×40 character
cells to scan reliably; if the window is smaller you'll see
QR code too large for terminal in amber (visible in
the screenshot above) instead of the QR.
Zoom the terminal out a couple of notches and the QR will fit. Standard zoom-out shortcuts:
| OS | Common terminals | Zoom out |
|---|---|---|
| macOS | Terminal.app, iTerm2, Ghostty, Warp | ⌘ + − |
| Windows | Windows Terminal, PowerShell, WSL | Ctrl + − |
| Linux | GNOME Terminal, Konsole, Alacritty | Ctrl + − |
If zooming further isn't an option (small laptop screen, accessibility settings), d downloads the cert as a file you can side-load to the device instead.
Once the window is large enough, the QR code renders in the dialog and scans straight from the terminal:
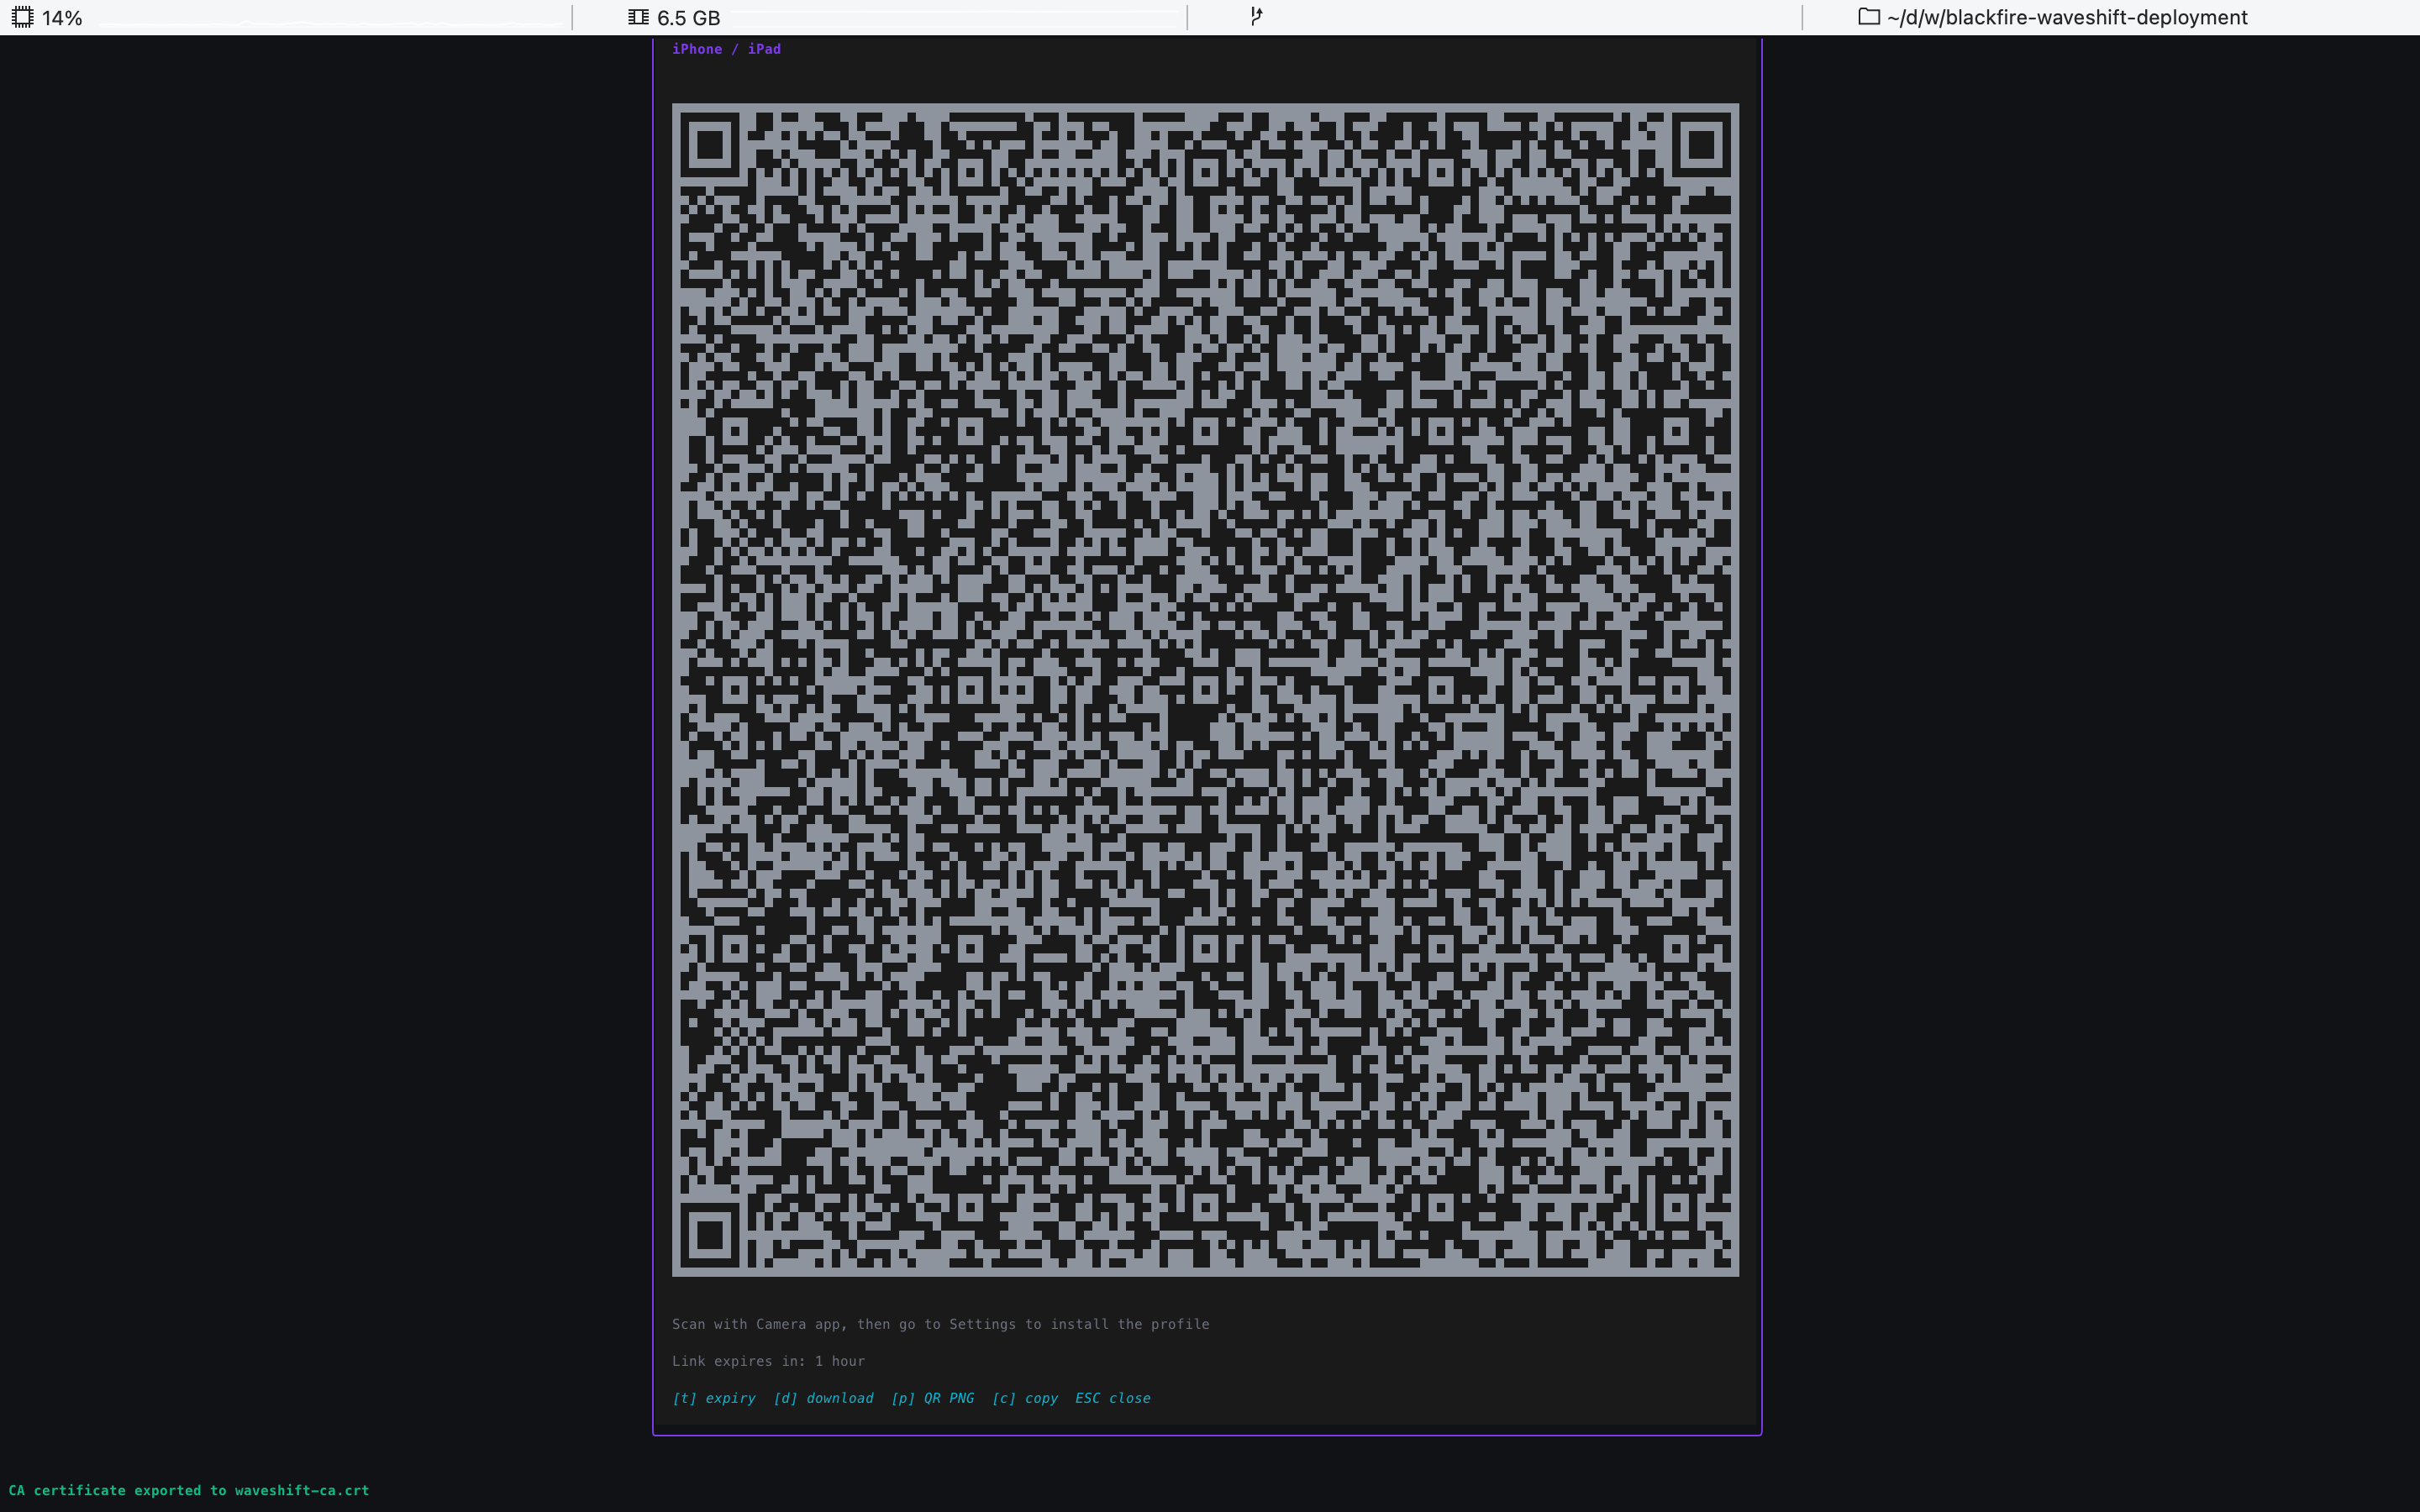
From the dialog:
- p saves the QR code as a PNG in the working
directory (
waveshift-qr-ios.png/waveshift-qr-android.png). - d downloads the cert file to the working directory
(
waveshift-ca.mobileconfigfor iOS,waveshift-ca.cerfor Android). - c copies the URL to the clipboard.
- t cycles the link expiry (1 hour, 12 hours, 1 day, 3 days, 7 days) and regenerates the URL.
On iOS, once the device has the .mobileconfig, the user opens
Settings → Profile Downloaded to install it, then
General → About → Certificate Trust Settings to enable full
trust for the Waveshift Root CA.
Node Sites — list view
Get there: main menu → 4 Node Sites.
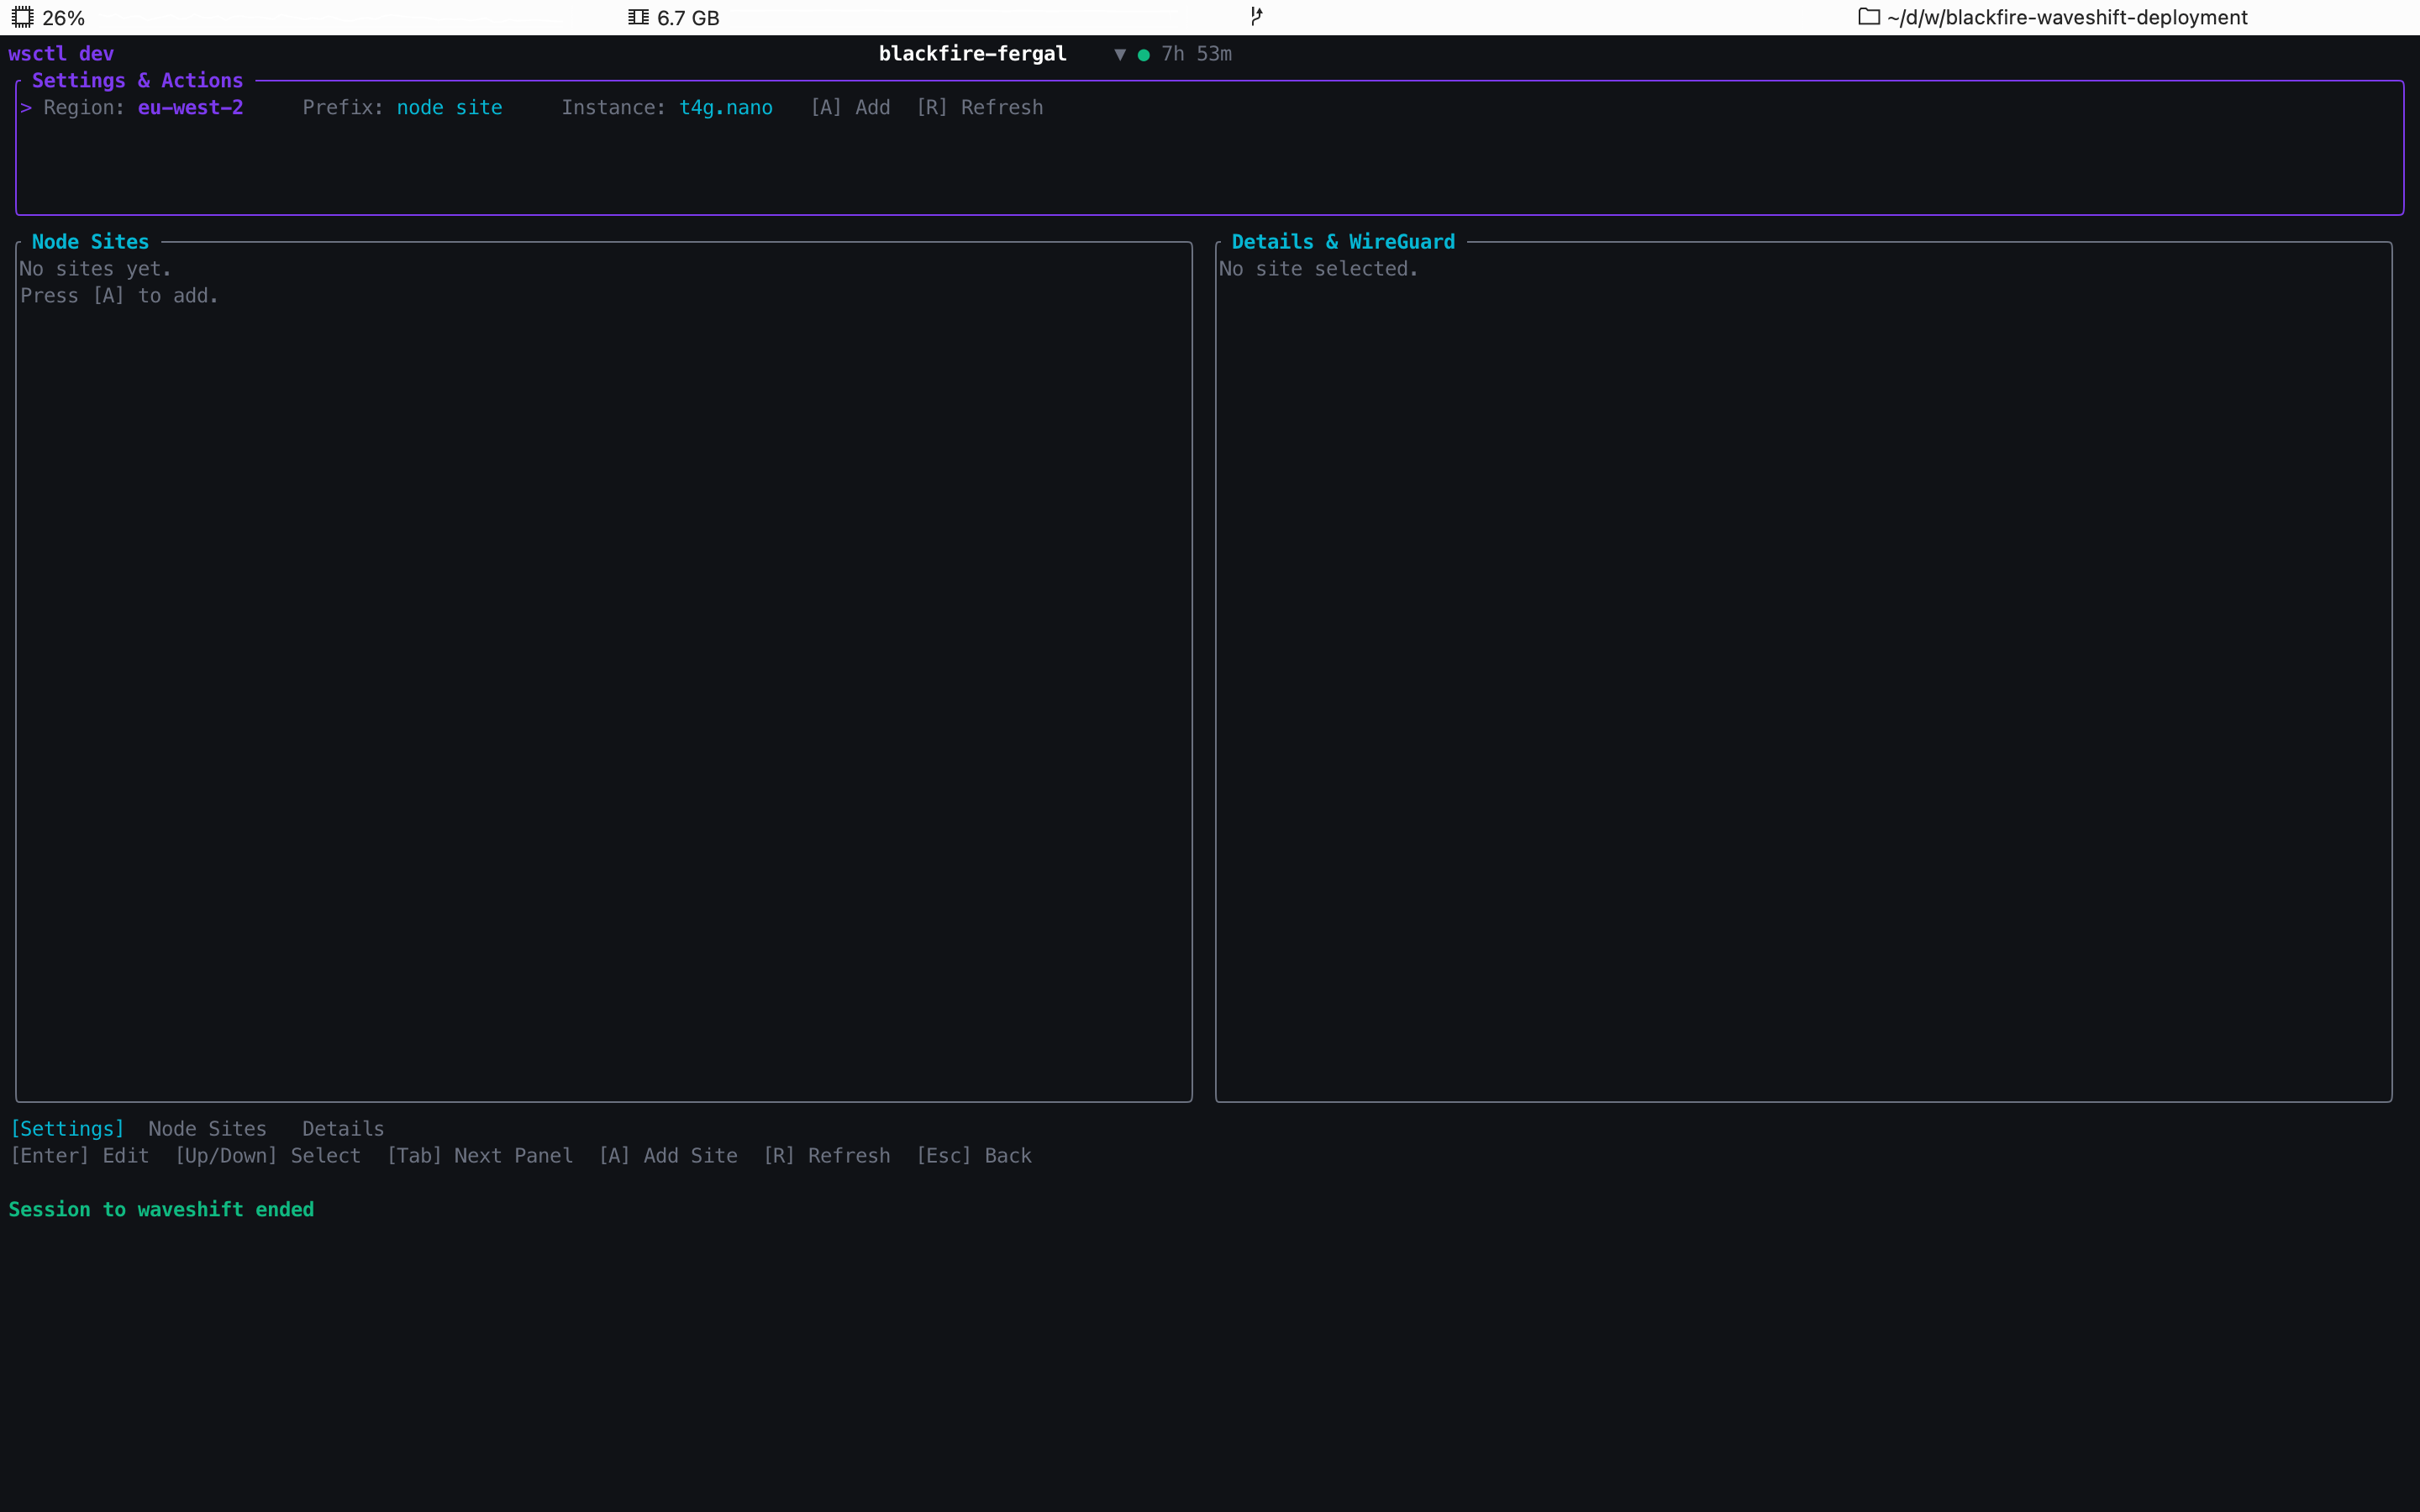
The Node Sites screen is where you create the Site +
Infrastructure Server pairs that hardware Hubs dial into. The
top Settings & Actions panel pre-fills the per-Site
defaults — Region (default the deployment's region), name
Prefix (e.g. node site), and Instance type
(t4g.nano is the default for an Infrastructure Server). The
left panel lists existing sites; the right panel shows details
+ WireGuard config for whichever you've selected.
Keys: [A] Add Site, [R] Refresh, Tab cycle panels,
Up/Down select, Enter edit a setting. With a site selected in
the list: [H] Configure Hub, [C] copy its WireGuard config,
[D] deregister the Hub, [X] destroy the site.
Create Node Site — confirmation dialog
Get there: main menu → 4 Node Sites → A Add.
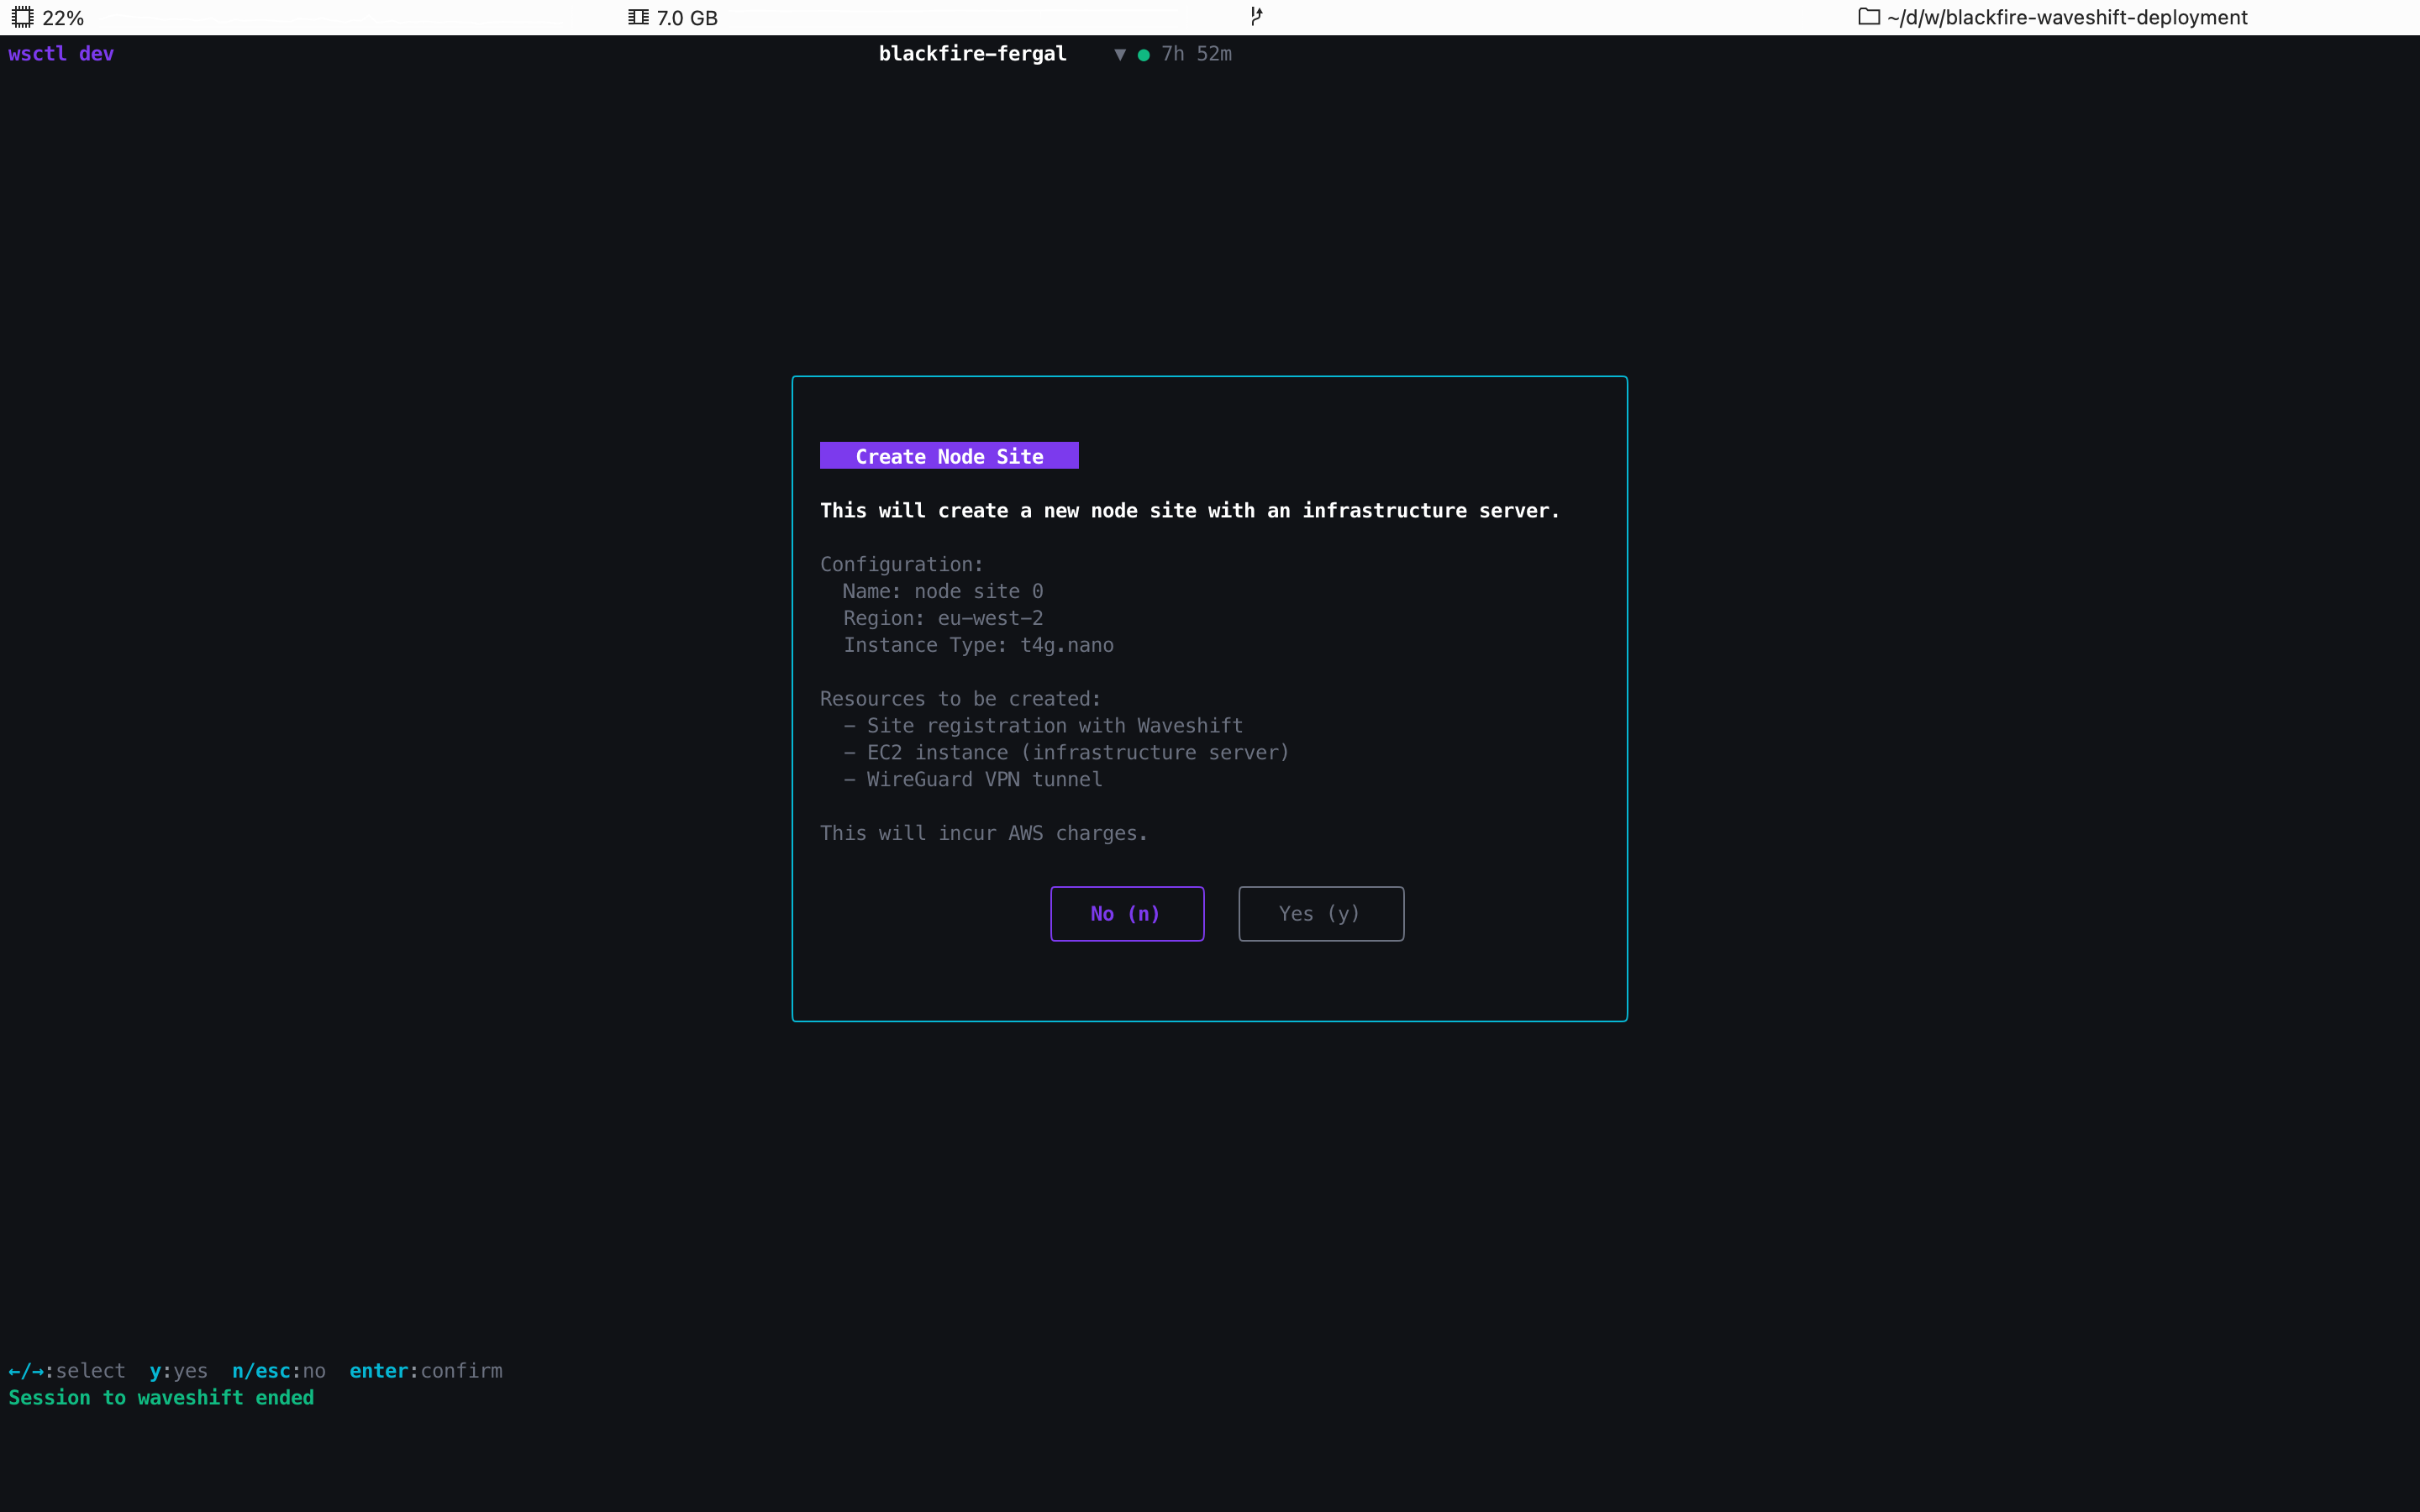
Pressing A on the Node Sites screen opens this confirmation
dialog. It summarises the configuration (Name, Region,
Instance Type) and lists the AWS resources the create-site
saga will provision:
- Site registration with Waveshift — the orchestrator-side scope that users get assigned to.
- EC2 instance — the Infrastructure Server WireGuard host.
- WireGuard VPN tunnel — the credentials the Hub will use to dial in.
The dialog flags This will incur AWS charges. since the
Infrastructure Server EC2 starts billing immediately. Confirm
with y / enter, cancel with n / esc.
Destroy — tear the deployment down
Get there: main menu → 1 Destroy.
Clean the Console first
wsctl only knows about the resources it created — the
orchestrator EC2, the Kasm host, the VPC, IAM, DNS. The
Egress Servers and Regions the Console provisions
are AWS resources wsctl never sees. If you Destroy All
while they're still active they'll be orphaned in the
customer's AWS account and you'll need to chase them down
by hand in the EC2 / VPC consoles.
Before tearing the deployment down, sign in to the Waveshift
Console as admin and, in this order:
- Destroy every Egress Server — System → Danger zone → Delete every egress server in the org.
- Tear down every enabled Region — System → Regions.
Only then run Destroy (or wsctl destroy all).
Destroy is permanent
Destroy removes EC2 instances, S3 buckets (including the user-files bucket), DNS records, IAM roles, and the VPC. There is no undo and the user-files bucket is not versioned, so anything stored in the Console's File Browser is lost. Snapshot anything you want to keep first.
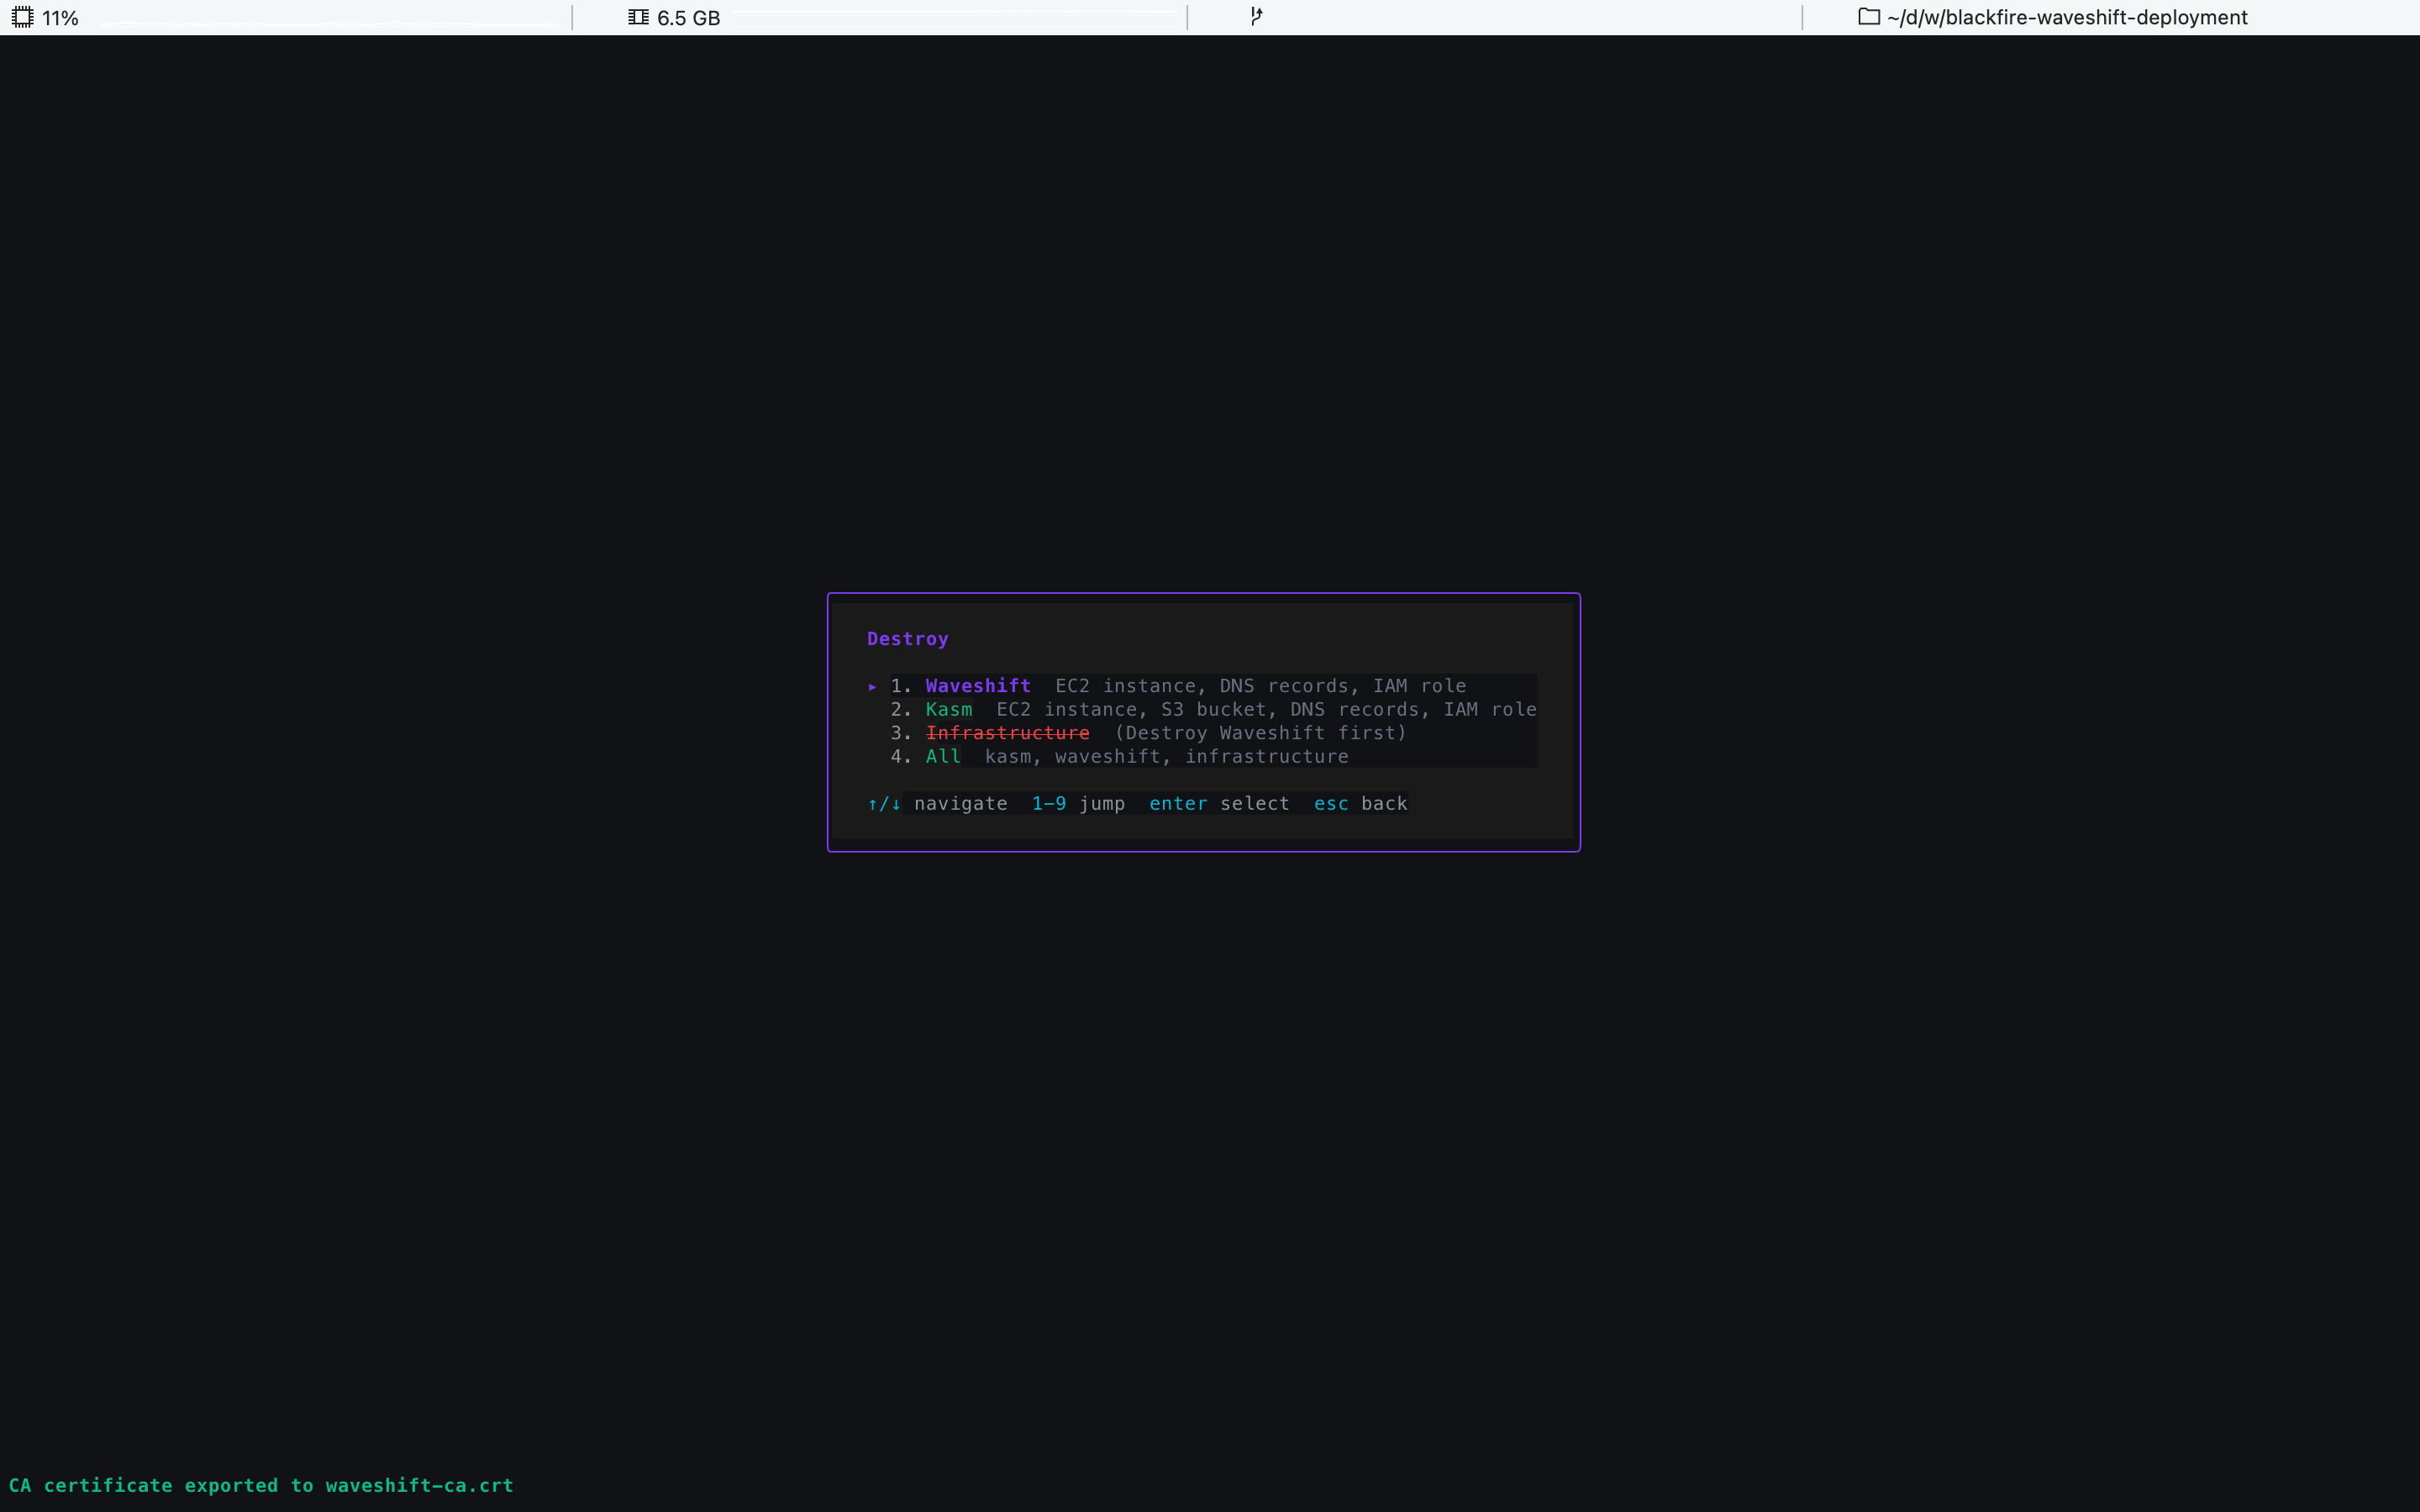
Four options, mirroring the Deploy menu but inverted:
- 1. Waveshift — EC2 instance, DNS records, IAM role.
- 2. Kasm — EC2 instance, S3 bucket, DNS records, IAM role.
- 3. Infrastructure — VPC, subnets, NAT gateway, Route 53 hosted zone, S3 buckets, shared IAM. Greyed out until Waveshift and Kasm have been destroyed first; the dependency order is enforced so you can't accidentally orphan the EC2 hosts.
- 4. All — all three, in reverse-deploy order (Kasm, Waveshift, then Infrastructure). The recommended path for a clean tear-down.
Selecting All opens a final confirmation:
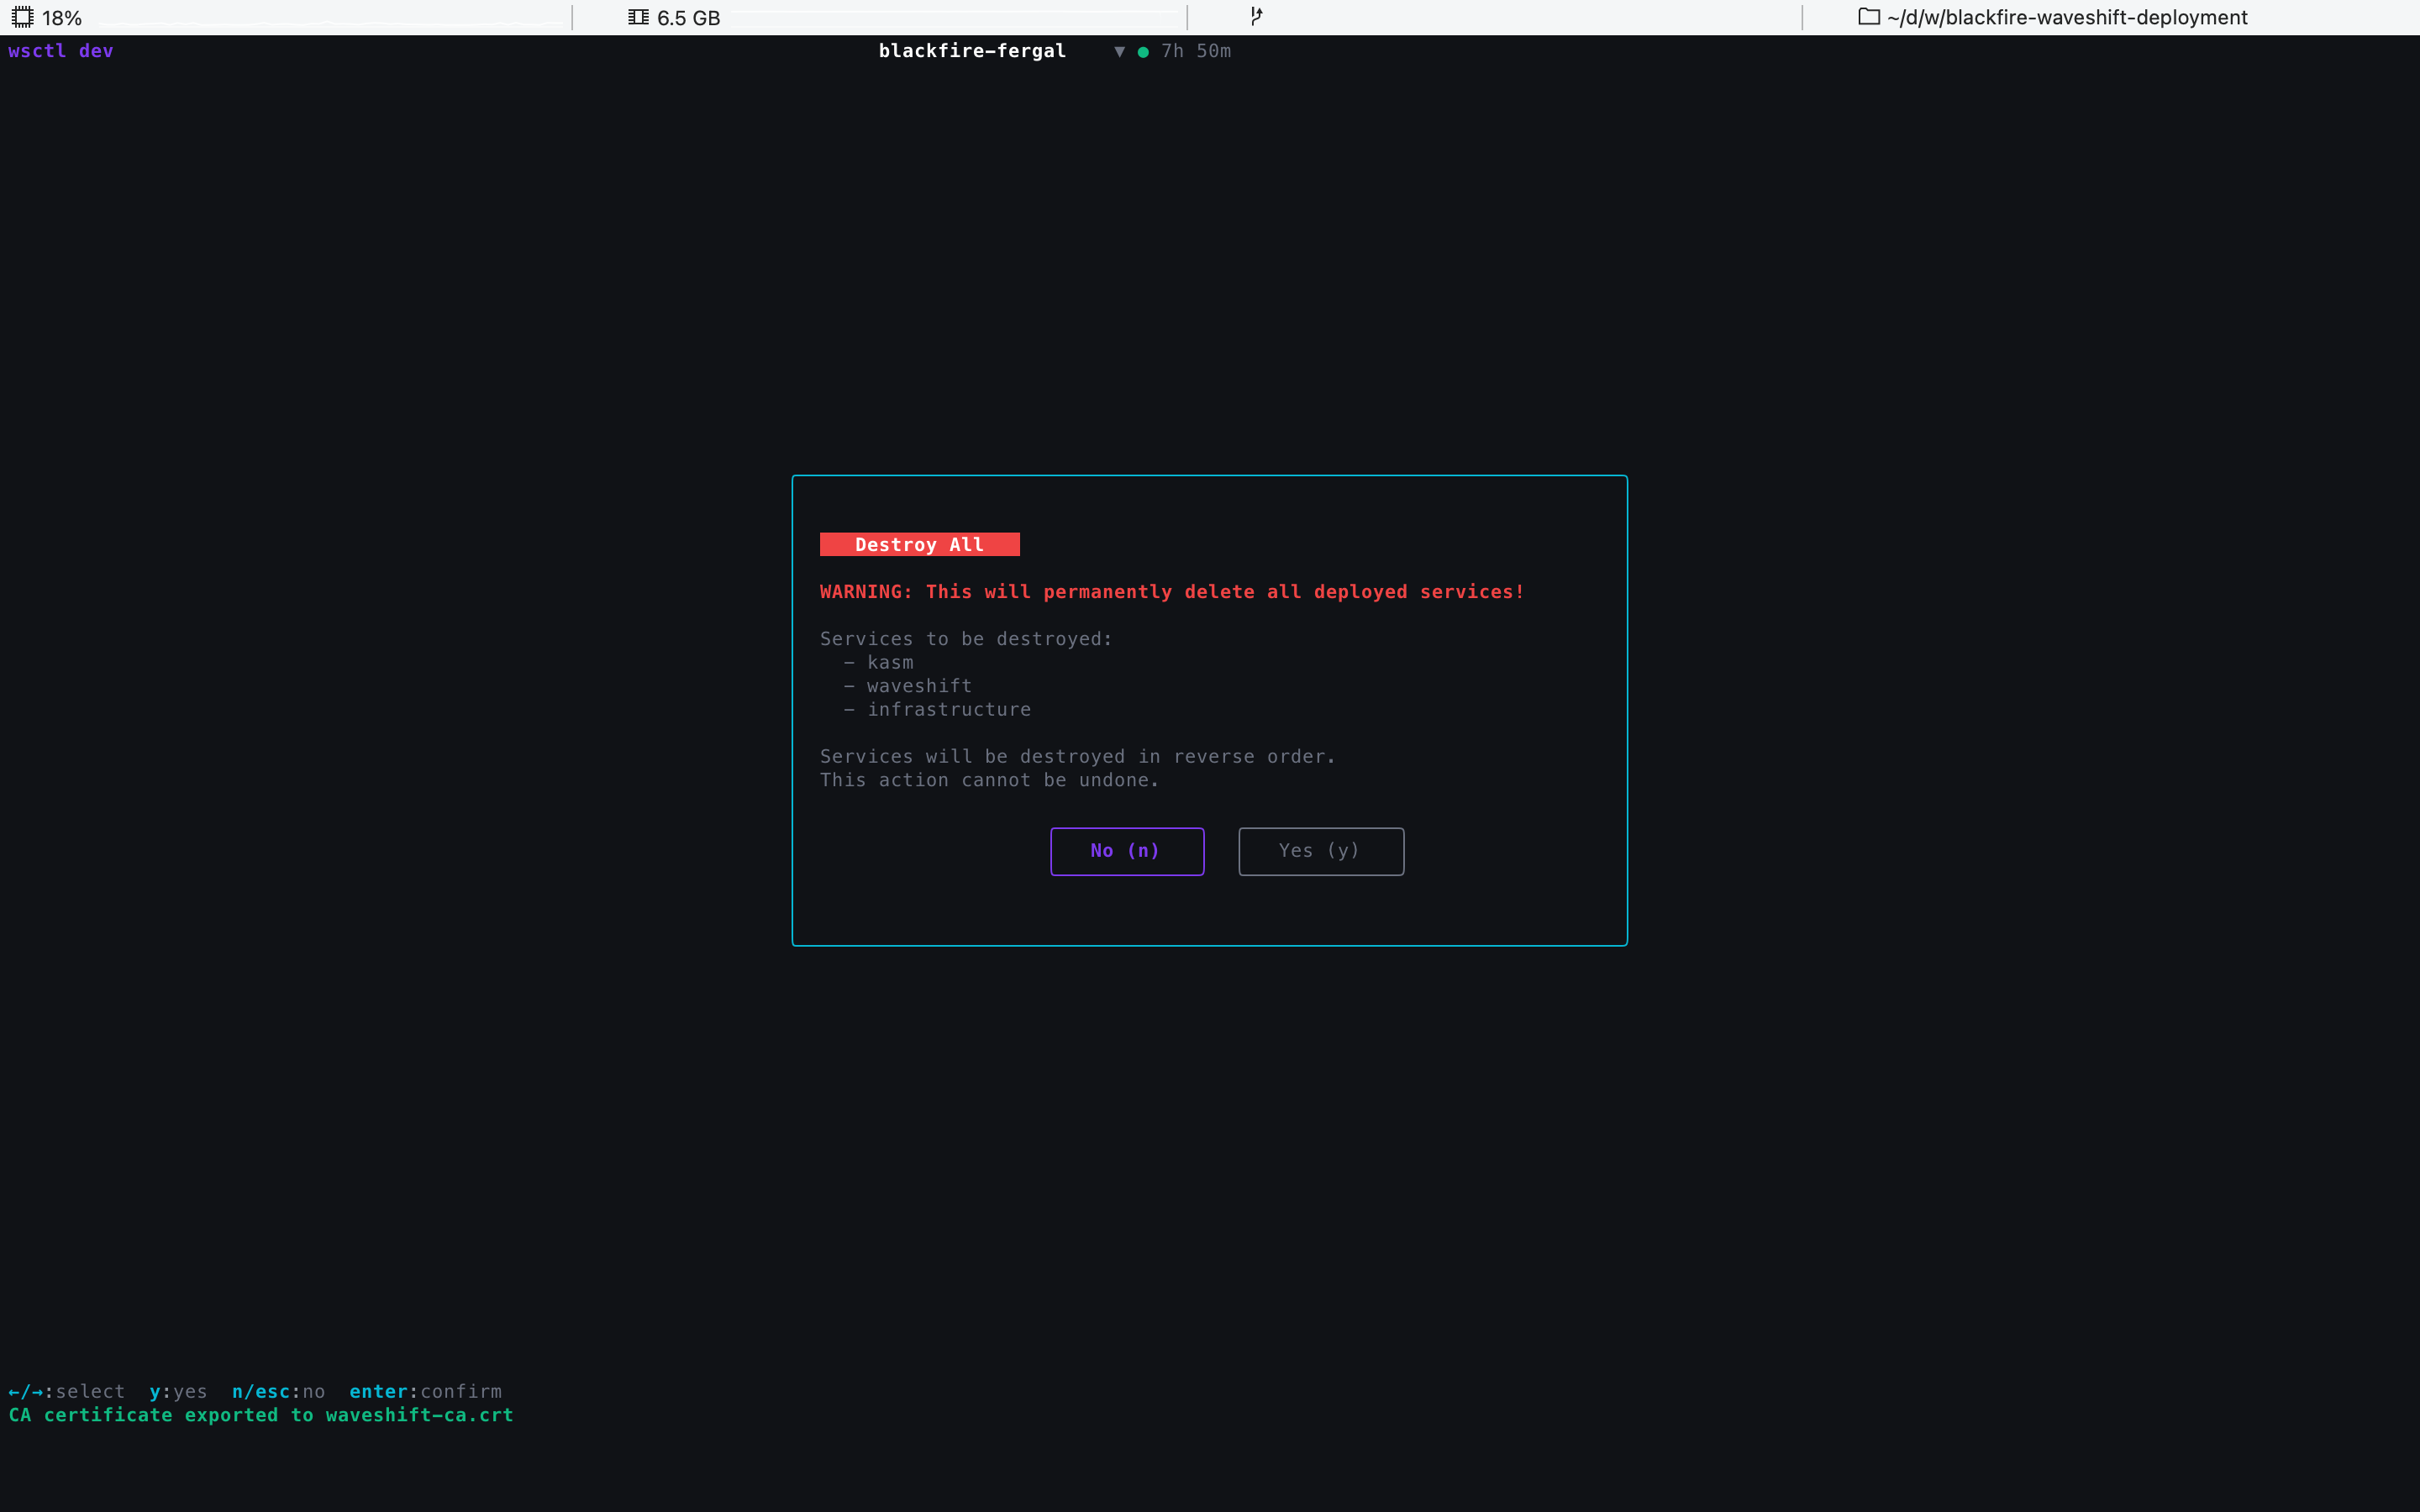
The dialog spells out exactly what will be deleted. Confirm with y, cancel with n / Esc. Tear-down runs in the same screen as the deploy, with the same traffic-light stages — typically 5–10 minutes for a clean run.
Migrating from wavectl
wsctl is a complete rebuild of the older v0.4 wavectl CLI.
The TUI replaces the sequence of one-shot commands you used to
run by hand; there's no automatic migration. The safe play for
a v0.4 → v0.5 deployment is a clean install:
- Capture any state you want to preserve from the existing v0.4 Console (user list, sites, licence, etc.).
- Tear the v0.4 deployment down with the v0.4
wavectl(wavectl deploy --destroy all). - Install the v0.5
wsctlbinary and follow the walkthrough above from the top.
See also
- Deploy walkthrough — the procedural install guide (prerequisites, AWS setup, post- deploy actions in the Console).
- Configuration —
wsctl.jsonreference. - Defaults — every value baked into a stock deploy.
- Common issues — symptoms with first-thing-to-check for each.